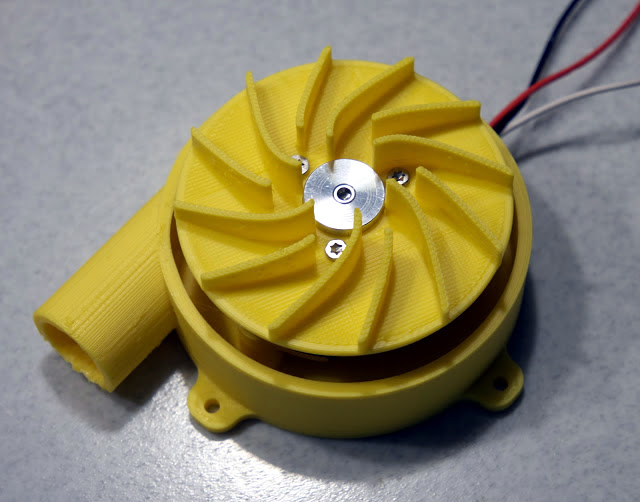
[Mark Rehorst] has been on the hunt for the perfect 3D printer cooling fan and his latest take is a really interesting design. He’s printed an impeller and housing, completing the fan using a hard drive motor to make it spin.
We should take a step back to see where this all began. Many 3D printers us a cooling fan right at the tip of the extruder because the faster you faster you cool the extruded filament, the fewer problems you’ll have with drooping and warping. Often this is done with a small brushless fan mounted right on the print head. But that adds mass to the moving head, contributing to problems like overshoot and oscillation, especially on larger format printers that have longer gantries. [Mark] just happens to have an enormous printer we covered back in January and that’s the machine this fan targets.

Make sure you give [Mark’s] Mother of all print cooling fans article a look. His plan is to move the fan off of the print head and route a flexible tube instead. He tried a couple of fans, settling on one he pulled from a CPAP machine (yes the thing you wear at night to combat sleep apnea) found in the parts bin at Milwaukee Makerspace. It works great, moving quite a bit more air than necessary. The problem is these CPAP parts aren’t necessarily easy to source.
You know what is easy to source? Old hard drives. [Mark] mentions you likely have one sitting around and if not, your friends do. We have to agree with him. Assuming you already have a 3D printer (why else do you want to print this fan?), the only rare part in this mix is the ESC to make the motor spin. Turns out we just saw a BLDC driver build that would do the trick. But in [Mark’s] case he found a rather affordable driver that suits his needs which is used in the video demo below.


Putting hand near this… quite risky idea, as running it with open case.
You can’t imagine how deadly is PLA shrapnel, if it go apart on high RPM. (I ran it in enclosure, and that’s what saved me)
You’re probably right. I did wear safety glasses…
That’s unfortunate since the other filament options that are less brittle and have better inter-layer adhesion will deform more than PLA. Maybe one of those exotic glass or CF filled nylon or PETG filaments would work.
I printed the whole thing with ABS.
That would be the way to go IMO. You could even give it a good soak in acetone to solidify it.
Unfortunately I think ABS is a bad word around here. The last article I read Hackaday about filaments said something about ABS users being pedophiles who eat puppies or something.
I started out printing in ABS about 6 years ago, and never printed PLA until about 2 years ago. I still prefer ABS for most things, but I just printed some PETG for the first time and found it very easy (the 80mm version of this blower is going to be at least part PETG). I’ve never liked PLA- too brittle, and softens at low temperature. To me it seems to be sort of a useless material, except for making Yoda heads and tugboats.
It does not move much air because design.
The fan appears to be based on standard CPAP fan design. See Figure 6 http://www.cpap-supply.com/Articles.asp?ID=134
Was the output nozzle really b below the blades?
Yes, that’s how these things are designed. This isn’t a squirrel cage blower- the air doesn’t pass through the impeller. There’s very little clearance between the top cover and the impeller. As the impeller spins, the air is flung off the periphery of disc and goes down into the body of the blower where it keeps spinning and finds it’s way out through the exhaust port. I think this design is intended to simultaneously maximize pressure and minimize acoustic noise.
It’s a radial compressor, not a blower. the CPAP machine is meant to produce a constant positive pressure that keeps the patient’s airways open, so the emphasis is not on pushing a lot of CFM.
Gotcha. I watched without audio so was trying to figure out what specific design was being done… Or if none were. Obviously that ought to be able to move a lot of air at low pressure.
The impeller design is almost a direct copy of the CPAP blower I was using in the original article. The HDD motor is quite a bit larger than the motor in the CPAP blower and takes up more space in the enclosure with the 60 mm diameter impeller (smaller than the CPAP blower), so I have redesigned it using an 80 mm impeller (larger than the CPAP blower) that has a bit more space for the air to move. I’ve noticed that air leaks from the seams of the housing due to the high pressure inside it, so I’ll be sealing it with aluminum tape. The new design will be posted to my blog once I have printed and tested it.
The HDD motor is much lower power and probably speed than the CPAP blower, but it seems to move more than enough air and does so pretty quietly.
It seems that the impeller cover doesn’t match the slope of the blades – if it’s just a round box, the compression doesn’t work so well. The idea of the shape is to push the air into a smaller volume, so the cover should swoop down with the blades.
The intaglio surface matches the 15 degree slope of the impeller blades, and there’s a fillet in the “corner” to direct the air downward. The cover was printed upside down to avoid using support material.
I want to faster my faster like this guy did…
Aren’t multi-platter HDs basically a Tesla turbine waiting to be hatched?
Yes, if you’re somehow able to cut slots in the centre of the platter. It might be easier to replace the platters with acrylic discs.
Clear CD Spacers they don’t crack when you pick them up or look at them.
If they are the ones that are the same as the CD-R blanks, just not metallized, they should be modestly durable(though even with CDs being polycarbonate there’s a reason why nobody ever sold drives faster than 52x back in the day). If the are the spacers made out of the same, or similar, polyethylene that the cases are they’ll be so much shrapnel in pretty short order.
Safer shrapnel than glass platters, at least, those things are an unpleasant surprise.
And that reason is mainly the wavelength of light, and unwillingness to use dangerous UV light laser in consumer products, as well as erasing the data is unfortunate. The same reason then as why DVD speeds never got as high as CD.
“Many 3D printers us a cooling fan ..” many of us could us an edit button }:¬)
What is the weight of the part of the tube that the hot-end carriage has to carry? We can easily find a maximum for that weight (just take the whole part of the tube after the last frame anchor point), but how to know precisely what the carriage carries, and what the frame carries? Is that really lighter than what was installed previously? Why not use some of the air to cool the cold-end as well?
I haven’t weighed it, and it’s hard to know the total force on the carriage because some of it is the effort required to move the hose around. I think the weight savings on the extruder is a toss-up, and instead of running wires to a fan on the extruder, you’re running a hose which is a lot bulkier. So you have to decide for yourself if this whole thing is useful or a waste of time/effort.
The print cooling fan doesn’t run all the time, so unless you came up with a splitter and some sort of valve to control the air going to the print separately from the air going to the hot-end, it wouldn’t work for cooling both. All that sounds a lot more complicated than just using one fan for the hot end and another for the print.
This type of blower/fan/compressor can move quite a bit of air through a long tube which is what makes it useful for this application. It is capable of moving a lot more air than is needed to cool a print, at least at normal printing speeds, but in a high speed printer, or printing weird materials (chocolate?) it could be pretty useful to have a lot of air available. For me it was an interesting exercise in copying the existing impeller and designing a housing to fit. Who knows, there may be other applications for this type of compresser/fan/blower- maybe a DIY CPAP? Spraying paint? Drying hair? Annoying a cat?
Very useful design for a DIY portable white chamber which needs constant positive air pressure to prevent dust coming inside.
You’d have to put a filter on the intake, but, yeah, it could be useful- maybe for drying paint or lacquer inside a dust-free tent (I don’t know how you’d get the dust out in the first place, but you could sure stop more from getting in…). I mounted one of these blowers on a foam cooler once and found it created enough pressure to blow the top off without taping it down, so it can easily generate the pressure needed inside a tent to prevent dust entry.
Combine this with a bissell style fan design and you might have something else cool. :-) That’s it form now on I keep all my hard drive motors for projects. :-)
There are a lot of useful parts inside HDDs- save the head positioning lever bearings, the magnets, the platters, and all the little screws, too! You can store a lot of those parts in a small box.
I’ve used the bearings to make a high precision Z=0 switch in my printer, and a tangle free filament spool holder. The platters make great front surface mirrors (if you store them carefully).