Hackaday Belgrade preparations have now passed the flash point and the hacker village that is set to descend on Serbia in a few weeks grows larger and more awesome by the day. Prepare for a massive data dump on what is in store. But before you go any further, make sure you have a ticket.
Day: April 29, 2018

Hard Drive Gives Its Life To Cool 3D Prints
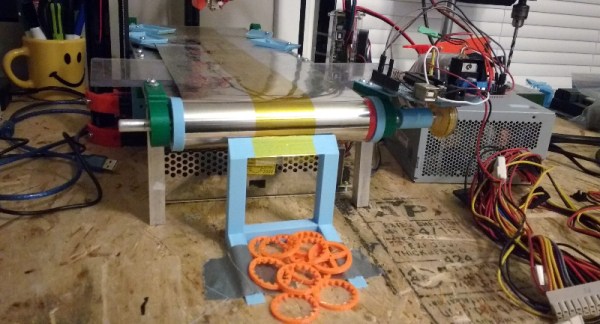
[Mark Rehorst] has been on the hunt for the perfect 3D printer cooling fan and his latest take is a really interesting design. He’s printed an impeller and housing, completing the fan using a hard drive motor to make it spin.
We should take a step back to see where this all began. Many 3D printers us a cooling fan right at the tip of the extruder because the faster you faster you cool the extruded filament, the fewer problems you’ll have with drooping and warping. Often this is done with a small brushless fan mounted right on the print head. But that adds mass to the moving head, contributing to problems like overshoot and oscillation, especially on larger format printers that have longer gantries. [Mark] just happens to have an enormous printer we covered back in January and that’s the machine this fan targets.

Make sure you give [Mark’s] Mother of all print cooling fans article a look. His plan is to move the fan off of the print head and route a flexible tube instead. He tried a couple of fans, settling on one he pulled from a CPAP machine (yes the thing you wear at night to combat sleep apnea) found in the parts bin at Milwaukee Makerspace. It works great, moving quite a bit more air than necessary. The problem is these CPAP parts aren’t necessarily easy to source.
You know what is easy to source? Old hard drives. [Mark] mentions you likely have one sitting around and if not, your friends do. We have to agree with him. Assuming you already have a 3D printer (why else do you want to print this fan?), the only rare part in this mix is the ESC to make the motor spin. Turns out we just saw a BLDC driver build that would do the trick. But in [Mark’s] case he found a rather affordable driver that suits his needs which is used in the video demo below.
Continue reading “Hard Drive Gives Its Life To Cool 3D Prints”

Hackaday Links: April 29, 2018
Amazon has released the Echo Dot Kids Edition, an always-on, Internet-connected microphone. According to Amazon’s Children’s Privacy Disclosure, the Amazon Echo Dot Kids Edition collects data such as, ‘name, birthdate, contact information (including phone numbers and email addresses), voice, photos, videos, location, and certain activity and device information. The Amazon Echo Dot Kids Edition is able to read audiobooks for bedtime reading and teaches your children to live in a dystopian panopticon of Orwellian proportions. It comes in green, red, and blue.
 Kim Possible! The biggest news headline this week is the coming end of the Korean War. The peninsula has been in a state of war since 1950, but leaders from both countries have agreed to negotiate a treaty to replace the 60-year-old truce. There is also an agreement between the two countries for complete denuclearization. This is great news for Hackaday. Every day, we’re eyeing our North Korean readership. Some days we get a view, some days we don’t, but year over year we’re always getting more views. Will this treaty result in even more Hackaday readers in North Korea? Only time will tell. Here’s some music. It wasn’t a chicken.
The East Coast RepRap Festival is on. Inspired by the Midwest RepRap Festival, the ERRF is happening north of Baltimore on June 23rd and 24th. What’s it going to be like? Nobody knows! This is the first time ERRF is happening, but judging by MRRF standards, it should be awesome. Also, crab season.
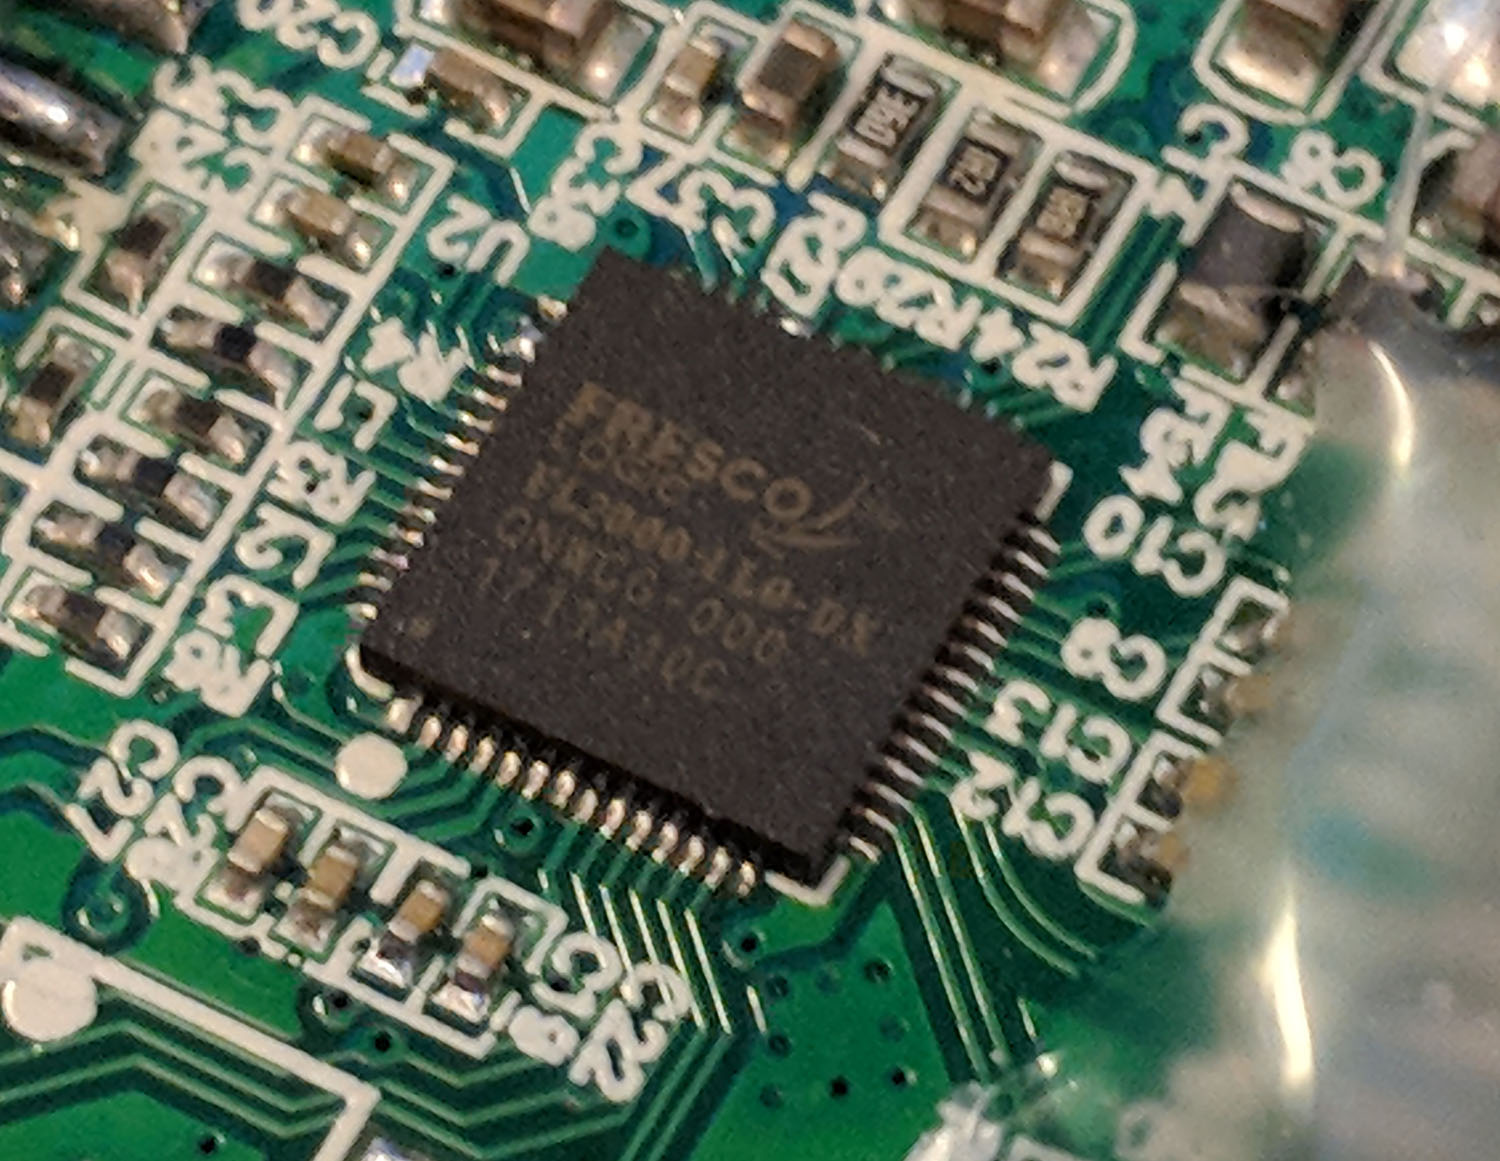
One of the most interesting hacks of this year is [Steve Markgraf]’s tool to allow transmit-only SDR through cheap USB 3.0 to VGA adapters. The hack relies on the Fresco Logic FL2000 chip and gives you the ability to transmit FM, TVB-T, and create your own GSM cell site. You can also spoof GPS to get something besides a rattata in Pokemon Go or hack your ankle bracelet to keep your parole officer off your back. The open question, though, is which USB to VGA adapter has the FL2000 chipset. I can confirm this one on Amazon has the relevant chipset. It’s a bit expensive at $15 (the same chipset is available from the usual eBay and AliExpress suppliers for $6), but if you’re looking for something that is available with Prime, there you go. Now we’re looking for shared OSH Park projects with a VGA input on one end and some antennas on the other. Make it happen, people.
Supercapacitors are awesome, but is it possible to fly a drone with a bank of them? Sure, for about 10 seconds. [dronelab] built a 7-cell, 200F supercap and managed to fly a little racing quad for about ten seconds. Not terribly great, but this is going to be awesome when we get multi-thousand Farad superultramegacaps.
Like Open Hardware? The Open Source Hardware Association is opening up the Ada Lovelace Fellowship for women, LGTBA+ and other minorities to attend the Open Hardware Summit. The deadline is tomorrow, so do it soon.
M3D has announced a new 3D printer that can print with four filaments. The Crane Quad is your basic i3 ripoff with an interesting extruder. It looks like it uses four tiny motors to feed filament into the main extruder motor. This isn’t really anything new; the Prusa i3 multimaterial upgrade does the same thing. However, M3D claims they have mastered color mixing. The Prusa upgrade doesn’t do mixing, and this is most likely the reason it works so well. Can M3D pull it off? This is a very, very, very hard problem.
Towards More Automated Printers
3D printers can be used in a manufacturing context. This might be surprising for anyone who has waited hours for their low-poly Pokemon print, but for low-volume plastic parts, you can actually run a manufacturing line off a few 3D printers. The problem with 3D printers is peeling the print off when it’s finished. If only there were a conveyor belt solution for a bed that wasn’t forgotten by MakerBot.
[Swaleh] may have a solution to the problem of un-automated 3D printers. He’s designing the WorkHorse 3D, a printer that uses a conveyor belt as a bed. When the print is finished, the conveyor belt rolls forward, depositing a printed part in a bin. It’s the solution to truly automated printing.
The use of conveyor belts to automate a batch of 3D prints isn’t a new idea. Way back in the Before Time, MakerBot released the Automated Build Platform, and used it in production to print off parts for Thing-O-Matics. This bit of Open Hardware was left by the wayside for some reason, and last year saw the invention of a new type of conveyor belt-based printer, The Infinite Build Volume Printer (for lack of a better name) from [Bill Steele]. This printer angles the print bed at 45 degrees, theoretically allowing for prints that are infinitely long. This idea was turned into the Printrbot Printrbelt, and the Blackbelt 3D printer was made public around the same time.
[Swaleh]’s printer is not of the infinite build volume variety. Instead of concentrating on creating long beams, most of the engineering work has gone into making a printer that’s designed to just push prints out. The conveyor belt bed is flat — and may unfortunately infringe on the MakerBot patents — but if you want a printer that’s designed to dump parts out like a very slow injection molding machine, this is the design you want.
The print queue application for this project is just a simple desktop app that serves as a buffer for G-code files. The app sends one G-code file off to the printer, rolls the bed forward, and queues up the next part. It’s simple, yes, but there aren’t too many things that do this now because there aren’t too many printers built to be factories. It’s impressive, and you can check out a few videos of this printer in action below.
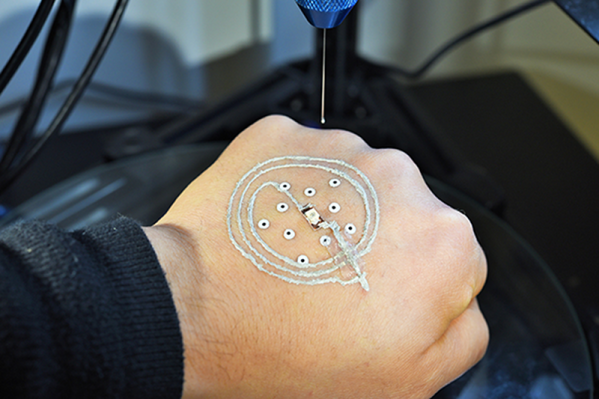
3D Printing Electronics Direct To Body
Some argue that the original Star Trek series predicted the flip phone. Later installments of the franchise used little badges. But Babylon 5 had people talking into a link that stuck mysteriously to the back of their hand. This might turn out to be true if researchers at the University of Minnesota have their way. They’ve modified a common 3D printer to print electronic circuits directly to the skin, including the back of the hand, as you can see in the video below. There’s also a preview of an academic paper available, but you’ll have to pay for access to that, for now, unless you can find it on the gray market.
In addition, the techniques also allowed printing biologically compatible material directly on the skin wound of a mouse. The base printer was inexpensive, an Anycubic Delta Rostock that sells for about $300.

How To Put The ‘Pro’ In Prototype
It’s easy to get professional-quality finishes on your prints and prototypes if you take the right steps. In the final installment of his series about building with Bondo, product designer [Eric Strebel] shows us how it’s done no matter what the substrate.
How does he get such a smooth surface? A few key steps make all the difference. First, he always uses a sanding block of some kind, even if he’s just wrapping sandpaper around a tongue depressor. For instance, his phone holder has a round indent on each side. We love that [Eric] made a custom sanding block by making a negative of the indent with—you guessed it—more Bondo and a piece of PVC. The other key is spraying light coats of both primer and paint in focused, sweeping motions to allow the layers to build up.
If you need to get the kind of surface that rivals a baby’s behind, don’t expect to prime once, paint once, and be done with it. You must seek and destroy all imperfections. [Eric] likes to smooth them over with spot putty and then wet sand the piece back to smooth before applying more primer. Then it’s just rinse and repeat with higher grits until satisfied.
There’s more than one way to smooth a print, of course. Just a few weeks ago, our own [Donald Papp] went in-depth on the use of UV resin.
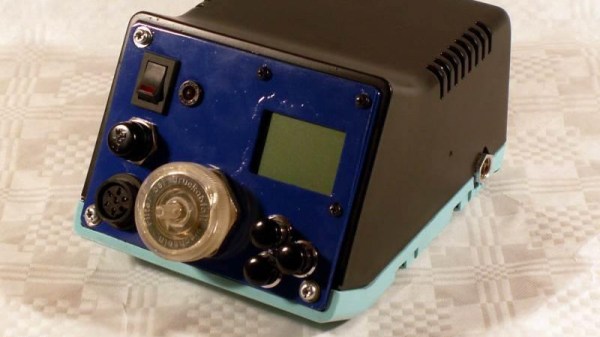
Auction Finds Combined For A Unique Desoldering Station
If you are in the market for a high-quality soldering iron, a rewarding pursuit can be attending dispersal auctions. It is not unusual to see boxes of irons, as anything remotely iron-like is bundled up together by the auctioneer into a lot with little consideration for what combination has been gathered. [Stynus] found himself in this position, the proud owner of a Weller DSX80 desoldering iron from an auction, but without its accompanying solder station required for it to work. Fortunately, he had another Weller solder station, not suitable for the DSX80 as it stood, but which provided a perfect platform for a home-made Weller DSX set-up.
The old station had a side-mounted valve and a 24V input, so he had to install a toroidal mains transformer and move the valve frontwards. Fortunately, this style of Weller station case was frequently available with just such a transformer installed, so there was plenty of space in the enclosure. A custom board was then created for a temperature controller centered upon a PIC microcontroller, and a new front panel was crafted to accommodate a Nokia 5110-style LCD display.
The resulting unit with its upper half repainted, is a pleasing and professional-looking project. Heated desoldering irons are an extremely useful tool that anyone should consider for their arsenal, but not all of them are as good as this Weller-based one. We recently reviewed a much cheaper example, with comedic results.


