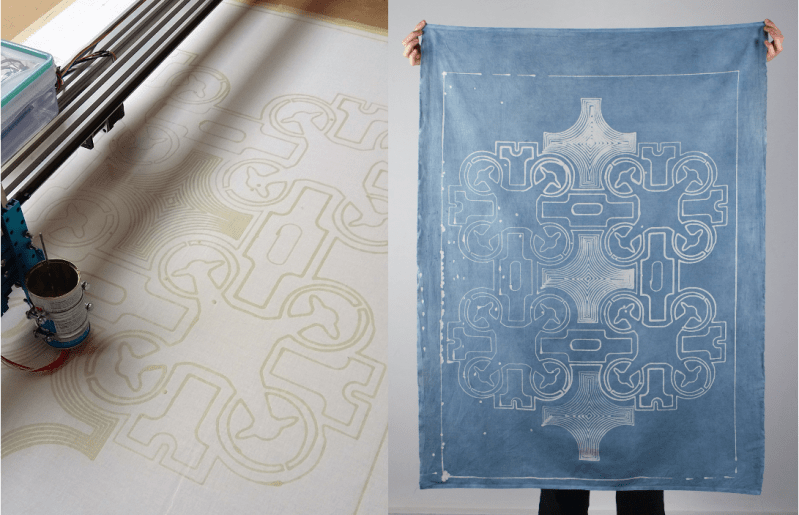
Batik is an ancient form of dyeing textiles in which hot wax is applied to a piece of cloth in some design. When the cloth is submerged in a dye bath, the parts covered with wax resist the pigment. After dyeing, the wax is either boiled or scraped away to reveal the design.
[Eugenia Morpurgo] has created a portable, open-source batik bot that rolls along the floor and draws with wax, CNC-style, on a potentially infinite expanse of cloth. The hardware should be familiar: an Arduino Mega and a RAMPS 1.4 board driving NEMA 17 steppers up and down extruded aluminium.
Traditionally, batik wax is applied with a canting, a pen-like object that holds a small amount of hot wax and distributes it through a small opening. The batik bot’s pen combines parts from an electric canting tool with the thermistor, heater block, and heater cartridge from an E3D V6 hot end. [Eugenia] built the Z-axis from scrap and re-used the mechanical endstops from an old plotter. Check out the GitHub for step-by-step instructions with a ton of clear pictures and the project’s site for even more pictures and information. Oh, and don’t resist the chance to see it in action after the break.
We love a good art bot around here, even if the work disappears with the tide.


imagine doing this process a number of times on the same fabric using different dye’s ….
You don’t have to imagine it. It’s been done by hand for hundreds of years. (c:
Never heard of this technique (batik) before – well heard of but never learned what it meant.
Not having any experience at all dyeing textile I guess this is best for larger production runs of two color designs?
I don’t see why it can’t be done with multiple colours. There may be an issue with re-aligning the material after it’s been dyed and boiled, but not insurmountable, I don’t think.
More of a hand produced art form than for mass production runs. There are other processes that lend themselves to industrial printing more readily.
Definitely not limited to two colours either. You keep applying different colour dyes (usually darker colours each time) and more wax to ‘lock in’ those colours. You can also ‘paint’ on the dye to specific areas instead of dyeing the entire piece each time to get a little more creative.
Thanks, that sounds like a good way to handle multiple colors. But wouldn’t locally applied dyes spread to nearby areas when fixating them? It should be obvious I have absolutely no idea how this works. :)
If you use dyes that have a thicker binder – something like silk screen dye, it doesn’t bleed through at all and you can paint to your hearts content and use the wax as a masking layer.
If an area is surrounded by wax, unless it cracks you don’t get any bleed though either with less viscous dyes.
(granting a slightly warped set of sensibilities) i would’ve expected an early attempt at replicating the Shroud of Turin. (or a ‘personalized’ version based upon a client’s b/w photograph?)
> Oh, and don’t resist the chance to see it in action after the break.
Yeah, we get it, dye resist ;).
Actually came here to see how many folks got it, because the title made me chuckle. Odd sense of humor around here…
I thought the ending line about ‘disappearing with the tide’ was pretty smooth, too!
Now if it could just inkjet inject the dye in various colors… But then I guess you wouldn’t need the wax.
I’m impressed by the quadcopter theme in the print.
Squirt that wax on a slab of copperclad, and dunk it in etchant instead of dye. Insta-PCB.
Wait, I can do that right now with my 3D printer! Why didn’t I think of this before? (I’m sure someone has…)
Huh. Anyone tried just laying down ABS or PLA directly on copper clad and etching it? Like don’t even bother making a motor-driven syringe for wax or whatever. Wonder how reliably that would work.
Ninjaflex
http://www.instructables.com/id/Make-Flexible-Circuit-Boards-Using-A-3D-Printer/
Niiiice. Dang it would’ve taken me a long while to remember that flexible TPU likes to stick to weird bed materials. Looks like that’s the key. Thanks for the tip! I am off to etch some circuit boards.