photo of the CNC controller, with the PLCC socket for the CPU, surrounded by driver ICs

Old CNC Brain Swapped With An Arduino

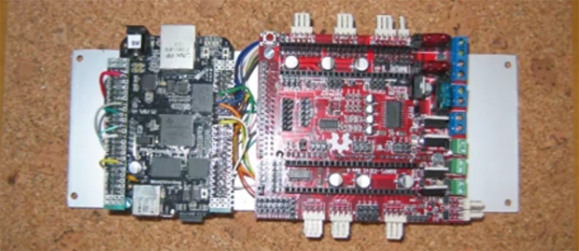
[Sebastian] and [Stefan Shütz] had a ISEL EP1090 CNC machine at home, sitting unused, and they decided to bring it to life. With pretty good mechanical specs, this CNC looked promising – alas, it was severely constrained by its controller. The built-in CPU’s software was severely outdated, had subpar algorithms for motor driving programmed in, and communication with the CNC was limited because the proprietary ISEL communications protocol that isn’t spoken by other devices.The two brothers removed the CPU from its PLCC socket, and went on to wiring a grbl-fueled Arduino into the controller box.

The interposer PCB, with an extra 74HC245 buffer on it
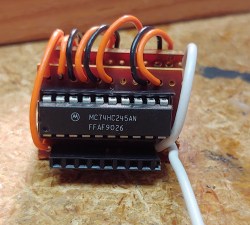
They reverse-engineered the motor driver connections – those go through a 74HC245 buffer between the original CPU and the drivers. Initially, they put an Arduino inside the control box of the CNC and it fit nicely, but it turned out the Arduino’s CPU would restart every time the spindle spun up – apparently, EMC would rear its head. So, they placed the Arduino out of the box, and used two CAT7 cables to wire up the motor and endstop signals to it.

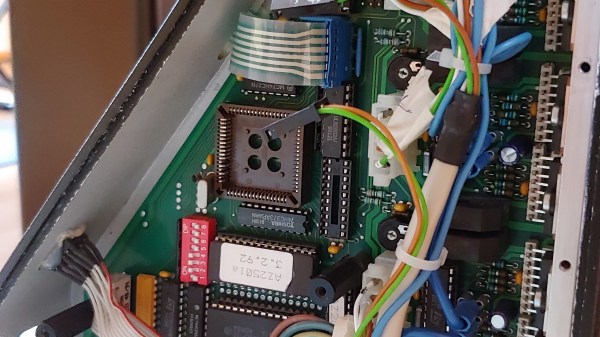
For tapping into these signals, they took the 74HC245 out of its socket, and made an interposer from two small protoboards and some pin headers – letting them connect to the STEP and DIR lines without soldering wires into the original PCB. There’s extensive documentation, GRBL settings, and more pictures in their GitHub repo, too – in case you have a similar CNC and would like to learn about upgrading its controller board!

After this remake, the CNC starts up without hassles. Now, the brothers shall CNC on! Often, making an old CNC machine work is indeed that easy, and old controller retrofits have been a staple of ours. You can indeed use an Arduino, one of the various pre-made controller boards like Gerbil or TinyG, or even a Raspberry Pi – whatever helps you bridge the divide between you and a piece of desktop machinery you ought to start tinkering with.

A Wireless Controller For The Mostly Printed CNC

The Mostly Printed CNC (MPCNC) is an impressive project in its own right, allowing anyone with a 3D printer and some electrical conduit to build their own fairly heavy-duty CNC platform perfect for routing. Customization is the name of the game with the MPCNC, and few machines will look the same when they’re done. But even fewer will feature a control interface nearly as slick as the wireless handset that [Steve Croot] has put together for his.

On the hardware side, the project is fairly straightforward. Inside the 3D printed enclosure is a 4.3″ Nextion touchscreen, a Mega 2560 PRO microcontroller, a nRF24L01 2.4 GHz transceiver, and a 4000 mAh 3.7 V LiPo battery with appropriate charging circuit. Besides the physical toggle switch to turn the handheld on and off, all of the device’s functions are touch controlled. For the receiver side, [Steve] is using another nRF24L01 radio and microcontroller pair to toggle relays and shuffle the appropriate G-code commands around.

But what really makes this project shine is the software. As you can see in the video after the break, [Steve] has done an absolutely phenomenal job with the user interface on this controller. The themed boot screen and concise iconography give the controller a very professional look, and the ability to jog the machine around using taps on a virtual workspace helps keep the touch interface from being a gimmick.

We’ve seen some impressive custom-built CNC controllers over the years, but between the mostly off-the-shelf hardware used and impressive UI, we think [Steve] has created something unique. It looks like he’s keeping the source code to himself for the time being, but hopefully he sees fit to release it in the future; a project of this caliber deserves to become more than a one-off creation.

Continue reading “A Wireless Controller For The Mostly Printed CNC”

Mechanical Issues For A Pi CNC

The Raspberry Pi platform has become popular in the maker community for various CNC projects. The single board computers are readily suited to acting as a server for a small CNC setup or 3D printer, though it’s fair to say that for heavy work they probably aren’t quite up to the task of driving the steppers in a serious rig directly. [Danny] set out to try to build a CNC plotter of his own, using a Pi Zero, and learned a few things along the way.

The plotter uses 3D printed parts combined with brushed DC motors which are geared down. Potentiometers are added to allow the Pi to keep track of the location of the pen. This enables the position to be corrected through feedback.

While the plotter does move and accept commands, it does have some issues. There is significant play in the gear train which [Danny] suspects of causing the poor output results. If you’ve got any ideas as to how this could be improved or overcome, throw them down in the comments!

We’ve seen another take on CNC control with the Raspberry Pi, too. Video after the break.

Continue reading “Mechanical Issues For A Pi CNC”

We Couldn’t Resist This CNC Batik Bot

Batik is an ancient form of dyeing textiles in which hot wax is applied to a piece of cloth in some design. When the cloth is submerged in a dye bath, the parts covered with wax resist the pigment. After dyeing, the wax is either boiled or scraped away to reveal the design.

[Eugenia Morpurgo] has created a portable, open-source batik bot that rolls along the floor and draws with wax, CNC-style, on a potentially infinite expanse of cloth. The hardware should be familiar: an Arduino Mega and a RAMPS 1.4 board driving NEMA 17 steppers up and down extruded aluminium.

Traditionally, batik wax is applied with a canting, a pen-like object that holds a small amount of hot wax and distributes it through a small opening. The batik bot’s pen combines parts from an electric canting tool with the thermistor, heater block, and heater cartridge from an E3D V6 hot end. [Eugenia] built the Z-axis from scrap and re-used the mechanical endstops from an old plotter. Check out the GitHub for step-by-step instructions with a ton of clear pictures and the project’s site for even more pictures and information. Oh, and don’t resist the chance to see it in action after the break.

We love a good art bot around here, even if the work disappears with the tide.

Continue reading “We Couldn’t Resist This CNC Batik Bot”

The TinyG Motion Controller

When you go to a trade show of any kind, you’re expecting cool demos in the booths. At Maker Faire, there were plenty, but one of the most hypnotic was a robot built around Synthetos’ TinyG motion controller.

The demo was simply a large CNC gantry moving a ball bearing around on a string. The gantry moved in the X and Y axes, and the miniature wrecking ball was spooled and unspooled in the Z axis. The ball move around the space, coming to a complete stop without any swaying. There were even a few clear plastic tubes that the ball fell in, and popped out of without raising or lowering the string. It’s the height of motion controller coolness, all made possible with the TinyG.

The TinyG was one of a few motion control and CNC boards found at the faire. In its base configuration, it has 6 axes of motion control, RS485 to network several boards for crazy machine configurations, and a suitably powerful processor to do everything correctly.

BeagleBone Black + RAMPS

CRAMPS

The BeagleBone Black, with an impressive amount of computing power and a whole bunch of I/O, would make an impressive CNC controller, save for two shortcomings: The BBB isn’t in stock anywhere, and CNC capes are a little on the pricey side. [Marc Peltier] can’t do anything about finding a distributor that doesn’t have the BeagleBone on backorder for you, but he did come up with an adapter for the very popular RAMPS-FD 3D printer controller board (Forum, French, Here’s the Google translation matrix).

The RAMPS-FD is an extension of the RAMPS board and a shield for the Arduino Due. Both the Due and BBB work on 3.3 V, meaning controlling the RAMPS-FD is simply a matter of finding the correct wiring diagram and pin assignments on the BeagleBone. [Marc] solved this problem by using the settings from the BeBoPr cape and using the existing BeBoPr LinuxCNC configuration.

The end result of [Marc]’s tinkering is something a lot like [Charles Steinkueler]’s CNC capes for the BeagleBone Black we saw at the Midwest RepRap Fest. [Charles] isn’t selling his capes, but no one else seems to be selling BeagleBone Blacks, either.

Continue reading “BeagleBone Black + RAMPS”

A Brilliant And Elegant CNC Pendant

pendant

[Mike Douglas] has a small hobby CNC router, which works great — but you’re limited to controlling it from your PC. And unfortunately, there just aren’t pendants made for this consumer level stuff. Annoyed at having to reach over to use his keyboard all the time, he stumbled upon a simple, but brilliant solution: A dedicated USB 10-key pendant keypad.

These USB keypads are designed for laptops that don’t have full size keyboards. They can be had for a few dollars from China, and let you expand your keyboard possibilities… All [Mike] had to do was print off some stickers to put on the keys!

It’s easy to program new hot keys in Mach3  — and there you go! Why haven’t we thought of this before? While you’re at it, why not build a cyclonic dust separator for your CNC too — and if you’re having trouble clamping down work pieces, [Mike] has a pretty cool solution for that as well.