As difficult as it is for a human to learn ambidexterity, it’s quite easy to program into a humanoid robot. After all, a robot doesn’t need to overcome years of muscle memory. Giving a one-handed robot ambidexterity, however, takes some more creativity. [Kelvin Gonzales Amador] managed to do this with his ambidextrous robot hand, capable of signing in either left- or right-handed American Sign Language (ASL).
The essential ingredient is a separate servo motor for each joint in the hand, which allows each joint to bend equally well backward and forward. Nothing physically marks one side as the palm or the back of the hand. To change between left and right-handedness, a servo in the wrist simply turns the hand 180 degrees, the fingers flex in the other direction, and the transformation is complete. [Kelvin] demonstrates this in the video below by having the hand sign out the full ASL alphabet in both the right and left-handed configurations.
The tradeoff of a fully direct drive is that this takes 23 servo motors in the hand itself, plus a much larger servo for the wrist joint. Twenty small servo motors articulate the fingers, and three larger servos control joints within the hand. An Arduino Mega controls the hand with the aid of two PCA9685 PWM drivers. The physical hand itself is made out of 3D-printed PLA and nylon, painted gold for a more striking appearance.
This isn’t the first language-signing robot hand we’ve seen, though it does forgo the second hand. To make this perhaps one of the least efficient machine-to-machine communication protocols, you could also equip it with a sign language translation glove.
arduino mega96 Articles
Arduino Saves Heat Pump
For home HVAC systems, heat pumps seem to be the way of the future. When compared to electric heating they can be three to four times more efficient, and they don’t directly burn fossil fuels. They also have a leg up over standard air conditioning systems since they can provide both cooling and heating, and they can even be used on water heating systems. Their versatility seems unmatched, but it does come at a slight cost of complexity as [Janne] learned while trying to bring one back to life.
The heat pump here is a Samsung with some physical damage, as well as missing the indoor half of the system. Once the damage to the unit was repaired and refilled with refrigerant, [Janne] used an Optidrive E3 inverter controlled by an Arduino Mega to get the system functional since the original setup wouldn’t run the compressor without the indoor unit attached. The Arduino manages everything else on the system as well including all of the temperature sensors and fan motor control.
With everything up and running [Janne] connected the system to a swimming pool, which was able to heat the pool in about three hours using 60 kWh of energy. The system is surprisingly efficient especially compared to more traditional means of heating water, and repairing an old or damaged unit rather than buying a new one likely saves a significant amount of money as well. Heat pump projects are getting more common around here as well, and if you have one in your home take a look at this project which adds better climate control capabilities. to a wall mount unit.
A Low-Cost Spectrometer Uses Discrete LEDs And Math
A spectrometer is a pretty common lab instrument, useful for determining the absorbance of a sample across a spectrum of light. The standard design is simple; a prism or diffraction grating to break up a light source into a spectrum and a detector to measure light intensity. Shine the light through your sample, scan through the spectrum, and graph the results. Pretty easy.
That’s not the only way to do it, though, as [Markus Bindhammer] shows with this proof-of-concept UV/visible spectrometer. Rather than a single light source, [Marb] uses six discrete LEDs, each with a different wavelength. The almost-a-rainbow’s-worth of LEDs are mounted on circular PCB, which is mounted to a stepper motor through a gear train. This allows the instrument to scan through all six colors, shining each on the sample one at a time. On the other side of the flow-through sample cuvette is an AS7341 10-channel color sensor, which can measure almost the entire spectrum from UV to IR.
The one place where this design seems iffy is that the light source spectrum isn’t continuous, as it would be in a more traditional design. But [Marb] has an answer for that; after gathering data at each wavelength, he applies a cubic spline interpolation to derive the spectrum. It’s demonstrated in the video below using chlorophyll extracted from spinach leaves, and it seems to generate a reasonable spectrum. We suppose this might miss a narrow absorbance spike, but perhaps this could be mitigated by adding a few more LEDs to the color wheel.
Continue reading “A Low-Cost Spectrometer Uses Discrete LEDs And Math”
Arduino VGA, The Old Fashioned Way
Making a microcontroller speak to a VGA monitor has been a consistent project in our sphere for years, doing the job for which an IBM PC of yore required a plug-in ISA card. Couldn’t a microcontroller talk to a VGA card too? Of course it can, and [0xmarcin] is here to show how it can be done with an Arduino Mega.
The project builds on the work of another similar one which couldn’t be made to work, and the Trident card used couldn’t be driven in 8-bit ISA mode. The web of PC backwards compatibility saves the day though, because many 16-bit ISA cards also supported the original 8-bit slots from the earliest PCs. The Arduino is fast enough to support the ISA bus speed, but the card also needs the PC’s clock line to operate, and it only supports three modes: 80 x 25, 16 colour text, 320 x 200, 256 colour graphics, and 640 x 480, 16 colour graphics.
Looking at this project, it serves as a reminder of the march of technology. Perhaps fifteen years or more ago we’d have been able to lay our hands on any number of ISA cards to try it for ourselves, but now eight years after we called the end of the standard, we’d be hard placed to find one even at our hackerspace. Perhaps your best bet if you want one is a piece of over-the-top emulation.
Build Yourself A Beautiful Interactive Light Toy
Sometimes, we build things with LEDs as indicator lamps or to illuminate something important. Sometimes, we build things with LEDs purely to glow and be beautiful. This interactive light toy from [Jens] falls into the latter category.
The build uses a 16×16 addressable LED matrix. [Jens] then ported some “Bouncy Bubbles” Processing code from Keith Peters to the Arduino Mega, and set it up to display on the matrix. An accelerometer was used to control the bouncing ball animations, while a second Arduino was then tapped to act as a musical synthesizer to add more vibes. The whole kit was then built into a 3D-printed housing with a nice hazy diffuser to give the LEDs a smoother, even look. [Jens] steps through how he got the diffuser just right, including a support structure that made all the difference to the aesthetic of the finished product. Getting diffusion right is key to making a nice LED project, and [Jens] got it very right here.
It’s a nice little art piece that looks kind of relaxing to play with in a dark room. We love a good glowable project here at Hackaday, so if you’ve built your own—don’t hesitate to let us know! Video after the break.
Continue reading “Build Yourself A Beautiful Interactive Light Toy”
This Is The Future Of Waste Management
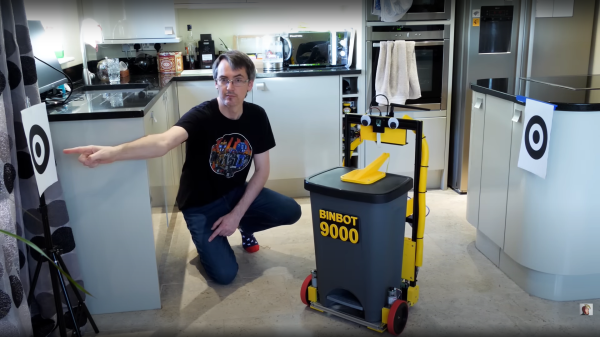
Many of us have been asking for some time now “where are our robot servants?” We were promised this dream life of leisure and luxury, but we’re still waiting. Modern life is a very wasteful one, with items delivered to our doors with the click of a mouse, but the disposal of the packaging is still a manual affair. Wouldn’t it be great to be able to summon a robot to take the rubbish to the recycling, ideally have it fetch a beer at the same time? [James Bruton] shares this dream, and with his extensive robotics skillset, came up with the perfect solution; behold the Binbot 9000. (Video, embedded below the break)
Aqua PCB Is A Big Upgrade For The Mattel Aquarius
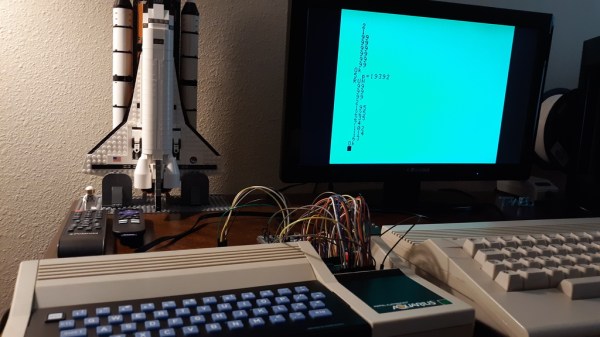
In case you weren’t around in the 80s, or you happened to blink, you may have missed the Mattel Aquarius computer. [Nick Bild] has a soft spot in his heart for the machine though and built the Aqua cartridge to make the Aquarius into a more usable machine.
Originally equipped with a mere 4 KB of RAM and a small, rubbery keyboard, it’s not too surprising that the Aquarius only lasted five months on the market. [Nick] decided on the cartridge slot to beef up the specs of this little machine given the small number of expansion ports on the device. Adding 32 KB of RAM certainly gives it a boost, and he also designed an SD card interface called Aqua Write that connects to the Aqua cartridge for easily transferring files from a more modern machine.
The Aqua Write uses an Arduino Mega 2560 to handle moving data between the SD card and the system’s memory. This is complicated somewhat because a “PLA sits between the Z80 and data bus that XORs data with a software lock code (initialized to a random value on startup).” [Nick] gets around this by running a small program to overwrite the lock code to zero after startup.
Getting data on and off retrocomputers can certainly be a challenge. If you’re trying to get files on or off another old machine, check out this Simple Universal Modem or consider Using a Raspberry Pi as a Virtual Floppy Drive.


