If you’ve had the misfortune of leaving your 3D printer filament out on a muggy day or, heaven forbid: showering with it, it’s probably soaked up quite a bit of moisture. Moisture will do more than just make your printer sound like Rice Crispies, it’ll ruin surface finishes and cause the filament to string into thin wisps between separate geometries on the same layer. Luckily for us, though, both [SafetyGlassesRequired] and [Joe Mike Terranella] give us the breakdown on taking a pair of snippers and about $40 in cash to start drying out our filament far away from the possibility of ruining any nearby kitchen ovens.
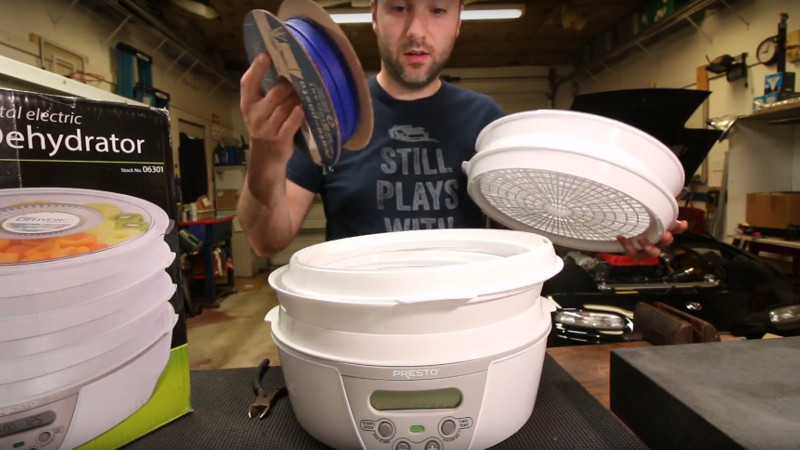
If you’ve been circling the 3D printer community for a while, you might have already heard about this trick. But with the arrival of a curiously-culinary-looking contraption called PrintDry, we can’t let the elephant in the room keep silent for much longer. Rather than risk our own pennies and leave ourselves stranded with a device that only makes the jerky on the box cover, [SafetlyGlassesRequired] and [Joe Mike Terranella] kindly prove our suspicions for us once and for all: a food dehydrator works perfectly for drying all that filament that we left out in the rain!
Clumsiness aside, a dehydrator isn’t a bad investment in the long run. Not only can we keep our supply dry, we might just be able to give all that freebie filament (that we dug out of the trash) a second life by resetting it to a clean, dry state.
These dehyrdators will toast all that moisture out of your filament, but it wont keep them dry whilst printing. For that problem, you’ll need to summon a heated drybox like this one.
[Joe Mike’s] solution will run us about $40. If you can do better, let us know in the comments.


Good thing I live on the plains of Colorado. The humidity runs 10-15 percent most of the time so we don’t normally have a mostire plomblsm! :-)
Oops I meant problem :-(
Also remove the 7 from the end of my email address. (Fat fingers on my tablet)
Oops I meant problem :-(
Also remove the 7 from the end of my email address. (Fat fingers on my tablet)
My idea is a cooler or other insulated container, a PC fan, and a Peltier used as a mini dehumidifier. Something like that can also be used for PLA annealing.
Interesting. How’s the peltier used? To gather condensation on the cold side?
Pretty much.
Using: Print directly from a large ziplock bag. Put the spool on the rollers inside the bag, and then jam the end of the filament through the bag bottom so it’s a tight fit.
Storing: Get a storage bin with seals, and put a container of Damp-Rid in the corner.
Drying: Convection toaster oven on low with the door slightly cracked.
same instructions apply to beef jerky
A small heater in an old filing cabinet should help. Golden rod is a brand popular for gun safes so they should be easy to find second hand.
Or a small heater in a 5 gallon bucket, with a grille of some kind between the heater and the filament spools.
I’ve seen good old filament light bulbs mounted a five gallon bucket with some reusable desiccant tins in the bottom work fairly well.
Oh yes, accidentally showering with your filament. We’ve all been there. ;)
Uhm.. if people really need instructions how to cut out a plastic grid…. why do they have a 3D printer in the first place?
Some printer owners are newbies and those plastics are different than what most people print anyway. Breaking away support and cutting the acrylic grids are very different.
Of course it is different, but that shouldn’t scare anyone! The info on the food dehumidifiers was usefull, I simply didn’t know they made a “useless” (to me) gadget like that so cheap, but it’s a bit wexing that they include such super basic DIY instructions, like they’re instructing a 4 year old how to draw a tree.
once dry can you store the filament in the refrigerator to keep it dry?
that seemed to keep a bag of potato chips dry or at least prevent them from getting soggy
What else is in the refrigerator? The fridge will keep it cold, but cold air holds less moisture than warm air. If there’s something in the fridge that will give off water (like any food, or the bolus of warm air that flooded into the fridge when you opened the door), it’ll condense onto your filament.
I made dry meat/jerky in the fridge ( 3weeks/kilo) without condensation issue. Have to try it with filament…
For 40$ you can buy enough silicagel you probably won’t be able to lift it all :P
And for those that still don’t know – silicagel is renewable, just heat it over the boiling point of water for a couple of hours…the non-indicator type tolerates temperatures well up to 200°C and doesn’t degrade when heated (unlike the plastic filament)…
Just don’t breathe the fine dust, silicosis is not something you want ;-)
Heat works faster and better than silica. Silica is good for extracting moisture from the air but it doesn’t necessarily free it from within the plastic, especially at room temperature or colder. Some of the industrial plastic dryers use both heat and silica to dry the plastic before extrusion & injection molding.
i place my wee silica gel packets on the machine just above the main board…it’s nice n toasty there and should help keep them fresh as a dried daisy? ;)
Ok, as someone who has done this: The cheapest dehydrator they had at walmart (I think it was $20) However, no temp adjustment.
I can confirm this works well. I’ve also used it on PVA, and I think ABS (I don’t tend to print in ABS that often.)
Another thing that works, but may get too hot, is to put it outside in a car… It works, but I have had it get a little sticky when printing. So I wouldn’t recommend that in most cases.
I use the heated bed of the printer and a cardboard box over the spool, like a tea cozy. It’s the most reliable constant heat source I have readily available. And then store the dry spools in hardware store paint buckets, that by definition are leakproof.
There was a recent instructables where they used an old crock pot (set to low) modified to be a vacuum chamber, evacuated with a brake line bleeder as the vacuum pump. The vacuum means that moisture in the filament is going to go vapour at a lower temperature. The initial cost would be higher, but I think the energy cost (heating) would be lower and the dehydration speed faster. Google for VACUUM SLOW COOKER FILAMENT RESTORATION. Disclaimer: I have no connection with the site or the instructable author, just thought it was a more clever idea.