Getting good results from a 3D printer is like Goldilocks’ porridge. There are a lot of things that have to be just right. One common thing that gives people poor results is damp filament. This is especially insidious because the printer will work fine and then after some period time results degrade but it is no fault of the printer mechanics or electronics. There are many ways to attempt to dry filament, but [HydeTheJekyll] prefers using a slow cooker modified to operate with low air pressure.
We assume this works because the low pressure reduces the boiling point of water, allowing the water to boil off at temperatures that won’t distort the filament. The modifications aren’t very severe. You’ll need some hose and a pump along with some silicone caulk and petroleum jelly.
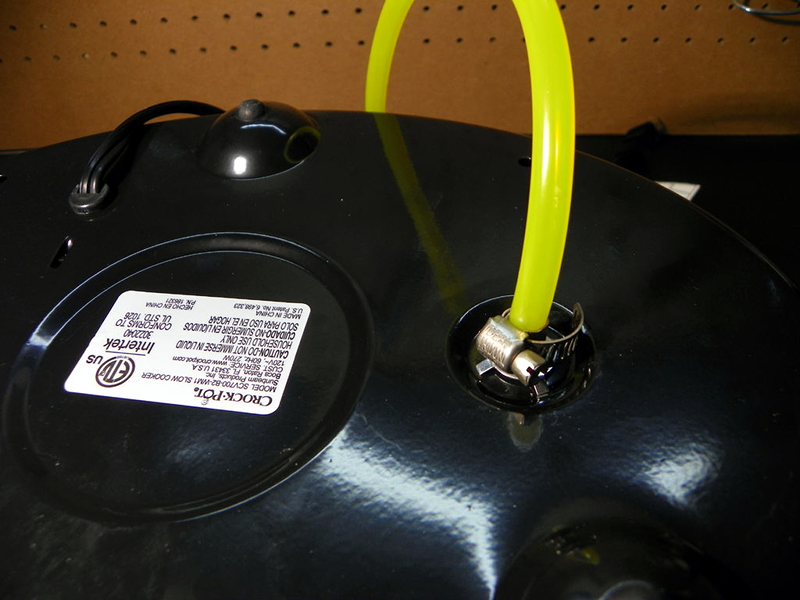
The stone pot inside the slow cooker isn’t used. The heating vessel has drain holes and one of these becomes the inlet for the vacuum hose. The other holes are plugged with silicone. In addition, the silicone forms a seal around the rim to keep air from leaking around the edge of the lid. Some petroleum jelly on the lid helps make the seal. For a vacuum pump, a common vacuum worked fine.
If you can draw enough vacuum, you don’t need any heat as the water will boil off at room temperature. We’ve used that trick many times to dry out electronics that got wet. [HydeThe Jekyll] mentions he plans to patent this process, but we will be curious if that’s feasible as using heat and vacuum to dry things isn’t novel in our non-legal opinion.
However, it is a great hack to a piece of kitchenware. We’ve found that just sealing the filament up with crystal cat litter or other silica gel is sufficient, but it takes awhile. This method ought to be a lot faster and should work better than trying to dry at high temperatures in an oven.
We’ve seen heated dry boxes before, and very recently a food dehydrator pressed into service as a filament dryer. Of course, most filament now is sealed and has some desiccant in with it. So if you don’t open the filament and then use it quickly, you shouldn’t have this problem.


If you don’t have access to a vacuum pump, another alternative would be to store / dry filament in an enclosure with a nitrogen purge (N2 tank + regulator). Nitrogen from a gas supplier should have an extremely low dew point (read: very dry). Nitrogen drying is an established method of drying out equipment, pipelines, food, etc.
Yeah, i remember flushing out any moisture in the targeting and observation optics of the battle tanks after we’ve taken them apart and repaired them. You just had to be careful not to blow it in there with high pressure, rather slow and steady over several minutes.
Perhaps pure isopropyl alcohol will dehydrate filament without otherwise affecting it? Once the water is pulled out and forms an azeotrope with the alcohol is is not likely to be available to rehydrate the plastic, and if in the bottom of the container you have a bed of anhydrous calcium chloride (cheap!) you may even find that the alcohol is recycled as the water’s affinity for the salt is even higher. The two part system means that the contact with the filament is intimate and the drying rapid, put the life of the most expensive substance is extended. You can always dehydrate the saturated salt and return it to the bed as needed. Recirculate the alcohol through a filter at the bottom of the bed to shower down over the filament using a small peristaltic pump to reduce the amount of alcohol needed to dry out an entire spool.
Happy Hacking, and F*K patents.
https://hackaday.io/project/6908-thrift-vacuum-oven Trying way too hard.
Cat litter didn’t work for me. Dessicant for rooms worked, it’s not silica based, helped to go from 60% to 30%.
Did you get the crystal cat litter? It works great for me in a storage container and when you put your hand it the container you can feel how dry the air is.
For me good way to dry filament is to use welding rod oven normally used for 7018 electrodes.
I have one of these things: http://www.printdry.com/product/filament-dryer
Its actually pretty well put together and cheaper than any food dehydrators I could find to repurpose.
Lazy susan filament holder thing works well.
The factory temp controller is HILARIOUSLY sh*t though.
Bi metallic switch located in on the inlet side of the heater. Before the hot part. Because stoopid.
Sent a few floppy rolls of PLA to the bin before I ripped it to bits to find out why it sucked so bad. Lord knows what they were thinking there.
$10 ebay temp controller with the probe mounted up in the filament chamber. Solved.
Makes a huuuge difference to prints here in NZ where the humidity is always pretty high.
If the filament is this fussy I’ll hold off buying a 3D printer until the tech improves.
It’s not that fussy. I keep my unused filament in a ziplock with the dessicant pack that comes with it, but the stuff going to my printer sits on top of my printer enclosure out in the air. I’ve not had any moisture issues. It’s weeks between prints sometimes.
Same here, the only problem I’ve had was buying bad quality filament which I corrected by returning it and switching back to Hatchbox/eSun
Stick welding rods require an oven for storage. We should probably hold off on welding until the tech improves.
Well, the low-hydrogen ones anyway. Can’t say I’m signing up to buy any consumables that need to be stored at 100C and brought out for use no more than an hour or two in advance.
You can keep 6012s in a sealed bag indefinitely, and bake them lightly (150C for 30 mins) if they’re left out too long. I did recently discover a bad seal on my bag though – the rods burn nicely at the start and get progressively worse along their length towards the end which was nearer the open end of the box/bag.
The filament humidity issue isn’t really a problem if you regularly use your printer. Unless you’re using some kind of ultra-hygroscopic material or you live in a lake, just use it and you’ll use up a spool before it needs to go in an oven or whatever.
Also I doubt refinements to the tech are going to change the nature of humidity. Dunno what you’re waiting for there.
I’m probably to stupid to understand this completely. Could someone explain to me where the moisture is going in this vaccuum atmosphere? I get that it wants to evaporate at lower temperature in a low pressure environement. But then you have water vapor in that pot and as soon as you release the vaccuum or lower the temperature, it condensates again on the surface of the filament.
Should you not provide something that sucks up the moisture once it has left the filament?
It condenses everywhere, so it also condenses on the sides of the pot, and in the air, so you still lose quite a bit of moisture from the plastic.
It will migrate back to the pump, in this case I suspect most of it will end up in the tube attached to the top and condensate when it cools
Eventually it is going out of the pump. The key is this: Water in the air lands on the plastic and works its way in while water in the plastic gets chucked out into the air. If water is landing faster than it is leaving, the plastic gets moister. If there is a process that is kicking the water out of the container, then the plastic gets drier. Relative humidity and sweating work the same way.
They do the same thing in the refrigeration and air conditioning service and installation industry. They call it “Pumping down a system”. As someone else mentioned a nitrogen purge is another good way to eliminate moisture. They’ll do that on large refrigeration systems that would take hours to do with vacuum and many systems can’t afford to be down that long. Just blast a tank of nitrogen through the pipes and you are adding refrigerant in a matter of minutes rather than hours.
Although I wouldn’t trust this on a refrigerant system, even in a car, if you have access to an air compressor a guy could use on of these to create a vacuum on the cheap since you don’t need 0% moisture or even close and just want to get rid of excess moisture
https://www.harborfreight.com/air-vacuum-pump-with-r134a-and-r12-connectors-96677.html
it’s a nice hack but i haven’t found it necessary. since i started buying form futura easyfil pla, this protocol has worked great for me. (i found one that works and stuck with it, i’m not saying other brands or protocols won’t work)
i store my filament in a rubbermaid that i put a foam gasket in (weather stripping for doors from the hardware store). there is also a can of reusable silica desicant in there. i remove about 40 meters of filament at a time to load up on my printer, where it hangs in the open in my humid basement (indiana). i don’t print large objects often so it will hang there for a few months sometimes. i don’t have any problems: it’s strong, not brittle, doesn’t warp (much), doesn’t smell, doesn’t jam.
when i used a cheap no-name clear PLA, it obviously absorbed water and gave me no end of trouble. i’ve never tried ABS but basically i think if you’re printing with ABS, it’s because you haven’t discovered PLA yet. get a quality PLA and you can even throw out your heated bed. of course if you want flexible then …
I’ve had a roll of PLA sitting in an apartment 500 meters from the ocean in humid Nova Scotia that produced good prints two years after it was opened. I think that just about everything said about PLA filament is true for certain values of ‘PLA’.
The problem for those of us in dry climates who don’t use up a kg spool very quickly is brittle filament. The following claims that filament brittleness is caused by dehydration. However, it’s confusing since they say this is caused “due to humidity in the air”. I think they meant to say due to LOW humidity in the air. The confusion may be due to English not being their native language.
https://blueprinted.co/blogs/wiki/106458374-how-to-preserve-and-restore-filament
A common misconception is that water causes filament to become brittle. The truth is filament including PLA is actually extruded into water to hydrate during the drying process. Without this important process filament wouldn’t be flexible enough to spool. Brittle filament is often caused by the plastic becoming dehydrated due to humidity in the air. Think of filament like dried spaghetti. When you put spaghetti into a boiling pot, it begins to re-hydrate which restores its flexibility (and its tastiness).
RESTORING BRITTLE FILAMENT – RE-HYDRATING
Method 2 – Find a suitable Tupperware container and place it in a cupboard away from UV light and moisture.
1. Cut at least 2 meters of brittle filament off the role.
2. Boil some water in a large pot.
3. Place the 2 meters of brittle filament into the boiling water with tongs for 6 seconds.
4. Allow the re-hydrated filament to dry completely (we recommend at least 24 hours). Do not dry the filament in direct sunlight.
5. Test the re-hydrated filament with your 3D printer. If filament sizzles when printing, we recommend repeating the process 1-5 again, but only re-hydrate the filament for 2-3 seconds. If the filament is still too brittle, repeat process 1-5 again but re-hydrate for 10-12 seconds. If the 2 meters of filament prints fine, proceed to step 6.
6. Submerge the entire spool in boiling water for the same amount of time which worked above.
7. Allow the spool to dry for at least 24 hours.
Your filament roll is now hydrated and ready to use again.
I’m skeptical. Plastics are extruded into water to cool and solidify the plastic quickly. Sometimes a plasticizer is added to make a plastic more flexible. Plasticizers are organic, not water. Water turns to steam when the plastic is melted causing poor extrusion. I think adding water to PLA is not sound practice.
a-HA! A new use for the chamber vacuum sealer in my kitchen!
That’s a pressure cooker not a slow cooker…..
Anything is a slow cooker if you keep it luke warm enough
Not sure if that slow cooker is rated for pulling a vacuum. The lid seems like it’s glass and not even a very thick one. I would be worried to operate this thing for the fear that it’ll implode.
According to this chart:
– https://www.engineersedge.com/h2o_boil_pressure.htm
If you can get it to 26 inches of mercury (about 1.8PSI) then water will boil at 50C.
If you had a good dual stage vacuum pump, like in neon plant, then you could get to 10 micron and boil at 12C.
A regular refrigeration single stage pump will get you to 50microns on a good day which is 38C boil approx.
A hand pumped vacuum bleed pump might get you to 20 in of mercury (4.5PSI) on a good day
– which will only lower the boiling temp to 70C. This is probably low enough to not deform the filament when heating.
But has to be a good sealed system to reach and maintain that pressure(vacuum) for long enough for the reel to reach 70C.
Or just bake it at 50 degrees for 3-6 hours as injection moulders would. These are solved problems which industry has worked around for years it took me a whole 30 seconds to find the drying time for PLA if you were going to use it for injection moulding and this is exactly the same situation.