If you’ve been hanging around Hackaday for a while, you know that a large portion of the stuff we publish goes above and beyond what most people would consider a reasonable level of time and effort. One could argue that’s sort of the point: the easy way out is rarely the most exciting and interesting route you can take. We, and by extension our readers, are drawn to the projects that someone has really put their heart and soul into. If the person who created the thing wasn’t passionate about it, why should we be?
 That being said, on occasion, even we are left in awe about the lengths some people will go to. A perfect example of this is the absolutely insane amount of time and effort [Drygol] has put into restoring an Atari 800XL that looked like it was run over by a truck. Through trial, error, and a bunch of polyester resin, he’s recreated whole sections of the Atari’s case that were missing.
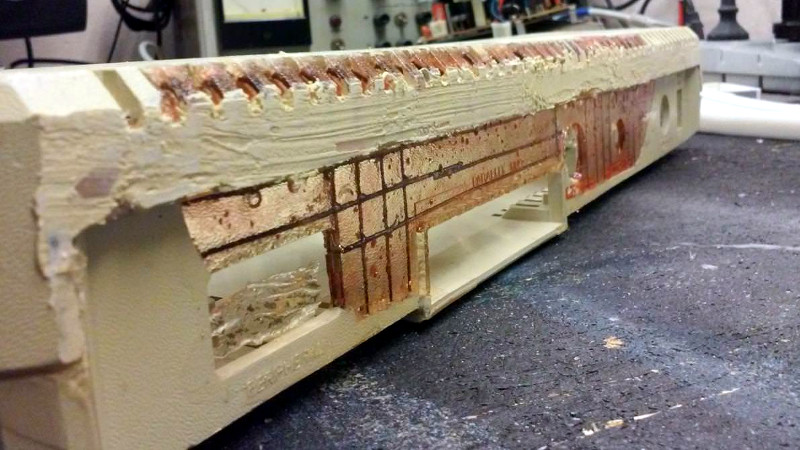
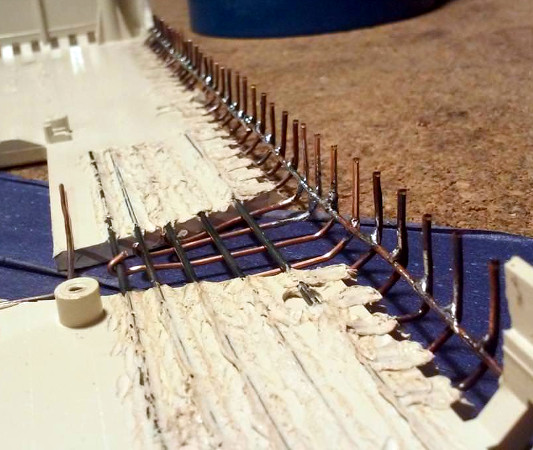
To start the process, [Drygol] used metal rods to bridge the areas where the plastic was completely gone. By heating the rods with a torch and pushing them into the Atari’s case, he was able to create a firm base to work from. Additional rods were then soldered to these and bent, recreating the shape of the original case. With the “skeleton” of the repair in palce, the next step was filling it in.
[Drygol] borrowed an intact Atari 800XL case from a friend, and used that to create a mold of the missing sections from his own case. Most of his rear panel was missing, so it took some experimentation to create such a large mold. In the end he used silicone and a custom built tray that the case could sit in vertically, but he does mention that he never quite solved the problem of degassing the silicone. The mold still worked, but bubbles caused imperfections which needed to be filled in manually during the finishing process.
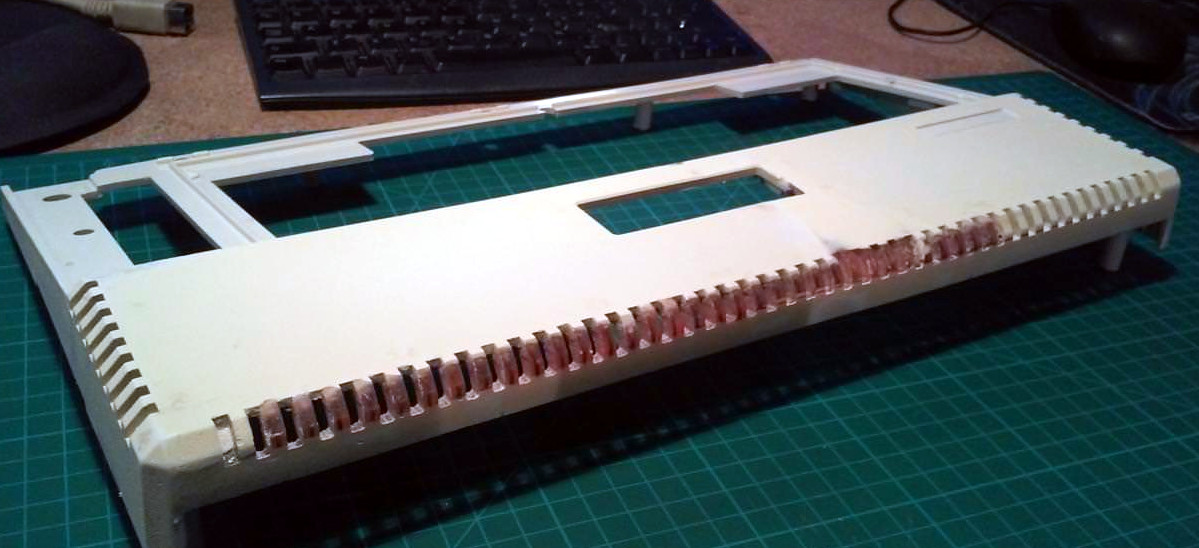 Using his silicone mold and the same tray, he was then able to pour polyester resin over the wire frame. This got him most of the way to rebuilding the case, but there was still plenty of filler and sanding required before the surface finish started to look half-way decent. When he got towards the very end of the finishing process, he used a mold he created of the case surface texture to roughen up the smooth areas left over from the filling process. Add a bit of custom spray paint, and the end result looks absolutely phenomenal considering the condition it was in originally.
We were already impressed by the work he put in during the first stages of the restoration, but this case repair is really on a whole new level. Between this and the incredible instructional videos [Eric Strebel] has been putting out, we’re really gaining a whole new respect for the power of polyester.


Nice job. But why? You can get a good condition 800XL for less than $100 on ebay, he probably spent almost that much in mold material.
Where’s the kudos in that? For less than $60 you could buy a single-board computer and emulate the damn thing.
What was it that John F Kennedy once said: “We don’t do things because they are easy, but because they are hard!” … something like that anyway.
This is more “yeah, I’ll make my own moon” though. And that’s how the Empire started…
Basically this guy is literally Vader.
Until you account for the fact that he’s only making an Atari 800XL.
But why even bother? For free you can make a comment on a webpage!
Next time he needs to fabricate some other piece he can’t just buy for $100, he’ll know how to do it.
In the future, someone else can use his work as a starting off point.
First of all, I thought we’d learned to never ask “WHY” for any of these strange projects. The answer will be “just o do it!” Anyway, here’s the answer from the associated web page:
Anyway, It all started a while before SillyVenture 2017 party.
My friend Wiecz0r/Lamers posted a link and pic from my C64 post on FaceBook.
TDC – atarionline.pl member – answered that he has an Atari that is un-refurbishable (lol nice word) That was actually an Atari 800 XL that he received during a PixelHeaven presentation from SOS as a gift :D
Obviously, I blindingly stated, that nothing is un-refurbishable and hastily answered to that post aaaaaand …
FastForward…
SillyVenture happened and to my great surprise … TDC approached me with a cunning look on his face. He’d brought that Atari to me and wanted to troll me saying – “here it is, you can fix it”. In order to counter-troll him, I’ve answered “No problem, I’ll do it lol :D”
This is HackADay, we don’t ask why here.
We do all the time. Literally not even a hack, quite the opposite. Unhack
Why didn’t he 3D print the case?
Nicely done! I can already hear the dismissal of others of, “Why bother? You could get another 800XL for little money.” But I would think of it was practicing skills for salvaging some other more rare find. Even the dedication to not just molding a whole side and insisting on patching around missing pieces is mind boggling. I’m impressed, no way I’d bother personally, but impressed none-the-less.
As practice for other rarieties sure.
This is a serious case of the Challenge Accepted (insert meme)!
I’ve done case repairs using metal rods and Cloth Reinforced cyanoacrylate (superglue)… This person takes it to a whole case section level…
I have much respects for him.
I have used the CA glue + toilet paper combo successfully to rebuild broken balsa structures, and CA + baking soda is perfect as a filler for small gaps in clay or stone
baking soda? your sooo close, the cat’s out of the bag for over 10 years now, so we can talk about it without legal issues. (bag=tradesecret but out=google)
BAKING-POWDER, also known as MAGIC-baking-POWDER.
dries and cures as fast as it mixes, can NOT be applied after mixing.
attaches dirty ceramic to dirty metal. no wiping required.
i was told to use, and used only INSTANT-DRY formulation and NOT original.
i have yet to try original crazyglue and baking-powder, or even baking-soda.
directions: glue with INSTANT-DRY as normal, sprinkle on baking-POWDER where the two objects touch, while holding. DO NOT APPLY POWDER TO LIQUID CRAZYGLUE BEFORE MATING TWO SURFACES TOGETHER. when applied to most plastics, bond will exceed strength of plastic by a large margin, there is no undo.
when you use the above formulation, you can glue a dirty cofee mug holding half a cup a joe to an oily, gresey, and tape-covered metal table-leg (both paint and steel). my first expierence swearing in front of an employer…
boss: trust me it will hold
boss: (walks away to next room)
me: bulls***
me: (goes to try it with own cofee)
me: w.t.f.
me: (goes to boss)
me: holyf***
me: (blank look, very confused)
boss: i told you it would work
me: have you ever seen it?
boss: im the one that told you it would work
me: i’ll try it again tomorrow at home, i think im imagining things, i dont feel right
(the next day)
me: )(*&$+)#(*+#@) … is this real?
This may be a “case” where the restoration took more work than creating the original. And I don’t mean molding the case, I mean creating the model from which the original molds were made.
If I ran a computer museum, and had funding, I know who I would want on my conservation / restoration team.
“With the “skeleton” of the repair in palce, the next step was filling it in.”
Palce?
Thank goodness you were able to find the most important element of this post.
You’re welcome! :D
*tips hat*
There’s a special palce in Hell (Michigan) for people like you!
B^)
I hear they serve cofeve there.
Well done sir! Well done!
Not only the restoration was nicely done, but documenting the gotchas and failures added a lot of value. It’s not something like “I used the perfect materials and methods from start and it went just fine,” but showing how to recover from bad decisions too.
Keep restoring things and posting, you will make your name!
There’s the people that says why bother since getting a 800XL is cheap and easy; and there’s the future generations in 400 years that will thank him for this kind of tutorial since getting an Atari 800XL won’t be that easy in 2418.
It’s not stutborness, it’s thinking ahead. Kudos to the author for this herculean task !
Good work! That’s dedication. Always love when people make effort to save old hardware that most people would jsut throw away.
impressive folly, and I mean that in the best way
Sometimes it is the journey that is the most satisfying, not so much the destination.
Does it not come down to the age old question of conservation or restoration?
Sorry posted on the wrong thread