
Disco balls take a zillion mirrors glued to a sphere and shine a spotlight on them. But what if the ball itself was the light source? Here’s a modern version that uses addressable LEDs in a 3D-printed sphere that also hides the electronics inside the ball itself.
Check out the video below to see the fantastic results. It’s a Teensy 3.6 driving a whopping 130 WS2812 LEDs to make this happen. (Even though the sphere has the lowest surface area to volume ratio.) There’s even a microphone and an accelerometer to make the orb interactive. Hidden inside is a 4400 mAh battery pack that handles recharging and feeds 5 V to the project.
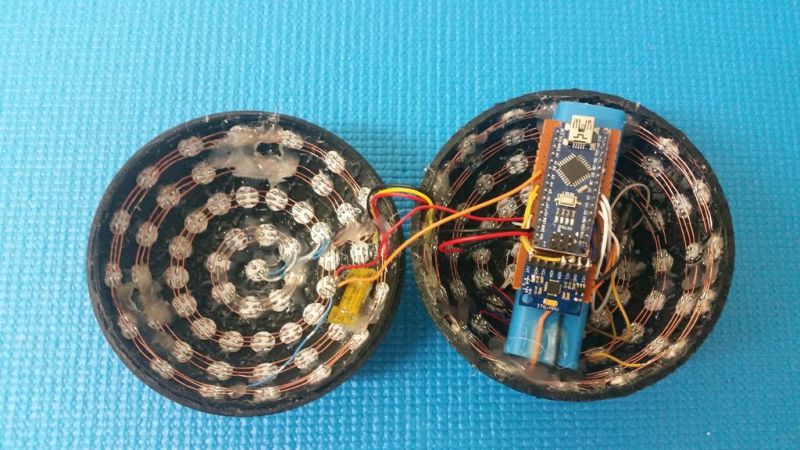
For us, it’s the fabrication that really makes this even more impressive. The sphere itself is 3D printed as four rings that combine to form a sphere. This makes perfect spacing for the LEDs a snap, but you’re going to spend some time soldering the voltage, ground, and data connections from pixel to pixel. In this case that’s greatly simplified because the LEDs were sourced from AliExpress already hosted on a little circle of PCB so you’re not trying to solder on the component itself. Still, that’s something like 390 wires requiring 780 solder joints!
We love seeing an LED ball you can hold in your hand. But if you do want something bigger, try this 540 LED sphere built from triangular PCBs.
[via PJRC]


Too bad that the music they put on the background video was not “disco”, but that techno garbage.
At least edit it with appropriate era music. Like this:
https://www.youtube.com/watch?v=2tG5SllettU
I was a young man in high school and college when disco was big. Yeah, let’s keep it dead.
1++
Disco was a blast. Best way to get to know the ladies.
“The sphere has the highest surface area to volume ratio!” REALLY? Sigh…
Doh! Lowest…
NO.
I hate soldering these things. But if you’re really determined, you can laser-cut little soldering helpers for those LED ‘dot’ boards. Cut a small square for the 5050 LED (~5x5mm), then deeply etch a circle for the board (~9.5mm diameter) and maybe an extra rectangular area for pin headers or similar to sit in.
Also, 3.7-4.2V works fine without a boost converter and the LEDs can listen to 3.3V logic levels.
This isn’t really a disco ball, in the he classic sense, unless there are tiny projection lenses on each LED that aren’t mentioned?
I thought a big part of the spot light used on classic disco balls was to create the sharp square/rectangle shapes of light. This seems like it would only create a wash of light. It might create a similar effect to a classic disco ball when looking directly at it though..
That’s not a disco ball…
…That’s a thermal detonator!
-3CP0 (sort of)
I’ve been building something much like this for several years, also using a Teensy for the controller since it’s such a great FFT machine. But I’m way too lazy to do all that 3D printing & soldering, so instead I buy the 50-LED balls (available in cheap three packs from Costco at this time of year) or the 100-LED GE “Super Spheres” (available from, say, Micheals). and remove the monocolor LED strands from them (not difficult after a little practice—use needle nose pliers). From AliExpress, I buy pre-wired WS2811 strings that use just a bare LED soldered to the little WS2811 board, ending up with something very similar to what’s being used here but without all the work. My LEDs stick out from the surface rather than being recessed like these, and I can still use the star reflectors that come with the globes. The LED nodes have several inches of wire between them and it takes a little effort to cram all that wire into the plastic spheres, but it works. I keep the Teensy outside the sphere with a three-conductor cable going to it so that I can easily futz with the programming. That requires a buffer on the data line if the cable is more than a foot or two long, but a spare WS2811 node (next to the Teensy) works fine for that (and let me tell you, I was super happy to make that discovery!)—I can use a cable about 10 feet long from the controller to the globe. Just remember to account for that extra node in your software.
BTW, hot melt glue isn’t ideal for this, because it’s tough to get it to hold securely without globbing on huge amounts (especially if you reuse the reflectors, as I do) and it lets go over time—I assume that if you’re going to go to all the trouble to make this, you’ll expect it to last more than a year or two. If I were going to go to the trouble to solder everything together as was done here, then I’d make the holes in the globes smaller (just big enough for the four LED leads to pass through) and solder the little boards to the LEDs from the inside—then you have a super-secure mount, with no glue needed. If using the pre-made globes as I do, you could use plastic washers between the LEDs and the globe to reduce the hole diameter enough that the LEDs don’t fall through.
Mine isn’t a true “disco ball” any more that the one described here since the visual effect is on the globe rather than on the surrounding walls. But I bought 100 cheap, tiny lasers (on PC boards that will be easy to mount inside a globe), and when I get time I’m going to construct something much closer to a disco ball—but even better, since the lasers can be individually switched on & off using a microcontroller to give some wild effects. In that case, the controller will have to be inside the globe since the lasers have no controller for daisy chaining the way a WS2811 does and each laser will require a separate switched line.
But speaking of that, it seems to me that you could also use a WS2811 board (sans LED) to switch something other than RGB LEDs, if it ran on the same voltage and approximately the same current as one or more of the individual red, green, or blue LEDs within that RGB package. That would give you a super cheap (the boards sell for about 10¢ each without an LED) way to control strings of stuff without a lot of wiring. Or, if you have something that runs on 5V (rather than the various lower voltages of the three individual LEDs), it might even be worth tack soldering a tiny MOSFET or three to each board and using the WS2811 outputs to switch the 5V rail to your devices (e.g., the laser modules, which run on 5V). Even if your application requires adding MOSFETS for switching, that would be VASTLY cheaper than any other solution for creating individually-addressable strings of devices, and you could have up to three separately-controlled devices per WS2811 board. Each channel gives you either a PWM signal or an on/off, depending on your programming. Heck, if you need something other than the 5V that the WS2811s use, parallel a separate power line (say, 12V) to be switched by the MOSFETs. Then you have a four-wire cable instead of three-wire, but that’s no biggie. It would be a minuscule fraction of the wiring required to run a separate control line to each node, especially with more than a few nodes. Endless opportunities!