Portable Telescope Rolls Anywhere

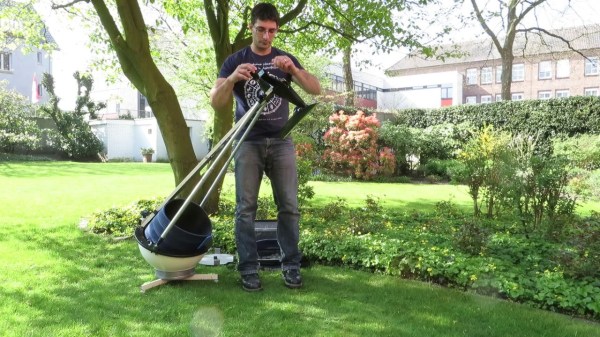
Since Galileo began observing celestial objects with a telescope, an almost uncountable number of improvements have been made to his designs and methods. Telescopes can now view anything from radio waves to gamma waves, come in a wide range of sizes and shapes, and some are also fairly accessible to hobbyists as well. In fact, several homemade telescopes are specifically designed for ease of use, portability, and minimum cost, like this portable ball telescope. (Google Translate from Italian)

The telescope was designed and built by [andrea console] and features a ball-shaped mount for the mirror which was built from a bowl. Ball designs like this are easier to orient than other telescopes since the ball allows for quick repositioning in any direction, but the main focus of this project was to investigate focal length with various accessories while also being as portable as possible. To that end, the mount for the eyepiece is on a lattice that assembles and disassembles quickly, and the ball and other equipment are easily packed. This makes transportation quick and easy and reduces weight compared to a more traditional, or even Dobsonian, telescope.

This build is impressive not just from having an extremely portable telescope, but also from [andrea console]’s documentation of the optics in his build. It includes some adjustable parts which can increase the magnification and has detailed notes on all of the finer points of its operation. The ball telescope is a popular build, and we’ve recently seen others made out of parts from IKEA as well.

Continue reading “Portable Telescope Rolls Anywhere”

Robotic Ball Bouncer Uses Machine Vision To Stay On Target

When we first caught a glimpse of this ball juggling platform, we were instantly hooked by its appearance. With its machined metal linkages and clear polycarbonate platform, its got an irresistibly industrial look. But as fetching as it may appear, it’s even cooler in action.

You may recognize the name [T-Kuhn] as well as sense the roots of the “Octo-Bouncer” from his previous juggling robot. That earlier version was especially impressive because it used microphones to listen to the pings and pongs of the ball bouncing off the platform and determine its location. This version went the optical feedback route, using a camera mounted under the platform to track the ball using OpenCV on a Windows machine. The platform linkages are made from 150 pieces of CNC’d aluminum, with each arm powered by a NEMA 17 stepper with a planetary gearbox. Motion control is via a Teensy, chosen for its blazing-fast clock speed which makes for smoother acceleration and deceleration profiles. Watch it in action from multiple angles in the video below.

Hats off to [T-Kuhn] for an excellent build and a mesmerizing device to watch. Both his jugglers do an excellent job of keeping the ball under control; his robotic ball-flinger is designed to throw the ball to the same spot every time.

Continue reading “Robotic Ball Bouncer Uses Machine Vision To Stay On Target”

Disco Ain’t Dead: Blinky Ball Makes You Solder Inside A Dome

Disco balls take a zillion mirrors glued to a sphere and shine a spotlight on them. But what if the ball itself was the light source? Here’s a modern version that uses addressable LEDs in a 3D-printed sphere that also hides the electronics inside the ball itself.

Check out the video below to see the fantastic results. It’s a Teensy 3.6 driving a whopping 130 WS2812 LEDs to make this happen. (Even though the sphere has the lowest surface area to volume ratio.) There’s even a microphone and an accelerometer to make the orb interactive. Hidden inside is a 4400 mAh battery pack that handles recharging and feeds 5 V to the project.

For us, it’s the fabrication that really makes this even more impressive. The sphere itself is 3D printed as four rings that combine to form a sphere. This makes perfect spacing for the LEDs a snap, but you’re going to spend some time soldering the voltage, ground, and data connections from pixel to pixel. In this case that’s greatly simplified because the LEDs were sourced from AliExpress already hosted on a little circle of PCB so you’re not trying to solder on the component itself. Still, that’s something like 390 wires requiring 780 solder joints!

We love seeing an LED ball you can hold in your hand. But if you do want something bigger, try this 540 LED sphere built from triangular PCBs.

Continue reading “Disco Ain’t Dead: Blinky Ball Makes You Solder Inside A Dome”

Gyro Controlled RGB Blinky Ball Will Light Up Your Life

[James Bruton], from the XRobots YouTube channel is known for his multipart robot and cosplay builds. Occasionally, though, he creates a one-off build. Recently, he created a video showing how to build a LED ball that changes color depending on its movement.

The project is built around a series of 3D printed “arms” around a hollow core, each loaded with a strip of APA102 RGB LEDs. An Arduino Mega reads orientation data from an MPU6050 and changes the color of the LEDs based on that input. Two buttons attached to the Mega modify the way that the LEDs change color. The Mega, MPU6050, battery and power circuitry are mounted in the middle of the ball. The DotStar strips are stuck to the outside of the curved arms and the wiring goes from one end of the DotStar strip, up through the middle column of the ball to the top of the next arm. This means more complicated wiring but allows for easier programming of the LEDs.

Unlike [James’] other projects, this one is a quickie, but it works as a great introduction to programming DotStar LEDs with an Arduino, as well as using an accelerometer and gyro chip. The code and the CAD is up on Github if you want to create your own. [James] has had a few of his projects on the site before; check out his Open Dog project, but there’s also another blinky ball project as well.

Continue reading “Gyro Controlled RGB Blinky Ball Will Light Up Your Life”

Marble Chooses Its Own Path

[Snille]’s motto is “If you can’t find it, make it and share it!” and we could not agree more. We wager that you won’t find his Roball sculpture on any shopping websites, so it follows that he made, and subsequently shared his dream. The sculpture has an undeniable elegance with black brackets holding brass rails all on top of a wooden platform painted white. He estimates this project took four-hundred hours to design and build and that is easy to believe.

Our first assumption was that there must be an Arduino reading the little red button which starts a sequence. A 3D-printed robot arm grasps a cat’s eye marble and randomly places it on a starting point where it invariably rolls to its ending point. The brains are actually a Pololu Mini Maestro 12-channel servo controller. The hack is using a non-uniform marble and an analog sensor at the pickup position to randomly select the next track.

If meticulously bending brass is your idea of a good time, he also has a video of a lengthier sculpture with less automation, but it’s bent brass porn. If marbles are more your speed, you know we love [Wintergatan] and his Incredible Marble Music Machine. If that doesn’t do it for you, you can eat it.

Continue reading “Marble Chooses Its Own Path”

Mechanisms: Bearings

They lie at the heart of every fidget spinner and in every motor that runs our lives, from the steppers in a 3D printer to the hundreds in every car engine. They can be as simple as a lubricated bushing or as complicated as the roller bearing in a car axle. Bearings are at work every day for us, directing forces and reducing friction, and understanding them is important to getting stuff done with rotating mechanisms.

Continue reading “Mechanisms: Bearings”

Keeping Magnetized Marbles From Stopping The Music

Take a couple of thousand steel balls, add a large wooden gear with neodymium magnets embedded in it, and what do you get? Either the beginnings of a wonderful kinetic music machine, or a mess of balls all stuck together and clogging up the works.

The latter was the case for [Martin], and he needed to find a way to demagnetize steel balls in a continuous process if his “Marble Machine X” were to see the light of day. You may recall [Martin] as a member of the band Wintergatan and the inventor of the original Marble Machine, a remarkable one-man band that makes music by dropping steel balls on various instruments. As fabulous a contraption as the original Marble Machine was, it was strictly a studio instrument, too fragile for touring.

Marble Machine X is a complete reimagining of the original, intended to be robust enough to go on a world tour. [Martin] completely redesigned the lift mechanism, using magnets to grip the balls from the return bin and feed them up to a complicated divider. But during the lift, the balls became magnetized enough to stick together and no longer roll into the divider. The video below shows [Martin]’s solution: a degausser using magnets of alternating polarity spinning slowly under the sticky marbles. As a side note, it’s interesting and entertaining to watch a musician procrastinate while debugging a mechanical problem.

We can’t wait to see Marble Machine X in action, but until it’s done we’ll just settle for [Martin]’s other musical hacks, like his paper-tape programmed music box or this mashup of a synthesizer and a violin.

Continue reading “Keeping Magnetized Marbles From Stopping The Music”