Harmonicade Is A High-Scoring MIDI Controller

When [KOOP Instruments] started learning the piano, he wasn’t prepared for the tedium of learning chords and their relationships on the standard keyboard layout. But instead of killing his desire to tickle the ivories, it inspired him to explore alternative layouts that are easier to play. He converted to Isomorphism, started building MIDI controllers, and hasn’t looked back.

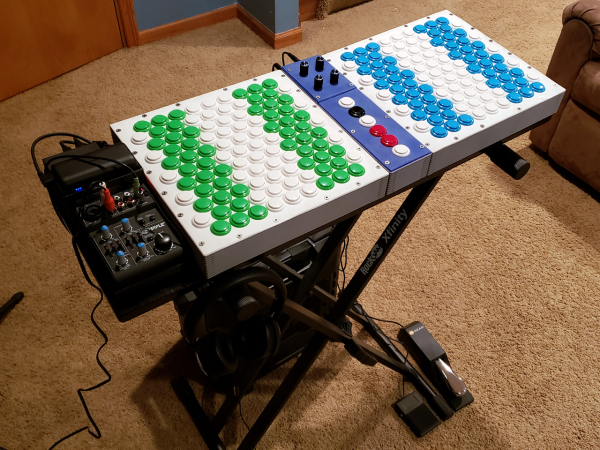
The latest incantation is Harmonicade, a dual-decked number arranged Wicki-Hayden style. Both decks have 5½ octaves, are (electrically) identical, and run off a single Teensy 3.6. We admire [KOOP]’s use of DB25 connectors to wrangle the wiring between the decks and the Teensy — quite a neat solution. Almost as neat as his beautifully-commented code.

Although the button decks and control boxes are all printed and open source, they are designed to be easily made from acrylic or plywood instead. [KOOP] is going to keep iterating until he’s totally happy with the control locations and layout, and the ease of breakdown and reassembly. We’ve got a double shot of videos for you after the break — one of [KOOP] playing Harmonicade, and a longer one exploring and playing its precursor, the Melodicade.

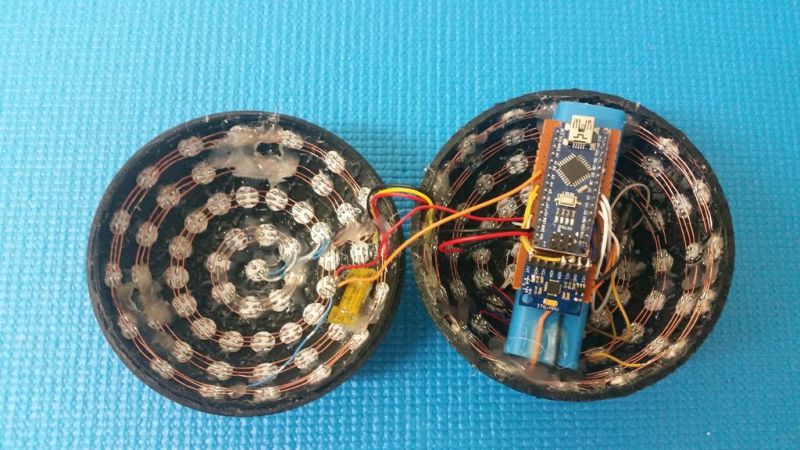
Tired of conventional-looking MIDI controllers? We hear your bellows and offer this MIDI controller in a concertina.

Continue reading “Harmonicade Is A High-Scoring MIDI Controller”

This Two-Wheeled RC Car Is Rather Quick

Radio control cars have always been fun, it’s true. With that said, it’s hard to deny that true speed was unlocked when lithium polymer batteries and brushless motors came to the fore. [Gear Down For What?] built himself a speedy RC car of his own design, and it’s only got two wheels to boot (Youtube link, embedded below).

The design is of the self-balancing type – if you’re thinking of an angry unmanned Segway with a point to prove, you’re in the ballpark. The brains of the machine come thanks to a Teensy 3.6, which runs the PID loops for balancing and control. An MPU6050 gyroscope & accelerometer provide the necessary sensing to enable the ‘bot to keep itself upright in varied conditions. Performance is impressive, with the car reaching speeds in excess of 40 MPH and managing to handle simple ramps and bumps with ease. It’s all wrapped up in a 3D printed frame which held up surprisingly well to many crashes into tripods and tarmac.

Such builds are not just fun; they’re an excellent way to learn useful control skills that can serve you well in industry and your own projects. You can pick up the finer details of control systems in a university engineering course, or you could give our primer a whirl. When you’ve whipped up your first awesome project, we’d love to hear about it. Video after the break.

Continue reading “This Two-Wheeled RC Car Is Rather Quick”

Disco Ain’t Dead: Blinky Ball Makes You Solder Inside A Dome

Disco balls take a zillion mirrors glued to a sphere and shine a spotlight on them. But what if the ball itself was the light source? Here’s a modern version that uses addressable LEDs in a 3D-printed sphere that also hides the electronics inside the ball itself.

Check out the video below to see the fantastic results. It’s a Teensy 3.6 driving a whopping 130 WS2812 LEDs to make this happen. (Even though the sphere has the lowest surface area to volume ratio.) There’s even a microphone and an accelerometer to make the orb interactive. Hidden inside is a 4400 mAh battery pack that handles recharging and feeds 5 V to the project.

For us, it’s the fabrication that really makes this even more impressive. The sphere itself is 3D printed as four rings that combine to form a sphere. This makes perfect spacing for the LEDs a snap, but you’re going to spend some time soldering the voltage, ground, and data connections from pixel to pixel. In this case that’s greatly simplified because the LEDs were sourced from AliExpress already hosted on a little circle of PCB so you’re not trying to solder on the component itself. Still, that’s something like 390 wires requiring 780 solder joints!

We love seeing an LED ball you can hold in your hand. But if you do want something bigger, try this 540 LED sphere built from triangular PCBs.

Continue reading “Disco Ain’t Dead: Blinky Ball Makes You Solder Inside A Dome”

The Polyphonic Analog/Digital Synth Project

[Matt Bradshaw]’s entry in the Hackaday Prize is Polymod, a modular digital synthesizer which combines the modularity of an analog synth with the power of a digital synth. Each module (LFO, Envelope Generator, Amplifier, etc.) are connected with audio cables to others and the result is processed digitally to create music.

The synth is built with a toy keyboard with each key having a tactile switch underneath it, contained inside a wooden case upcycled from a bookshelf found on the street. Each module is a series of potentiometers and I/O jacks with a wooden faceplate. The modules are connected to sockets on the main board and are held in place with thumbscrews so that the modules can be easily switched out. Each module can be connected to others using audio cables, the same way modular analog synths are connected.

The main board contains a Teensy 3.6 and a Teensy Audio Adapter creates the audio for the synth. Software that [Matt] wrote runs on the Teensy and allows the digital synthesizer to run in either monophonic or polyphonic modes. In polyphonic mode, the software creates digital copies of each module to allow the playing of chords. The Teensy scans up to eight module sockets and for each module that it finds, it reads the potentiometer value as well as the status of the I/O jacks. The keyboard buttons are converted to a control voltage which can be sent to any of the modules to create a melody.

[Matt] has created a great synth that combines benefits of both analog and digital synths together and the result is an inexpensive modular synth that can create some really cool sounds. Check out the videos after the break. In the meantime, take a look at this mess of wires and this article on a slew of open-source synthesizers.

Continue reading “The Polyphonic Analog/Digital Synth Project”

Emulating A Complete Commodore 64

When the Commodore 64 was released in 1982, it was a masterpiece of engineering. It had capabilities far outstripping other home computers, and that was all due to two fancy chips inside the C64. The VIC-II, the video chip for the C64, had sprites and scrolling, all stuffed into a single bit of silicon. The SID chip was a complete synthesizer on a chip. These bits of silicon made the C64 the best selling computer of all time, but have also stymied efforts to emulate a complete C64 system on a microcontroller.

[Frank Bösing] has just managed to emulate an entire C64 on a Teensy 3.6. The Teensy uses an exceptionally powerful microcontroller, but this is a labor of love and code.

The inspiration for this project comes from a reverse-engineered SID chip that was ported to the Teensy 3.2. The SID chip is the make it or break it feature of any C64 emulation, but the Teensy 3.2 didn’t have enough RAM for the most recent versions of reSID. With the release of the Teensy 3.6, [Frank] figured the increased amount of RAM would allow a complete C64 system, so he built it.

The new C64 emulator uses a Teensy 3.6, with a small add-on ‘shield’ (or whetever we’re calling them) to provide connectors for joysticks and the Commodore IEC bus. There’s audio out, support for USB keyboards, and support for an IL9341 SPI display or a regular ‘ol VGA display.

The entire development of this Commodore emulator has been documented over on the PJRC forums, and all the code is over on GitHub. It’s a fantastic piece of work, and as the video (below) shows, this is a real Commodore 64 that fits in your pocket.

Continue reading “Emulating A Complete Commodore 64”

MIDI To CV/Gate The Easy Way

Let’s say you’ve got a modular synthesizer. You’re probably a pretty cool person. But all your cool laptop DJ friends keep showing off their MIDI-controlled hardware, and you’re getting jealous. Well, [little-scale] has the build for you.

The Teensy 3.6 is the current top-of-the-line Teensy from PJRC, and it’s [little-scale]’s weapon of choice here. With USB-MIDI and two 12-bit DACs on board, it’s made creating an interface between the worlds of analog and digital music into a remarkably simple job. Control voltages for pitch and velocity are pushed out over the analog pins, while pin 29 is used for gate signals.

It’s a testament to the amount of development that has gone into the Teensy platform that such projects can be built with virtually no off-board components. The build is a further step forward in simplicity from [little-scale]’s previous work, using a Teensy 2 with an offboard DAC to generate the output voltages.

Here at Hackaday, we’ve always been big fans of adding computer control to analog hardware. This CNC mod to a guitar pickup winding machine is a great example.

The Monolith Brings The Boom To Maker Faire

[Ross Fish], [Darcy Neal], [Ben Davis], and [Paul Stoffregen] created “the Monolith”, an interactive synth sculpture designed to showcase capabilities of the Teensy 3.6 microcontroller.

The Monolith consists of a clear acrylic box covered in LED-lit arcade buttons. The forty buttons in front serve as an 8-step sequencer with five different voices, while touch sensors on the left and right panels serve as a polyphonic arpeggiator and preset controller, respectively.

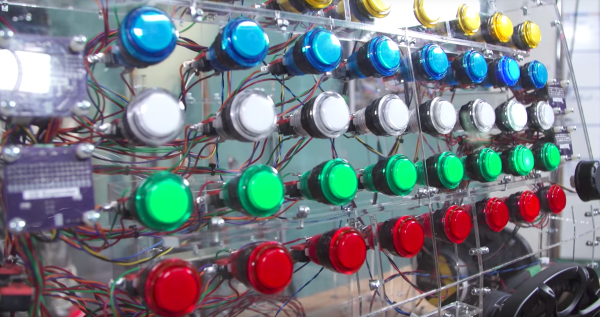
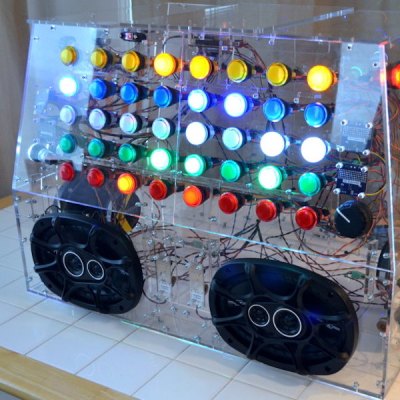
In order to control all of those buttons, the team designed breakout boards equipped with a port expander, 16-channel PWM driver chip, and N-channel MOSFETs allowing the entire synth to be controlled from a single Teensy 3.6.

In terms of software, [Paul] made improvements to the Teensy Audio Library to accommodate the hardware, improving the way signal-controlled PWM waveforms are handled and enhancing the way envelopes work. Ultimately they combined three Arduino sketches into one to get the finished code.

After showing off the project on Tested, the team set up the Monolith in the Kickstarter booth at Maker Faire Bay Area. The project was a hit at the Faire, earning a coveted red ribbon and inspiring countless adults and kids to check it out. We love a project that inspires so much interaction. Not only can three people play with the Monolith at once, but they can see through the clear case and get an idea of what’s going on.

If you want to learn more you can download project files from [Paul]’s GitHub. In the meantime, check out some other synth projects we’ve published on Hackaday: we’ve grooved on a synth-violin, a 3D-printed synth, and a single-PCB synth, among many others.

Continue reading “The Monolith Brings The Boom To Maker Faire”