There are differences between setting up a Raspberry Pi and installing an OS on any other computer, but one thing in common is that if you do enough of them, you seek to automate the process any way you can. That is the situation [Peter Lorenzen] found himself in, and his solution is a shell script to install and configure the Raspberry Pi for headless operation, with no need to connect either a keyboard or monitor in the process.
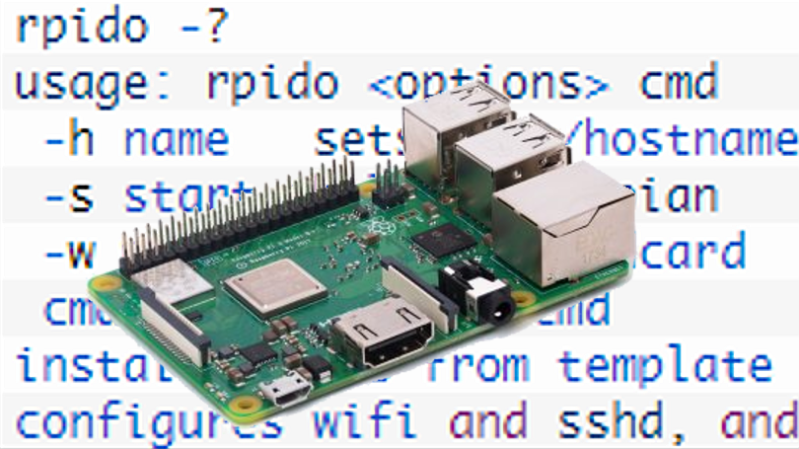
[Peter]’s tool is a script called rpido, and with it the process for setting up a new Raspberry Pi for headless operation is super streamlined. To set up a new Pi, all [Peter] needs to do is:
- Plug an SD card into his laptop (which happens to be running Ubuntu.)
- Run:
rpido -w -h myhostname -swhich downloads and installs the newest version of Raspbian lite, does some basic setup (such as setting the hostname), configures for headless operation, and launches a root shell. - Use the root shell to do any further tweaks or checks (like launching
raspi-configfor additional changes.) - Exit the shell, remove the SD card from his laptop, and install the card into the Raspberry Pi.
There are clear benefits to [Peter]’s script compared to stepping through a checklist of OS install and setup tasks, not to mention the advantage of not needing to plug in a keyboard and monitor. Part of the magic is that [Peter] is mounting the SD card’s filesystem in a chroot environment. Given the right tools, the ARM binaries intended for the Pi run on his (Intel) Ubuntu laptop. It’s far more convenient to make changes to the contents of the SD card in this way, before it goes to its new home in a Pi.
Not everything has to revolve around an SD card, however. [Jonathan Bennet] showed that it’s possible to run a Raspberry Pi without an SD card by using the PXE boot feature, allowing it to boot and load its file system from a server on the same network, instead of a memory card.


Neat. I need to get back to my project to install steam and run half life on a raspi. multiarch/qemu can’t do it, but I think chroot/qemu can.
The first approach allowed me to install steam, but it segfaulted after downloading updates, because library path issues. Clearly it wasn’t packaged to a multiarch environment.
With DietPi Image I don’t need keybord and a screen. I put the initial settings (wlan, lan, ssh, password) in the dietpi.txt and boot the image with connected lan and config the rest via ssh. It’s also possible to config a serial console, so I don’t see the need for this. If setup raspian light via lan to without problems.
There’s also a wonderful flasher and system setup script that automates the periph.io software test suite.
https://github.com/periph/bootstrap
And for the Krazy ones, gokrazy’s flasher is very neat as well, with the chrome os/container Linux/Android inspired dual root partition scheme which allows for full image updates remotely.
https://github.com/gokrazy/tools
You might as well be talking Latin
I set them headless all the time with Windows, make image with Win32DiskImager, put empty file named “ssh” into “boot” partition on SD card (that’s the only one visible in Windows), boot RPi, now you can ssh to it and enable VNC via raspi-config, also set IP (if you don’t want DHCP) via dhcpcd.conf and that’s it. Use TFTPD64 proggie if you need local DHCP server on your laptop/computer.
What advantage does this have over just flashing an SD card with ones preferred poison, setting the ssh.txt in the root folder and subsequently simply doing it headless over the network?
I agree, that is what I have done. It is sad that the rpi does not have some other options like that as well. The ability to set it up with a static ip address or join a wireless network for example. Have a network file like the ssh file.
Create a file called wpa_supplicant
and put this in it and put it in same place as the ssh file:
ctrl_interface=DIR=/var/run/wpa_supplicant GROUP=netdev
update_config=1
country=UK
network={
ssid=”SSID_NAME”
psk=”PSK_PASSWORD”
key_mgmt=WPA-PSK
}
Have you given PiBakery a try? (https://www.pibakery.org/index.html)
To setup wireless at fisrt boot, put your wpa_supplicant.conf file on tbe root of the boot partition and it will be copied ocer to /etc/wpa_supplicant/ at first boot.
A moderately dangerous way of doing things, if you don’t take care to read the script first .. effective, nevertheless, even though the #1 use case is not solved with this method (i.e. configuring wpa_supplicant with rasps-config…)
passwords,groups,users,wifi,keyboard,ssh,sudo is configured – via the the files in template, which were the whole point of this script.
Had I included the content of the files in template it would have been moderately dangerous for my network.
But i will argue that my systems setup using rpido are probably more secure, since no passwords are ever flowing over the network, from the very beginning.
As I point out in the article, any use of “sudo” is dangerous, especially from a script. That is why I show all the sudo commands as they are executed.
“There are differences between setting up a Raspberry Pi and installing an OS on any other computer, but one thing in common is that if you do enough of them, you seek to automate the process any way you can.”
That must be quite a lot of them.
“There are differences between setting up a Raspberry Pi and installing an OS on any other computer, but one thing in common is that if you do enough of them, you seek to automate the process any way you can.”
Strange, all you need to do is one of them, then simply clone the uSD to another uSD using dd.
If you’re happy to disrupt a running Pi just to clone its micro SD card, sure. Even if you had an already-provisioned image, you’d still need to set the hostname somehow, and if you were going to mount and chroot the micro SD, that seems to be what the tool does anyway.
This is amazing, I’ve actually been working on my own version of this, though I didn’t get to the executing a shell part, I decided that spending the time to re-learn how to use qemu for a different architecture was a problem for future me.
I was just configuring the hostname, removing the pi user, creating my user, cloning my dotfiles, and putting something in the bashrc to leave me a message on first login saying “remember to run the setup script”