Astrophotography is an expensive hobby. When assembling even a basic setup consisting of a telescope, camera, guiding equipment and mount, you can easily end up with several thousand dollars worth of gear. To reduce the monetary sting a little, [td0g] has come up with an innovative homebrew mount and guiding solution that could be assembled by almost any dedicated amateur, with the parts cost estimated around $100. The accuracy required to obtain high-quality astrophotographs is quite demanding, so we’re impressed with what he’s been able to achieve on a limited budget.
The inspiration for this design comes from an incredibly simple star tracking device known as a barn-door tracker, or Haig mount. Invented by George Haig in the 1970’s, this mount is essentially nothing more than a hinge aligned with the Earth’s axis of rotation. A threaded rod or screw, turned at a constant rate, is used to slowly open the hinge so that a mounted camera tracks the apparent motion of the heavens. As a result, long exposures can show pinpoint images of stars and sharp details of deep-sky objects, instead of curved star trails. [td0g] adapted this technique to drive a more traditional telescope mount, using barn-door-like drive screws on both the right ascension and declination axes. A pair of NEMA 17 stepper motors drive 4-mm pitch Acme threaded rods through toothed pulleys 3D printed from PETG.
Speaking of 3D-printed parts, this build is a good example of judicious use of the technology: where metal parts are warranted, metal parts are used, and printed plastic is relegated to those places where it can adequately do the job. [td0g] has placed the STL files for the printed parts on Thingiverse in case you want to replicate the drive.
The non-linear relationship between the threaded rod rotation and right ascension drive rate usually limits the length of exposure you can reasonably achieve with a barn-door tracker. To adjust for this, [td0g] created a lookup table in firmware to compensate the drive and allow longer exposures. He mentions that the drive will operate for three hours before it hits the end of the screw’s travel and needs to be reset, but if he can manage three hour exposures, his skies must be much darker than ours!

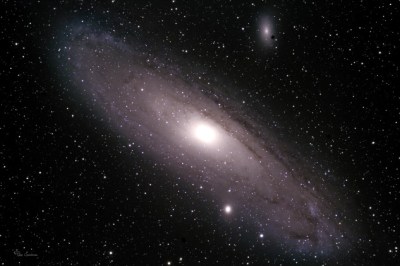
In case you’re wondering how accurate the tracking needs to be, [td0g] reminds us of the precision required to get blur-free images from a tracking mount: each pixel on his camera/telescope combination equates to only 1.5 arc-seconds, or 0.0004 degrees of rotation for the mount. Of course, maintaining such close tracking over any substantial amount of time for longer exposures quickly meets the limits of mechanical precision, especially in a DIY mount. To correct for unavoidable errors, [td0g] included a guiding camera and scope into the build. A modified web cam and 100 mm DSLR lens are piggy-backed on the mount to automatically correct for errors and keep the mount tracking with the Earth’s rotation. Images from the webcam are fed to the open-source PHD2 auto-guiding software, which detects bright stars in the webcam image and issues corrections to the stepper motor drivers to keep the images locked in-place. It apparently works pretty well, as the image of M31, the Andromeda Galaxy, shows.
If you want to get started with astrophotography and a simpler barn-door tracker is more your speed, check out the ones we’ve covered in the past: from the traditional hand-cranked variety, to a simple motorized one, and even a fully 3D-printed version.


I’d have to do the math… though seems like the longer arm radius systems are more accurate in tracking. This looks like a fairly longer arm radius.
In other words it a cheaparse polar mount.
Something wrong with that? If it does the job, it does the job.
“Cost Effective” are the words coming to mind.
Exactly, and it’s a beautiful thing! Look at that andromeda shot, no jitter to be found–each star a pefect little pinprick of light.
Yeah, I’ll be hauling ???????????????? around in a backpack….
Pretty sure this mounts not the only thing that wont fit in a backpack with a serious telescope. Your not gonna be mounting binoculars on one of these.
also nice way to contain lead screw backlash:
https://gerritsendesign.files.wordpress.com/2018/12/IMG_8413-Edit.jpg