DIY Guided Telescope Mount Tracks Like A Barn Door

Astrophotography is an expensive hobby. When assembling even a basic setup consisting of a telescope, camera, guiding equipment and mount, you can easily end up with several thousand dollars worth of gear. To reduce the monetary sting a little, [td0g] has come up with an innovative homebrew mount and guiding solution that could be assembled by almost any dedicated amateur, with the parts cost estimated around $100. The accuracy required to obtain high-quality astrophotographs is quite demanding, so we’re impressed with what he’s been able to achieve on a limited budget.

The inspiration for this design comes from an incredibly simple star tracking device known as a barn-door tracker, or Haig mount. Invented by George Haig in the 1970’s, this mount is essentially nothing more than a hinge aligned with the Earth’s axis of rotation. A threaded rod or screw, turned at a constant rate, is used to slowly open the hinge so that a mounted camera tracks the apparent motion of the heavens. As a result, long exposures can show pinpoint images of stars and sharp details of deep-sky objects, instead of curved star trails. [td0g] adapted this technique to drive a more traditional telescope mount, using barn-door-like drive screws on both the right ascension and declination axes. A pair of NEMA 17 stepper motors drive 4-mm pitch Acme threaded rods through toothed pulleys 3D printed from PETG.

Speaking of 3D-printed parts, this build is a good example of judicious use of the technology: where metal parts are warranted, metal parts are used, and printed plastic is relegated to those places where it can adequately do the job. [td0g] has placed the STL files for the printed parts on Thingiverse in case you want to replicate the drive.

The non-linear relationship between the threaded rod rotation and right ascension drive rate usually limits the length of exposure you can reasonably achieve with a barn-door tracker. To adjust for this, [td0g] created a lookup table in firmware to compensate the drive and allow longer exposures. He mentions that the drive will operate for three hours before it hits the end of the screw’s travel and needs to be reset, but if he can manage three hour exposures, his skies must be much darker than ours!

Continue reading “DIY Guided Telescope Mount Tracks Like A Barn Door”

The Coco-Nutcracker

Coconut is a delicious and versatile food but if you’ve ever tried to open one you know they can be a hard nut to crack. Those of us who live in the tropics where they are common might reach for a machete, drill, or saw to open them, which is often a messy and sometimes dangerous ordeal. Realizing that a coconut is just a large nut with a shell like any other, [Paul] of [Jackman Works] decided to build a nutcracker big enough to crack a coconut, which turns out to be almost exactly human-sized.

The nutcracker is built almost entirely out of reclaimed wood. Several rings made of many blocks of wood were constructed on the table saw before being glued and clamped together. Once the rings were stacked and glued to each other, [Paul] put them on a lathe to get a smooth finish. Then the arms, legs, body, and head were all assembled. The actual nutcracking mechanism is one of the few metal parts in this build, a long threaded rod which is needed to handle the large forces required for cracking the coconut.

Once the finishing touches were put on the nutcracker, including boots, a beard, some hair, and of course a pom-pom for his hat, [Paul] successfully tested it by cracking a coconut open. This build is exceptionally high quality and is definitely worth scrolling through. He runs a wood shop in DC where he builds all sorts of interesting things like this, including a giant wooden utility knife.

The Clementine Spacecraft

Preventing Embedded Fails With Watchdogs

Watchdog timers are an often overlooked feature of microcontrollers. They function as failsafes to reset the device in case of a software failure. If your code somehow ends up in an infinite loop, the watchdog will trigger. This is a necessity for safety critical devices. If the firmware in a pacemaker or a aircraft’s avionics system gets stuck, it isn’t going to end well.

In this oldie-but-goodie, [Jack Ganssle] provides us with a great write up on watchdog timers. This tells the story of a failed Clementine spacecraft mission that could have been saved by a watchdog, and elaborates on the design and implementation of watchdog techniques.

If you’re designing a device that needs to be able to handle unexpected failures, this article is definitely worth a read. [Jack] explains a lot of traps of using these devices, including why internal watchdogs can’t always be trusted and what features make for a great watchdog.

Thanks to [Jan] for the tip!

Addressable 7-Segment Displays May Make Multiplexing A Thing Of The Past

[Sean Hodgins] has a knack for coming up with simple solutions that can make a big difference, but this is one of those “Why didn’t I think of that?” things: addressable seven-segment LED displays.

[Sean]’s design is basically a merging of everyone’s favorite Neopixel RGB LED driver with the ubiquitous seven-segment display. The WS2811 addressable RGB driver chip doesn’t necessarily have to drive three different color LEDs – it can drive three segments of the same display. With three of the chips on a single board, all seven segments plus the decimal point of a display can be controlled over a single data line. No more shift registers, no more multiplexing. And as a nice touch, individual displays can be ganged together with connectors on the back of each module. [Sean] has some code to support the display but is looking for someone to build a standalone library for it, so you might want to pitch in. Yes, he plans to sell the boards in his shop, but as with all his projects, this one is open source and everything you need to build your own is up on GitHub. The brief video below shows a few daisy-chained displays in action.

Like many of [Sean]’s designs, including this Arduino rapid design board, this is a simple way to get a tedious job done, and it wrings a lot of functionality from a single IO pin.

Continue reading “Addressable 7-Segment Displays May Make Multiplexing A Thing Of The Past”

Electromagnetic 7-Segment Display Easy On The Eyes AND The Ears

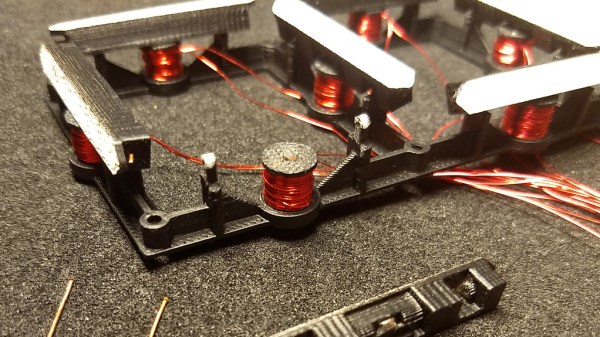
We love electromagnetic displays: take the modern look of a digital readout, combine with the low-tech coil mechanism that you theoretically could create yourself, add a dash of random clacking sounds, and what’s not to like? Evidently, [Nicolas Kruse] shares our affection for these displays, because he’s taken it beyond theory and created a 7-segment magnetically-actuated display from scratch.

The display is 3D-printed, as you would expect these days. Each segment contains a small neodymium magnet, and each coil a 1 mm iron core for flux concentration. The coils are driven with a 1.6 A peak current, causing the segments to flip in less than 10 ms. [Nicolas] provides STL files for the display base, segments, and spools so you can print your own display. He’s also released the schematics and code for the driver, which uses an ATtiny44 to drive the coils through N- and P-channel MOSFETs. Initially designed to drive a passive 4×7 matrix of displays, the driver couldn’t quite manage to flip one segment without affecting its neighbors. However, for a single display, the driver works fine. We hope he figures out the matrix issue soon, because we really want to see a clock made with these displays.

You can see (and hear) a short video of the display in action after the break. The clacking does not disappoint!

Continue reading “Electromagnetic 7-Segment Display Easy On The Eyes AND The Ears”

Radio Control Buggy Gets V10 Power

Amongst the more difficult machining tasks in the world are those involved in the production of internal combustion engines. Thanks to the Internet, it’s now possible to watch detailed videos of master craftsmen assembling tiny desktop V8 and V12 engines in home workshops with barely a CNC in sight. However, up until now, most of these builds have been left on the test stand to bark and wail away. No longer – [Keith] has decided that needs to change.

We’ve seen [Keith]’s work before – particularly, his 125cc V10 build, featuring fuel injection, dual overhead cams, and even a supercharger. With several micro engines under his belt now, it was time to put them to work – the V10 is getting a new home in a 1/3rd scale RC buggy.

We’re not sure [Keith] has heard the phrase “off the shelf” – even the suspension dampers on this build are custom machined. Currently up to part 5, the chassis is coming together and there are plans for a hybrid powertrain, too. Carbon fiber and anodized parts are in abundance – this build is truly a work of art.

We can’t wait to see this V10 monster tearing up the dirt – It’s an ambitious build, but if anyone can pull it off, it’s [Keith]. Video after the break.

Continue reading “Radio Control Buggy Gets V10 Power”

Cyberpunk Jacket Is The Garment Of Choice For The Streets Of 2019

Fans of science fiction and related genres have always been disappointed by real life. The future holds so much promise on paper, yet millions were disappointed upon reaching 2015 to find that hoverboard technology still eluded us. It’s not all bad, though – [abetusk] has developed a cyberpunk jacket so you can live out your grungy hacker fantasies in real life.

The effect is achieved with specially designed jacket patches. Nylon fabric is lasercut with artwork or lettering, and then placed over an electroluminescent panel. The fabric acts as a mask and is glued onto the EL panel, and the assembly is then attached to the back of the jacket with velcro.

It’s a build that focuses on more than just a cool visual effect. The attention to detail pays off in robustness and usability – wires are neatly fed through the lining of the jacket, and special strain relief devices are used to avoid wires breaking off the EL panels. The extra effort means this is a jacket that can withstand real-world use, rather than falling apart in the middle of a posed photo shoot.

Everything is well documented, from artwork creation to final assembly, so there’s no reason you can’t replicate this at home – and the final results are stunning. Our take is that electroluminescent technology is the way to go for retro and cyberpunk looks, but LEDs can be fun too – like in this high-powered Burning Man build.

Continue reading “Cyberpunk Jacket Is The Garment Of Choice For The Streets Of 2019”