Many of the projects we feature on Hackaday are motivated by pure greed. Not on the part of the hacker, mind you; but rather the company that’s charging such an outrageous price for a mass produced item that somebody decides they can do the same thing cheaper as a one-off project. Which is precisely how [Bryan Kevan] ended up building his own carbon fiber tube wrapping machine. Not only do the finished tubes look fantastic, but they cost him a fraction of what even the “cheap” commercial ones cost.
The principle behind producing the tubes is really pretty simple: carbon fiber ribbon (or “tow”, in the official parlance) gets wrapped around a rotating mandrel, ideally in interesting patterns, and epoxy is added to bind it all together. When it’s hardened up, you slide the new carbon fiber tube off the mandrel and away you go building a bike frame or whatever it is you needed light and strong tubes for. You could even do it by hand, if you had enough patience.
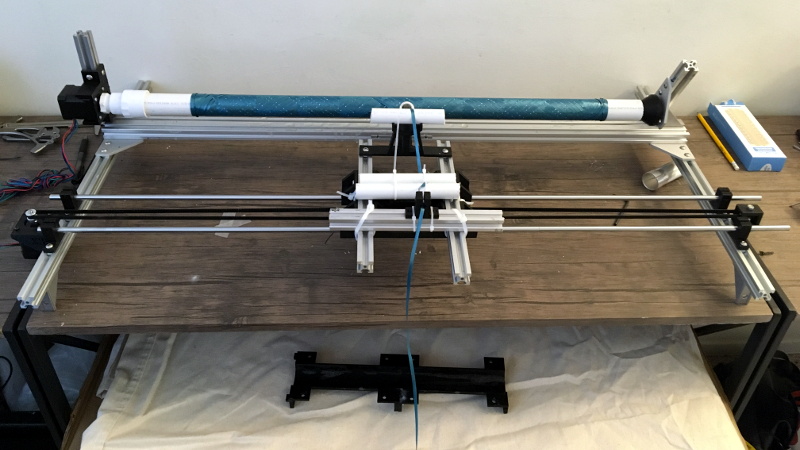
 [Bryan] had done it by hand before, but was looking for a way to not only automate the process but make the final product a bit more uniform-looking. His idea was to rotate a horizontal PVC pipe as his mandrel, and move a “car” carrying the carbon fiber ribbon back and forth along its length. The PVC pipe just needs to rotate along its axis so he figured that would be easy enough; and using a GT2 belt and some pulleys, getting the carbon-laying car moving back and forth didn’t seem like much of a challenge either.
The frame of the winder is built from the hacker’s favorite: 20/20 aluminum extrusion. Add to that an Arduino Uno, two stepper motors with their appropriate drivers, and the usual assortment of 3D printed odds and ends. [Bryan] says getting the math figured out for generating interesting wrap patterns was a bit tricky and took a fair amount of trial and error, but wasn’t a showstopper. Though we’d suggest following his example and using party ribbon during testing rather than the carbon stuff, as producing a few bird nests at the onset seems almost a guarantee.
One of the trickiest parts of the project ended up being removing the carbon fiber tubes from the PVC mandrel once they were done. [Bryan] eventually settled on a process which involved spraying the PVC with WD-40, wrapping it in parchment paper, and then using a strip of 3M blue painter’s tape to keep the parchment paper from moving. If you can toss the whole mandrel in the freezer after wrapping to shrink it down a bit, even better.
So was all this work worth it in the end? [Bryan] says he was originally looking at spending up to $70 USD per foot for the carbon fiber tubes he needed for his bike frame, but by buying the raw materials and winding them himself, he ended up producing his tubes for closer to $3 per foot. Some might question the strength and consistency of these DIY tubes, but for a ~95% price reduction, we’d be willing to give it a shot.
Years ago we covered a Kickstarter campaign for a very similar carbon winder. Probably due to the relatively limited uses of such a gadget, the winder didn’t hit the funding goal. But just like the current wave of very impressive homebrew laser cutters, the best results might come from just building the thing yourself.


That’s a tesla coil secondary winder trapped in a carbon fibre tube winder’s write up!
+1
Carbon fiber framed Tesla coil.
That is damn cool. Wish I didn’t hate epoxy fumes so much, or I would just want to build this for “future projects”!
I second that!
A CriCut or Zund Cutting machine is the next system I’m waiting to see come open source DIY. Almost seems the head alone would be all that is needed with a CNC router… and maybe a vacuum table or custom feed table. Hack a CNC router into that style cutting machine.
I’ve heard tell that certain people develop some kind of allergy or are otherwise hypersensitized to epoxy after being exposed too much to the fumes or perhaps dust from sanding fiberglass or whatever. Was that the case with you? Or was it always horrible?
Definitely helped convince me to get a good respirator.
One of the fellows that ran a rocketry business some years ago had to quit because he developed a severe allergy to epoxies. My understanding is that it was primarily due to the dust from sanding. But liquid epoxy resins and/or their curatives can also sensitize someone foolish enough to ignore simple precautions (gloves).
Maybe with 100% solids / no VOC epoxy?
Hmm…what kind of epoxy have you used that has such strong fumes? I’ve used epoxy resins from West Systems, System 3, US Composites, and some others. Odor is so low that I can use them indoors w/o significant ventilation, and it’s not a terribly unpleasant odor in any case. Some of the epoxy curatives do have stronger odors (amines–fishy odor), but still it’s not enough to cause She Who Must Be Obeyed to banish me to the garage…
Polyester resins: now that’s a different story. They reek, spelled with a capital REEK.
“Some might question the strength and consistency of these DIY tubes, but for a ~95% price reduction, we’d be willing to give it a shot.”
Define “give it a shot”.
Hey, I’m assuming that since this isn’t a “Fail of the Week” article or anything like that that his tubes turned out just fine. Awesome and congrats! I’d just like to add that for anyone making a bike frame I hope that “just give it a shot” means build some and then safely perform some sort of testing on it. Don’t just build the frame then go ride it around. Broken frames are nasty. You could hit your head on the ground. You could be impaled by your own broken tube! The same concept of course goes for many other things, not just bike frames.
“You could be impaled by your own broken tube!”
That made me wince so badly. I second the safety first comment.
This got picked up by the DIY echochamber today. This particular article sort of encourages people to just jump in and get to work. If someone comes across this in the future, I don’t want to discourage you against experimenting with fiberwinding. It’s awesome. But please recognize that there’s a lot that goes on behind the scenes that I didn’t put in the narrative. A lot of failures, a lot of purposeful breaking of parts, and lots of testing testing testing. Homemade machines are just that. Homemade. I’ve spent afternoons just hitting tubes with a mallet hundreds of times with my full strength just to see how they respond to impacts.
I am happy with the result, but it is unquestionably a refined design that took hundreds of hours of trial-and-error work. I ride the frame about 100-150 miles a week on mixed road and gravel and have had no delamination issues.
The tubes are easy for me to make now, but that took time and patience. Please don’t forget that I started at square one, and you should too. Make carbon plates. Make tubes WITHOUT a fiberwinder just so you know how composites flex and bend and cut. Just please be safe. I don’t want anyone coming back here with a shattered tube sticking out of their chest saying “well, you told me to do it this way” because I’ll throw a composites manufacturing text in your face and then you’ll have a broken nose, too.
+1000
-39 & 1/2
It is for this reason that I believe that ONLY showing off our accomplishments is a disservice to our readers. We must also show off our mistakes and our learning curve if we are to truly inspire others with a “you can do this too!” message.
How do you join the tubs to make the frame? Cool DIYish job. Sounds pretty professional to me.
these guys are doing something similar. They work well.
http://www.xwinder.com/
It would be interesting to see how strong the tubes made from “party ribbon” would be
I think this could be great for some more ambitious amateur radio antenna projects. Non-conductive supports are usually either very heavy, very expensive, or not very UV resistant.
Isn’t CF conductive, though? I heard that it was radio opaque, as well.
Am I the only one wondering how to use a process like this to make arbitrary shapes?
Hello Tom Nordi,
I´m a student from Sweden and wondering if it´s possible for me to use a picture of your machine and reference to you in my bachelor essay?
Best regards,
Johan Arvidsson
This is the work of Bryan Kevan. Click through the first link on the article to find his webpage. He has links there to Instagram which might allow you to contact him to ask the same question.