For those with 3D printers, taking a 3D model and spitting out a physical object is so routine as to be blasé. The reverse is something a little different. There are many ways to create a digital 3D model of a physical object, of varying complexity. [Eric Strebel] favors photogrammetry, and has shared a useful guide for those interested in using this technique.
In its most basic sense, photogrammetry refers to taking measurements from photographs. In the sense being discussed here, it more precisely refers to the method of creating a 3D model from a series of photographs of a physical object. By taking appropriate images of an object, and feeding them through the right software, it’s possible to create a digital representation of the object without requiring any special hardware other than a camera.
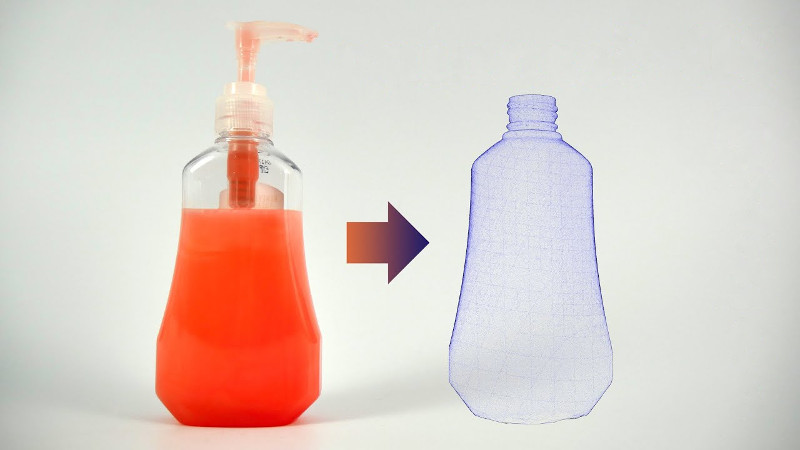
[Eric] shares several tips and tricks for getting good results. Surface preparation is key, with the aim being to create a flat finish to avoid reflections causing problems. A grey primer is first sprayed on the object, followed by a dusting of black spots, which helps the software identify the object’s contours. Camera settings are also important, with wide apertures used to create a shallow depth-of-field that helps the object stand out from the background.
With the proper object preparation and camera technique taken care of, the hard work is done. All that’s then required is to feed the photos through the relevant software. [Eric] favors Agisoft Metashape, though there are a variety of packages that offer this functionality.
We first reported on photogrammetry back in 2016. If cameras aren’t your thing, you can always give lasers a try. Video after the break.


FreeCAD discussion on Photogrammetry, OpenMVG/OpenMVS integration.
https://forum.freecadweb.org/viewtopic.php?t=13250
The problem is that this only really works on large, simple shapes. Any any real level of detail and it gets very soft and irregular very quickly. Certainly doesnt reproduce anything with straight, sharp edges.
Not quite true:
https://phys.org/news/2018-05-scientists-d-scanner-insects.html
idk i got a really good scan of my mom’s pet rock fred. its really detailed except for the googly eyes which didnt come out right because of the transparent bits. he is now a giant mountain in one of my minecraft worlds. ive also used it to make satisfactory reference models for cad design. enough to get accurate rough measurements for 3d printing or pcb fitting.
I’ve been looking into this topic lately. Glad to see it’s still alive and well
With all that IR chips for smartphone face recognition, I still waiting for opensource structured light scanner.
Not sure if it’s gonna happen any time soon. But there are affordable surface sensors that use structured light, Intel makes them for instance.
I have a huawei mate 20 pro that has this feature. It projects a cloud of IR points and can 3D Scan objects, supposedly. Never really worked well. Would be nice to have an open source alternative indeed.
There is equipment for high-res scans which will capture every detail up to microns, but it’s expensive – Gocator G3 sensors is a good example. A single sensor costs thousands of dollars, but there are cases where it’s a totally acceptable price.
Why does he use the turntable technique for painting, and not for taking the pictures ?
It seems to me that it’s much more convenient to put the camera on a tripod, so you have always clean background, same distance and make the object turn on a simple turntable (with a big smooth bearing and a printed 360 ° graduated circle for an even motion ;o).
Because you need the background to change. The way this works is the software looks for consistent patterns in each photo and it uses a bit of math to calculate the 3D space it might take up by comparing points on the photos that appear to move in each picture. If your background stays the same in each photo, certain areas might be assumed as data and they will be rendered as a real object.
If the background is just pure white it works fine. I built a “scanner” that rotates and tilts a platform that you put the object on which triggers the camera after each move. Works great (with the caveat that photogrammetry is a bit temperamental and sometimes fails for what seems like no reason at all).
i tried a picture taking robot (built out of lego) to scan small objects and it just didnt work. i think photogrammetry actually relies on background noise to get good measurements. i tried blacking out the background with an old black tshirt but it still confuses meshroom. what i think i need to do is make the camera jig revolve around the work instead of vise versa.
the cool thing about photogrammetry is you really dont need to be too precise with the camera. provided you are taking good pictures and have good lighting and a good surface it usually just works like magic.
Here is a model made with 123D Catch using images from a cheap Canon SD450 of a polar bear against a white(ish) background. I only rotated the model. https://youtu.be/WVS71wOwYlM
I believe it’s because the software uses the location of the camera to determine the geometry as shown when he loaded the images in the software. If the camera was stationary it would only show one camera position with each picture on top of each other.
I’d put the object on a turntable, with a way to have stops every X degrees. Then I’d make a frame arcing up on one side with different places to set the camera.
Put the camera in the lowest position, rotate the object through all the stops. Up to the next position and repeat. Repeat for the rest of the positions.
Then you have a set of precise pictures for photogrammetry, with the object the same size in every one.
Someone just got their first 3D printer yesterday and there’s nothing routine about using it for them.
To see some really great Photogrammetry, go to http://hover.to Their app and website has you walk around your house and take 8+ pictures approx 45° apart. After about 24 hours of processing, you get a 3D model of your house with measurements of everything: Window sizes and spacing, amount of siding and shingles, and just about any dimensions a contractor might need to estimate work on your house. It pretty accurately models whatever siding and roofing you already have, and you can choose others to see what it would look like. You can download the 3D model and bring it into Sketchup, Fusion360, or your favorite CAD or modelling program for further refinement. It is amazingly accurate!
(The xLights Christmas Lights enthusiasts are using it to model their homes and plan holiday lighting displays.)
8? i usually doo 100+ but my camera is ancient and only manages 14.1 megapixels.
Looks to me like it’s specific to houses and recognizes the architectural features (roof lines etc) then builds a model. It’s not using the mesh from photogrammetry which is why it comes out so great looking with so few photos. Still a very cool and useful application for houses.
I there,
https://micmac.ensg.eu/index.php/Accueil
Here you will find various informations related to Micmac, the photogrammetry software developped at the IGN (French National Geographic Institute) and ENSG (French national school for geographic sciences). This wiki is maintained by the department of Aerial and Spatial Imagery (DIAS) of ENSG school.