Emulating An Altair 8800 On An Apple II

The Altair 8800 was, to its creators, a surprise hit. Despite looking nothing like what we would today consider to be a computer, it sold thousands of units almost immediately upon its launch, way back in 1975. A few years later, the Apple II burst onto the scene, and the home computer revolution began in earnest.

Emulating older machines on newer hardware has always been a thing, and [option8] has coded an Altair 8800 emulator for the Apple II. Of course, if you don’t have one lying around, you can run this emulator on an Apple II emulator right in your browser. Honestly, it’s emulators all the way down.

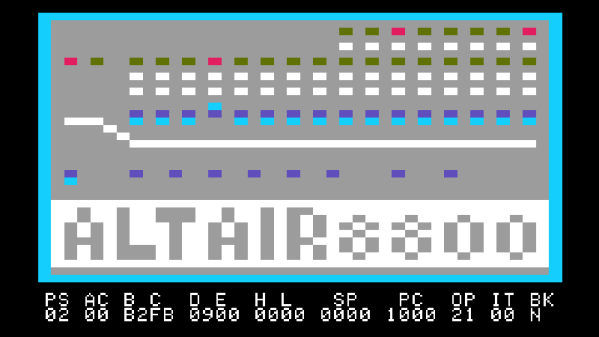
As far as emulators go, this is a particularly charming one, with the Altair’s front panel displayed in glorious color on the Apple’s 40 column screen. Replete with a full set of switches and blinking LEDs, it’s a tidy low-resolution replica of the real thing. Instructions to drive it are available, along with those for another similar emulator known as Apple80.

If that still hasn’t quenched your thirst, check out this Game Boy emulator that lives inside emacs.

ATtiny Gets A Tiny Software UART

Modern microcontroller platforms spoil us with their performance and expansive spec sheets. These days it’s not uncommon to be developing for a cheap micro that has a clock rate well in excess of 100MHz, with all manner of peripherals baked in. DACs, WiFi, you name it – it’s in there, with a bunch of libraries to boot. It wasn’t always this way, and sometimes you would even find yourself lacking hardware serial support. In these cases, the bitbanged software UART is your friend, and [MarcelMG] decided to document just how it’s done.

The amateur programmer’s first recourse may be to use delays to properly time the output data stream. This has the drawback of wasting processor cycles and doesn’t let the microcontroller do much else useful. Instead, [Marcel] discusses the proper way to do things, through the use of interrupt service routines and hardware timers.

[Marcel]’s implementation is for the ATtiny24A, though it should be easily portable to other AVR8 processors. Taking up just 2 bytes of RAM and 276 bytes of program space, it’s compact – which is key on resource-limited 8-bit devices. The code is available on Github if you fancy trying it out yourself.

It’s a technique that is more than familiar to the old hands, but useful to those new to the art. It can be particularly useful if you need to get data out of a legacy platform with limited options. As times change, it’s important to pass on the techniques of yesteryear to the new generation. Of course, if things are really tight, you can even do a half-duplex UART on a single pin.


3D Scanning Via DIY Photogrammetry

For those with 3D printers, taking a 3D model and spitting out a physical object is so routine as to be blasé. The reverse is something a little different. There are many ways to create a digital 3D model of a physical object, of varying complexity. [Eric Strebel] favors photogrammetry, and has shared a useful guide for those interested in using this technique.

In its most basic sense, photogrammetry refers to taking measurements from photographs. In the sense being discussed here, it more precisely refers to the method of creating a 3D model from a series of photographs of a physical object. By taking appropriate images of an object, and feeding them through the right software, it’s possible to create a digital representation of the object without requiring any special hardware other than a camera.

[Eric] shares several tips and tricks for getting good results. Surface preparation is key, with the aim being to create a flat finish to avoid reflections causing problems. A grey primer is first sprayed on the object, followed by a dusting of black spots, which helps the software identify the object’s contours. Camera settings are also important, with wide apertures used to create a shallow depth-of-field that helps the object stand out from the background.

With the proper object preparation and camera technique taken care of, the hard work is done. All that’s then required is to feed the photos through the relevant software. [Eric] favors Agisoft Metashape, though there are a variety of packages that offer this functionality.

We first reported on photogrammetry back in 2016. If cameras aren’t your thing, you can always give lasers a try. Video after the break.

Continue reading “3D Scanning Via DIY Photogrammetry”

Do-It-Yourself Scratch Cards

The lottery is to some a potential bonanza, to others a tax on the poor and the stupid. The only sure-fire way to win a huge fortune in the lottery does remain to start with an even bigger fortune. Nevertheless, scratch-off tickets are the entertainment that keep our roads paved or something. [Emily] over on Instructables came up with a way to create your own scratch-off cards, and the process is fascinating.

For [Emily]’s scratchers, there are five layers of printing on the front of the card. From back to front, they are the gray ‘security confusion layer’ printed with a letterpress, black printing for the symbols and prize amounts, also printed on a letterpress, a scratch-off surface placed onto the card with a Silhouette cutter, the actual graphics on the card, printed in blue with a letterpress, and a final layer of clear varnish applied via screen printing. There’s a lot that goes into this, but the most interesting (and unique) layer is the actual scratch-off layer. You can just buy that, ready to cut on a desktop vinyl cutter. Who knew.

After several days worth of work, [Emily] had a custom-made scratcher, ready to sent out in the mail as a Christmas card. It’s great work, and from the video below we can see this is remarkably similar to a real scratch-off lottery ticket. Not that any of us would know what scratching a lottery ticket would actually be like; of course that’s only for the gullible out there, and of course none of us are like that, oh no. You can check out a video of the scratch-off being scratched off below.

Continue reading “Do-It-Yourself Scratch Cards”

Become The Next Fabergé With A Rose Engine Lathe

The basics of a skill may take a long time to master, but there is always something else to learn about regardless of the craft. Building a piece of fine furniture out of hardwood or being able to weld together a bicycle from scratch are all impressive feats, but there are fine details that you’ll only learn about once you get to this level of craftsmanship. One such tool that will help with these intricacies is known as the rose engine lathe.

This tool is based on an average lathe, typically used for creating round things out of stock which is not round. A rose engine lathe has a set of cams on it as well which allow the lathe to create intricate patterns in the material it’s working with, such as flower type patterns or intricate spirals. One of the most famous implementations of this method was on the Fabergé eggs. While this might make it sound overly complex, this how-to actually shows you how to build your own rose engine lathe out of a piece of MDF and a large number of miscellaneous pieces of hardware.

We recently featured another build which performs a similar function called engine turning. While similar, this is the method responsible for creating overlapping spirals on a piece of metal. Either way, both projects are sure to spice up your metal or woodworking endeavors.

Thanks to [PWalsh] for the tip!

Proposed NASA Budget Signals Changes To Space Launch System

The White House’s proposed budget for 2020 is out, and with it comes cuts to NASA. The most important item of note in the proposed budget is a delay of the Space Launch System, the SLS, a super-heavy lifting launch vehicle designed for single use. The proposed delay would defer work on the enhanced version of the SLS, the Block 1B with the Exploration Upper Stage.

The current plans for the Space Launch System include a flight using NASA’s Orion spacecraft in June 2020 for a flight around the moon. This uncrewed flight, Exploration Mission 1, or EM-1, would use the SLS Block 1 Crew rocket. A later flight, EM-2, would fly a crewed Orion capsule around the moon in 2022. A third proposed flight in 2023 would send the Europa Clipper to Jupiter. The proposed 2020 budget puts these flights in jeopardy.

Continue reading “Proposed NASA Budget Signals Changes To Space Launch System”

3D-Printed Rotary Dial Keypad Is Wonderfully Useless

Right up front, let us stipulate that we are not making fun of this project. Even its maker admits that it has no practical purpose. But this 3D-printed Commodore-style rotary dial keypad fails to be practical on so many levels that it’s worth celebrating.

And indeed, celebrating deprecated technology appears to be what [Jan Derogee] had in mind with this build. Rotary dials were not long ago the only way to place a call, and the last time we checked, pulse dialing was still supported by some telephone central office switchgear. Which brings us to the first failure: with millions of rotary dial phones available, why build one from scratch? [Jan] chalks it up to respect for the old tech, but in any case, the 3D-printed dial is a pretty good replica of the real thing. Granted, no real dial used a servo motor to return the dial to the resting state, but the 3D-printed springs [Jan] tried all returned the dial instantly, instead of the stately spin back that resulted in 10 pulses per second. And why this has been done up VIC-20 style and used as a keypad for Commodore computers? Beats us. It had to be used for something. That the software for the C-64  generates DTMF tones corresponding to the number dialed only adds to the wonderful weirdness of this. Check out the video below.

We’ll hand it to [Jan], he has a unique way of looking at the world, especially when it comes to clocks. We really enjoyed his persistence of phosphorescence clock, and his screw-driven linear clock turns the standard timekeeping UI on its head.

Continue reading “3D-Printed Rotary Dial Keypad Is Wonderfully Useless”