
After a youth spent playing with Amigas and getting into all sorts of trouble on the school computer network, I’ve always had a soft spot in my heart for hardware from the 80s and 90s. This extends beyond computers themselves, and goes so far as to include modems, photocopiers, and even the much-maligned dot matrix printer.
My partner in hacking [Cosmos2000] recently found himself with a wonderful Commodore MPS 1230 printer. Its parallel interface was very appropriate in its day, however parallel ports are as scarce as SID chips. Thankfully, these two interfaces are easy to work with and simple in function. Work on a device to marry these two disparate worlds began.
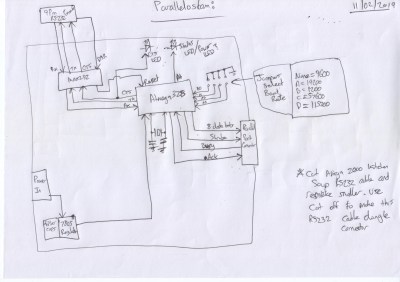
Enter: The Paralleloslam
While I was gallivanting around the Eastern coast of Australia, [Cosmos2000] was hard at work. After some research, it was determined that it would be relatively simple to have an Arduino convert incoming serial data into a parallel output to the printer. After some testing was performed on an Arduino Uno, a bespoke device was built – in a gloriously plastic project box, no less.
An ATMEGA328 acts as the brains of the operation, with a MAX232 attached for level conversion from TTL to RS232 voltage levels. Serial data are received on the hardware TX/RX lines. Eight digital outputs act as the parallel interface. When a byte is received over serial, the individual bits are set on the individual digital lines connected to the printer’s parallel port. At this point, the strobe line is pulled low, indicating to the attached device that it may read the port. After two microseconds, it returns high, ready for the next byte to be set on the output lines. This is how parallel interfaces operate without a clock signal, using the strobe to indicate when data may be read.
At this point, [Cosmos2000] reached out – asking if I had a name for the new build.
“Hm. Paralleloslam?”
“Done. Cheers!”
Making It Useful
With the preliminary work done and initial testing successful, I paid a visit to [Cosmos2000] on a cloudy Sunday. The interface was operating well with short passages of text, but we are big fans of printing photos and high-quality graphics on these painstakingly slow devices. Unfortunately, it’s not possible to simply bang graphical data out over the serial port, as the printer cannot keep up, and only has a limited buffer. It’s possible to get lucky sometimes by running at an excessively low baud rate, but dot matrix printers are slow enough as it is. We needed a proper solution.
We were most familiar with the CTS, or Clear to Send pin, on the serial side of things. When this pin is active, it indicates to the host that the attached device is ready to receive further data. We decided to implement flow control using this method. To do so, the Arduino was set up to monitor the BUSY line on the printer’s parallel port, setting the CTS line active whenever the busy line was inactive.
With our task made clear, hours of mucking about then ensued. Serial pinouts were confused, time and again, and there was regular double checking of cables to ensure the flow control pins were actually populated. Finally, after much consternation, we heard the familiar BUZZ and ca-CHUNK as our geriatric printer burst to life. If you’ve never seen two grown men whoop and cheer over a dot matrix before, I’d wager you haven’t spent much time around Hackaday readers.
Performance
There’s always plenty of fun to be had with the build, but we always enjoy putting the hardware through its paces. We spent a good afternoon making a logo and printing it over and over again, before pushing various photos and graphics through the machine.
Speed was a concern during development. We tested the device successfully at both 1200 and 9600 bits per second, with no problems. With a strobe time of 2 microseconds, and assuming the rest of the code takes roughly the same time to execute, that gives us a potential top speed of 250,000 Bytes per second (note Bytes, as the parallel code outputs 8 bits at a time). This is roughly in line with the limit of the ATMEGA328’s hardware serial port, which is capable of 2 million bits per second if configured properly.
However, to hit this speed reliably, I suspect several code optimizations would be required. Lacking hardware that requires such throughput, we’ve kept our testing to the lower end of the spectrum. It would be fun to test however, and I think it wouldn’t be too hard to hit at least 115,200 bits per second coming in over serial and being pushed out over the parallel port with the current setup.
Sharing It Around
With our success confirmed, we decided that the project should be shared. The code has proved reliable enough for our purposes, though if your dot matrix is in a safety-critical role, please reconsider your life choices, and send us a photo of your Paralleloslam getting the good work done. Whatever happens is on you, though.
Resources are available on Github for your perusal. It’s not a pixel-perfect, super tidy build. Experience with serial interfaces is recommended, as often debugging is required depending on the various cables and devices you happen to be using. However, for those with the requisite knowledge and tools, it should prove handy. We’d be particularly interested if anyone uses this work for other parallel devices. Anything that receives data in a simple byte-wise mode with unidirectional communication should theoretically work. As always, your mileage may vary.
From [Cosmos2000] and myself, we wish you the best of luck with your retro hardware adventures.


Is this some sort of proprietary parallel interface such that an off-the-shelf USB to Parallel converter wasn’t an option?
I have a USB flat-bed plotter by the simple expedient of finding a space inside for an off-the-shelf converter and wiring to pins on the PCB. But I think that was serial (it’s been 15 years..)
Nah, we just didn’t have one of those and we did have an Arduino lying around.
They’re not great, though, from what I’ve heard, the USB to Parallels.
I have one on the shelf next to me, by a bizarre quirk of happenstance. but when your only tool is an Arduino every problem looks like a nail, as they say.
I think that they work OK for printing, but that is all they do, there is no real way to use them as an EPP bus or for pin-by-pin control with CNC machines etc.
Most USB-to-LPT converters simply implement a rudimentary LP device, and don’t actually expose the parallel I/O. A few chipsets (USS720 comes to mind) do allow twiddling the parallel lines, but the data rate is extremely slow. I have a partial writeup at the link below, from many years ago; hopefully we have all moved on to better things.
http://reboots.g-cipher.net/lcd/index.html
They’re not great beause usb has 1ms latency which is too bad for direct control of stepper motors in cnc. Direct parallel port has much better latency. But just for sending data where you are not interested in exact data rate, it should be ok.
Yeah. But you can also get PCI, PCIe, Cardbus, FireWire, and expressport. I think I have even seen compact flash parallel port adapters.
That would be a boring article, about how you score a parallel printer and use the usb dongle from the shelf. But they work just fine. I had an HP Plotter that was parallel that I wish I still had.
There are USB-parallel converters, like the usb-serial market there are good and bad ones, the main issue is often how the driver (windows/client side) would talk to the device, up until xp a lot of drivers would poke data in to the lpt(x) port in memory reading back the return lines as response eg ack line (much the same way a pcanywhere cable worked) , the other issue is voltage, often the usb ports would not have enough grunt to feed the data lines and parasitic powered chips within the printers (or jtag/eeprom/plotter) would not have enough juice to operate, a good old PCI to lpt card in this case is the only way, they getting rare though so a good alternative is much needed. One solution i have for problem 1 mentioned above is use virtual box to simulate the pc and use vbox to pass data from it’s virtual lpt to your usb lpt. (not usb passthrought ) . for problem two a active lpt switcher can work, (belkin made some really good usb-lpt cables that worked with all but a few devices and active lpt switchers ) .
I am currently trying to resurect a Mercury laser cutter (25w model) and it’s good old serial or parasitic lpt, windows xp driver that just about installs in windows 7-32bit, it’s was free so no complaints but now what box did i put all those null modem, straight through and 25p-9p adapters we would never need again …..
PCI Parallel cards are not getting rare at all. Amazon is awash with them!
I bought 5 a year or so ago just to do a survey on which ones would a) Work with LinuxCNC and b) Work with EPP bus devices for CNC control.
NOTE!! Despite a commonly heard opinion, LinuxCNC does not need a P-Port, and in fact the general advice is to use something better, such as PCI card or Ethernet interface for motion control.
Also of note even if said ports* aren’t brought to the back, or out, there’s usually a header somewhere that can.
*Part of the chipset.
More of a worry is rarity of PCI slots, at least in non-enthusiast systems, i.e. generic commodity black box desktops, which are getting to be preponderantly small form factor, needing low profile cards most likely.
Yes, I noticed this today when trying to find a PCI motherboard for someone. They still exist, but are rare.
Fortunately the most popular PCI cards for LinuxCNC also have a PCIe variant. (My own lathe uses a 6i24)
Dinosaur here. I use a parallel port with LinuxCNC to drive an X-Carve. I’m running an [Atom D525] (https://ark.intel.com/content/www/us/en/ark/products/48952/intel-desktop-board-d525mw.html). I heard that Atom processors have good interrupt latency though my [Haswell DQ87PG](https://ark.intel.com/content/www/us/en/ark/products/70903/intel-desktop-board-dq87pg.html) has a real parallel port and not just a header.
Somewhere in my folks house I believe there is a Citizen 120D+ with a serial !! interface.
I should hook it up to be a MQTT output logger with a box full of fanfold :)
When you setup the printer driver in Workbench, you choose it to be serial or parallel and with the same device driver, it just works !?
It’s been a while…
120D was 9 pin dot matrix and everywhere in uk in the 90’s , i have fond memories of printing my pascal code to a form fed 120d, oki and epson also had same printers on the market at the same time.
Yeah, you set it up as serial on the Amiga. Paralleloslam then flips its GPIO pins, fires off a byte down the parallel port, and gets the next one in. And so on!
The printer drivers back then were super simple, just sending out a big slab of binary data. Whether you clock that into the printer 8 bits at a time or 1 bit at a time, the instructions are the same. :)
This has a much smaller footprint: https://www.tindie.com/products/Ron/grbl-to-db25-cnc-shield-with-arduino-uno-r3/
And tou can also give it g code.
I seem to recall that this is the purpose of a UART IC. Like 8250 or 16550 or AY3-1015D. I built this stuff back in the late 70’s, early 80’s. Shouldn’t this just be called a UART??? Am I missing something???
early uarts and printer ports were direct memory devices, that ment latency was at it’s lowest, newer ones have overheads, driver issues, comparability and such causing problems.
I, as well, reminisce about the days of the Parallel Port. From the humble Okidata dot matrix on my C-64 to the HP Deskjet for my AMIGA, I understand where you came from. Cheers to you on that accomplishment and very nice design. Oh, my handle back in the old AMIGA days was MEDiator. ;) Cheers again.
Amazing machines, hey. Glad you enjoyed it!
How nice to see that they’ve got this working. Fun project.
Would have been nice to see them using the CBM serial port instead of parallel, but considering the additional complexity and possible pitfalls of that (not RS-232 related in any way) protocol, I can understand why they went for centronics. Fun to see the old printer printing images originating from a modern PC. But perhaps the funniest parts was that the images gradually fades from dark to light grey during the printing process… ahhh memories.
I accidentally reported this comment and would like to point out that it’s way too easy to do that. Perhaps a confirmation pop-up would be nice.
Ha! Yeah, we’re using a cartridge that we (somewhat crudely) refilled. Later results are more consistent. Look out for that article in a few weeks!
Never take an Arduino to an SN74HC595 fight…
I literally learned this about two weeks after we built the above project, and knew someone would pick up on that in the comments! Do they handle flow control? That’s definitely what an OEM would have done back in the day I reckon.
Doesnt look like it, but that’s just a ‘not’ gate away.
> “setting the CTS line active whenever the busy line was inactive”
Is that not the job of an 7404, or is there more going on?
Which won’t extract a clock from the UART signal or strip the start/stop bits. That’s what, as Oldfart said a few comments up, a UART chip is for. A fixed-baud-rate receiver would be a fun little project to implement in discrete logic, though.
Could this be reprogrammed to perform a serial to GPIB converter?
Possibly! I’m unfamiliar with the standard, but I’d be surprised if an Arduino couldn’t handle it.
Hmmm, wondering if I can abuse this combined with esp 8266 under arduino environment and plip drivers to make parallel port wifi dongles for old stuffs.
I get it, it was a fun project… But for those who just need to print to an older parallel only printer, there is an easier way. Use a Jetdirect EX Plus, 300X or 500X. Prices start at $10 and up, (WAY UP) on your favorite online junkyard/rubbish sale site (e.g. ebay). These are dhcp enabled network print servers, and are supported by the latest windows versions through the LPR protocol.
For some real fun, hook them up to one of the old IBM line printers for some wide format fanfold banner fun!
Heh, got one of those stashed and a wide carriage 24 pin dot matrix, which I’m sure is going to be the only possible solution to some gnarly problem someday…