Marble-elevator dot-matric display

Simple Design Elevates This Mechanical Dot Matrix Display

Don’t get us wrong — we love unique displays as much as anyone. But sometimes we stumble across one that’s so unique that we lack the basic vocabulary to describe it. Such is the case with this marble-raising dot-matrix alphanumeric display. But it’s pretty cool, so we’ll give it a shot.

The core — literally — of [Shinsaku Hiura]’s design is a 3D-printed cylinder with a spiral groove in its outside circumference. The cylinder rotates inside a cage with vertical bars; the bars and the grooves are sized to trap 6-mm AirSoft BBs, which are fed into the groove by a port in the stationary base of the display. BBs are fed into the groove at the right position to form characters, which move upwards as the cylinder rotates. Just watch the video below — it explains it far better than words can.

The clever bit is how the BBs are fed into the groove. Rather than have a separate mechanism to gate the feed port, there’s a backlash mechanism that opens the port when the motor powering the drum runs in reverse for a bit. It’s a clever use of cams to get the job done without adding an extra servo, which sort of reminds us of the design parsimony exhibited in his one-servo seven-segment display.

It’s not clear that this would be a very practical display, but that doesn’t stop it from being cool. Although, [Shinsaku Hiura] just released a follow-up video showing a bigger version of this used to display upcoming events from Google Calendar, so perhaps we’re wrong. Continue reading “Simple Design Elevates This Mechanical Dot Matrix Display”

Retrotechtacular: Design For Assembly, 1980s-Style

To get its engineers thinking about design for assembly back in the 1980s, Westinghouse made a video about a product optimized for assembly: the IBM Proprinter. The technology may be dated, but the film presents a great look at how companies designed not only for manufacturing, but also for ease of assembly.

It’s not clear whether Westinghouse and IBM collaborated on the project, but given the inside knowledge of the dot-matrix printer’s assembly, it seems like they did. The first few minutes are occupied by an unidentified Westinghouse executive talking about design for assembly in general terms, and how it impacts the bottom line. Skip ahead to 3:41 if talking suits aren’t your thing.

Once the engineer gets going on the printer, though, things get really interesting. The printer’s guts are laid out before him, ready to be assembled. What’s notably absent from the table are tools — the Proprinter was so well designed that the only tool needed is a pair of human hands. And they don’t have to be particularly dexterous hands, either — the design favors motions that are straight down, letting gravity assist the assembly process and preventing assemblers from the need to contort their bodies. Almost everything is held in place by compliant mechanisms built into the plastic parts. There are a few gems in the film, like the plastic lead screw that drives the printhead, obviating the need to string a fussy timing belt, or the unique roller that twists to lock onto a long shaft, rather than having to be pushed to its center.

We found this film which we’ve placed below the break to be very instructive, and the fact that a device as complex as a printer can be assembled in just a few minutes without picking up a single tool is pretty illustrative of the power of designing for assembly. Slick designs that can’t be manufactured at scale are all too common in this age of powerful design tools and desktop manufacturing, so these lessons from the past might be worth relearning.

Continue reading “Retrotechtacular: Design For Assembly, 1980s-Style”

Apple II Prints Off The Breaking News

These days, we’re alerted to the rise of Bitcoin and the fall of nations via little buzzes from the smartphones in our pocket. Go back fifty years or so and it was all a bit more romantic, with noisy teletype machines delivering hot tips straight to the newsroom for broadcast to the wider public. [Joshua Coleman] wanted a bit of that old fashioned charm, so set up a news printer at home with his old Apple II.

The Apple II in this case isn’t directly connected to the Internet. Instead, it talks to a modern Macintosh, acting as a serial terminal. The Macintosh then connects to a modern BBS that delivers news headlines over Telnet. The Apple II then routes the headlines as they come in to a beautiful Epson LQ-500 dot matrix printer, replete with vintage tractor feed paper. [Joshua] takes the time to highlight just what hardware is required, as well as how to set up the Apple II to redirect the serial output to the printer so the news automatically prints as it comes in.

It’s a fun and noisy way to stay up to date, and you can be sure that if you hear the printer really start going for it, you might want to switch on the TV for more information on just what’s going wrong at the present minute. Old computers may not have the grunt to really hang with the modern net, but they can make a charming interface for it; this SE/30 does a great job with Spotify, as an example. Video after the break.

Continue reading “Apple II Prints Off The Breaking News”

A Tiny LED Matrix Is Better With Friends

When we last heard from [lixielabs] he was building Nixie tube replacements out of etched acrylic and LEDs. Well he’s moved forward a few decades to bring us the Pixie, a chainable, addressable backpack for tiny LED matrix displays.

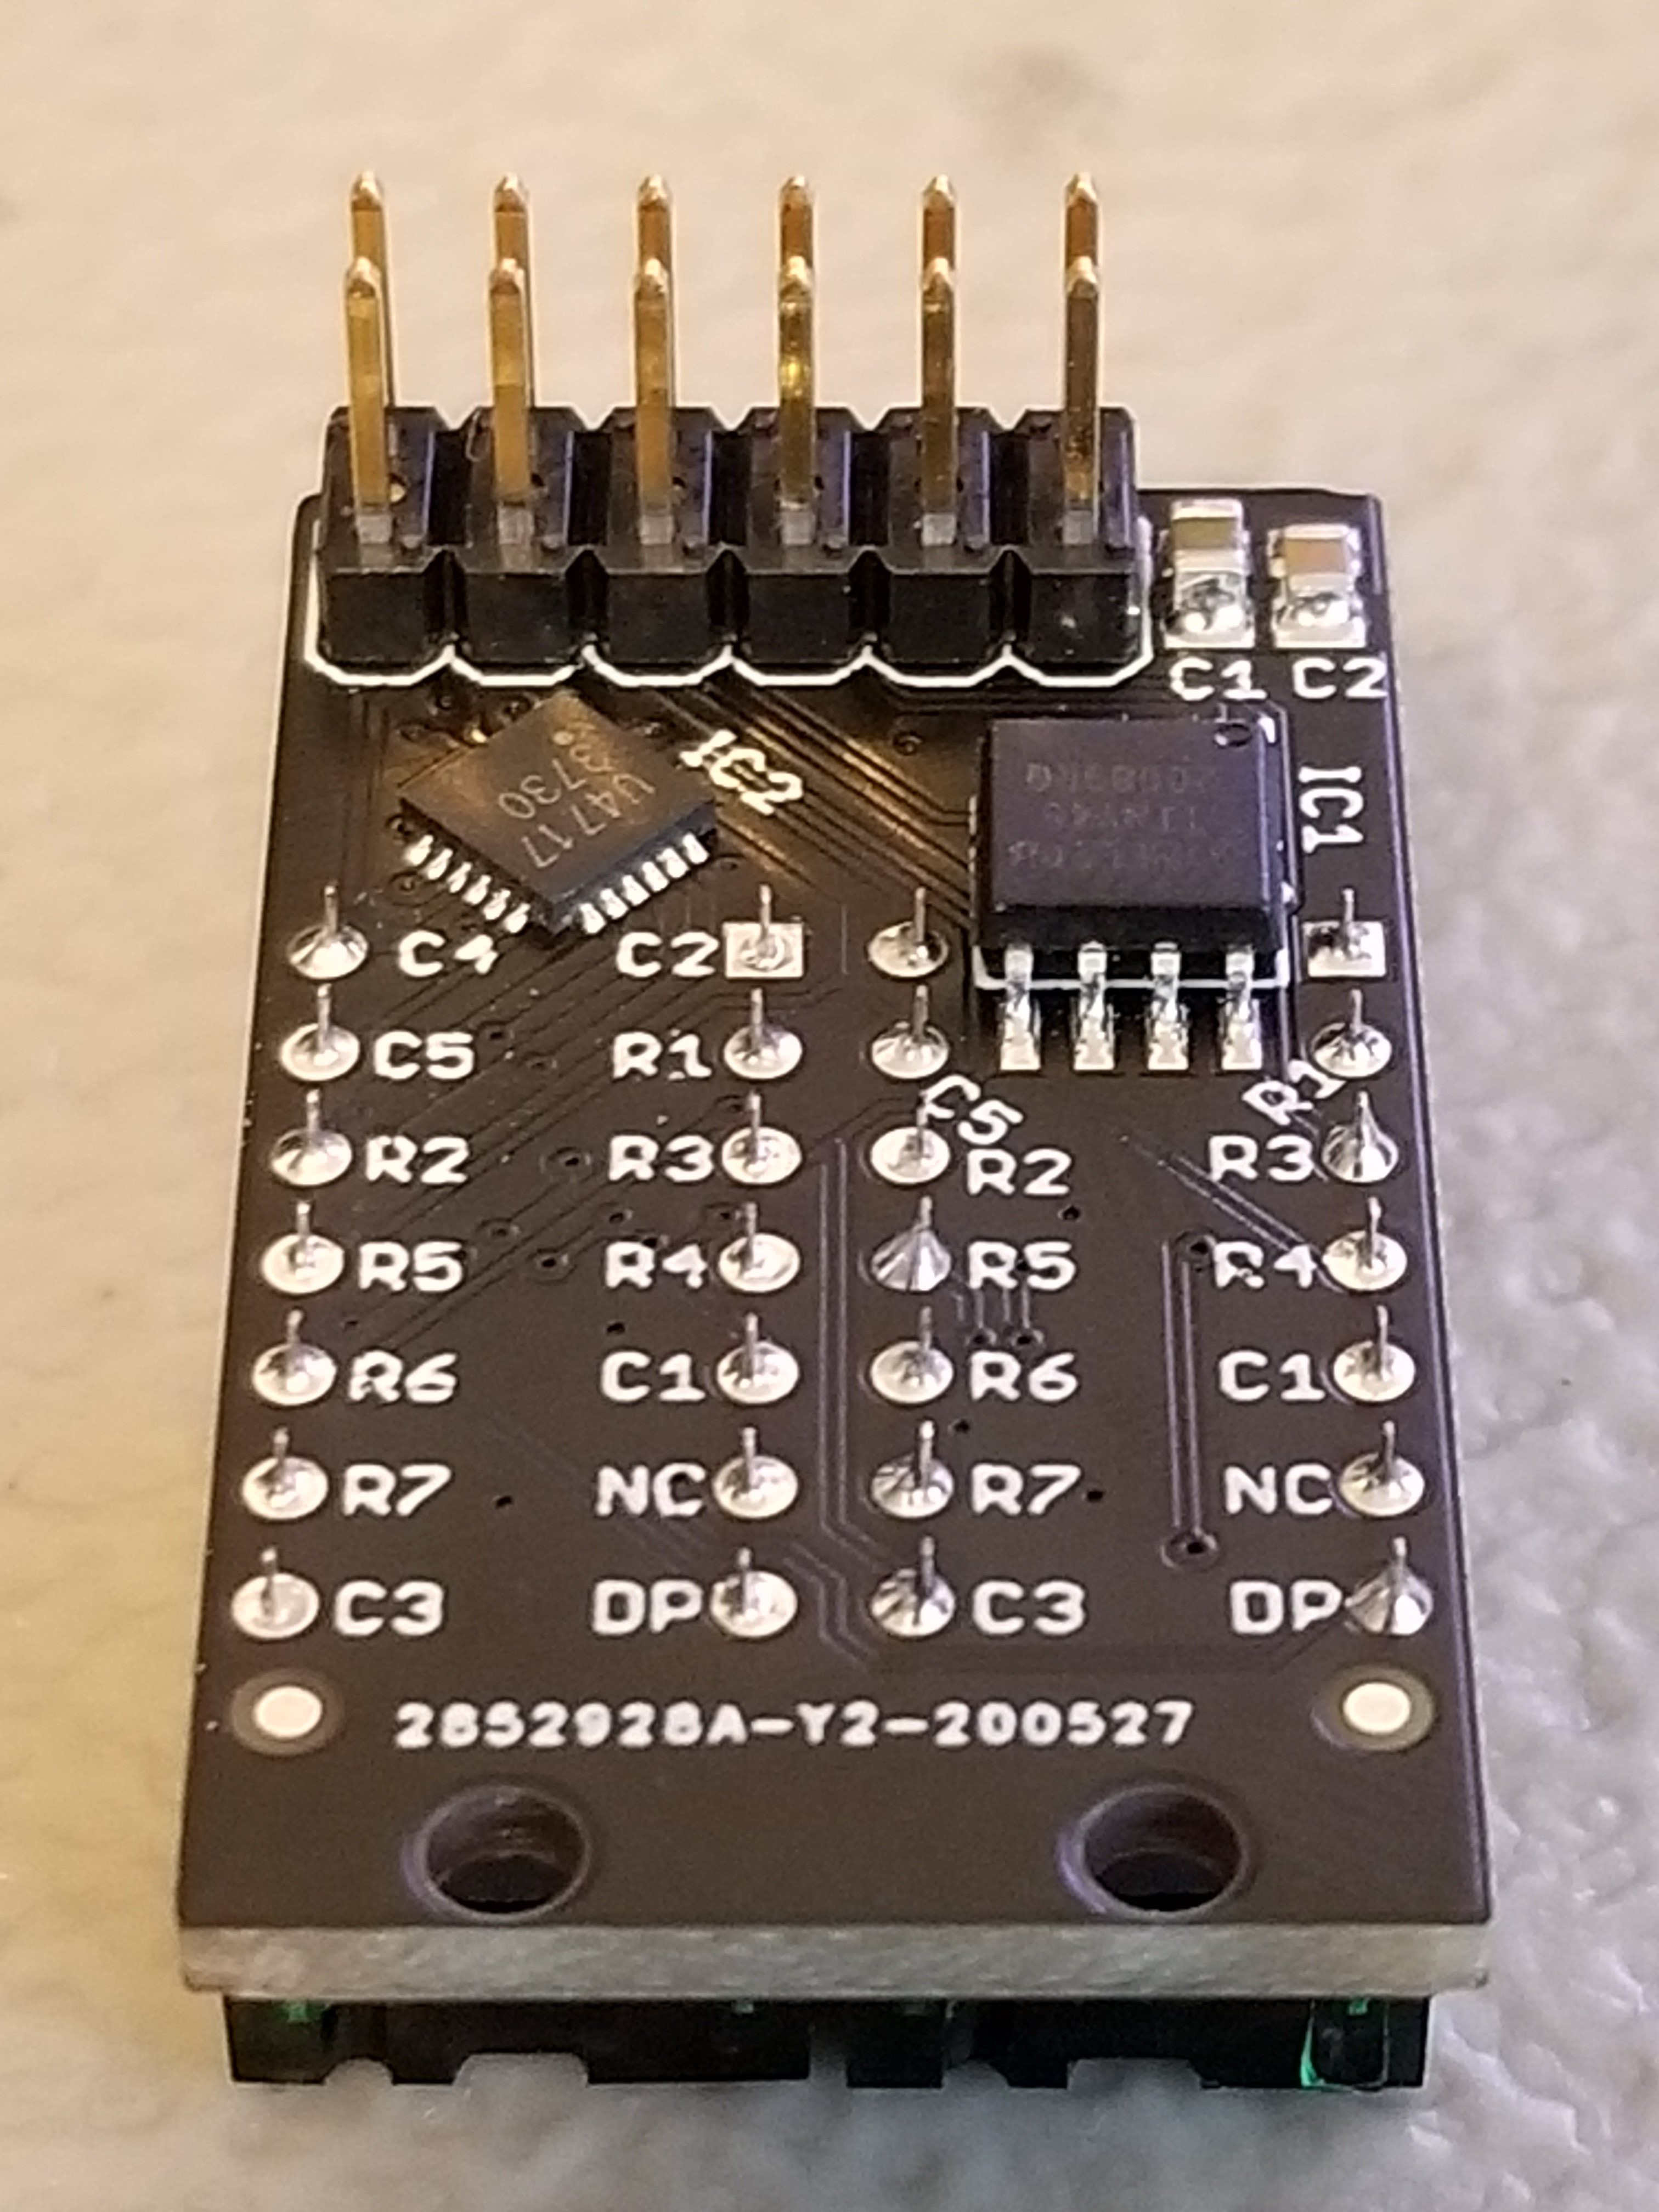
Each Pixie module is designed to host two gorgeous little Lite-On LTP-305G/HR 5×7 LED dot matrix displays, which we suspect have been impulse purchases in many a shopping cart. Along with the displays there is a small matrix controller and an ATTINY45 to expose a friendly electrical interface. Each module is designed to be mounted edge to edge and daisy chained out to 12 or more (with two displays each) for a flexible display any size you need. But to address the entire array only two control pins are required (data and clock).

[lixielabs] has done the legwork to make using those pins as easy as possible. He is careful to point out the importance of a good SDK and provides handy Arduino libraries for common microcontrollers and a reference implementation for the Raspberry Pi that should be easy to crib from to support new platforms. To go with that library support is superb documentation in the form of a datasheet (complete with dimensions and schematic!) and well stocked GitHub repo with examples and more.

To get a sense of their graphical capabilities, check out a video of 6 Pixie’s acting as a VU meter after the break. The Pixie looks like what you get when a hacker gets frustrated at reinventing LED dot matrix control for every project and decided to solve it once and for all. The design is clean, well documented, and extremely functional. We’re excited to see what comes next! Continue reading “A Tiny LED Matrix Is Better With Friends”

RGB LED Shutter Shades

[splat238] is back at it again with another cool RGB LED display project. We were contemplating whether or not our readers have had enough of these over the last few weeks, but we’ve learned over the years that you can never have too many LED projects.

Instead of making a cool mask like we’ve covered before, [splat238] decided to trick-out some shutter shades. What’s really cool is he used the PCB itself as the frame, similar to another hack we’ve seen, which we’re sure also made his design process that much more convenient.

[splat238] got his boards pre-assembled since it would be really difficult to solder all those LEDs by hand. There are 76 of them in this design. It’s pretty helpful that he walks the reader through how to get the boards assembled, providing information on reliable fabrication and assembly houses that he’s had good experiences with. Pretty solid information if you don’t already have a go-to one-stop-house or have never designed for assembly before.

The glasses use an ESP8266-based microcontroller since it has plenty of space for storing LED patterns and has the potential benefit of including WiFi control in later revisions. However, we think you’ll be pretty happy with simply toggling through the patterns with a simple pushbutton.

The LEDs use a whopping 2.5 A at maximum and rely on an external power bank, so you’ll probably want to be really careful wearing this over an extended period of time. Maybe consider doing a bit of PWM to help reduce power consumption.

Another cool project [splat238]! Keep them coming. Continue reading “RGB LED Shutter Shades”

A Face Mask That’s Functional And Hacker-Certified

[splat238] needed a mask for going out in public, but wanted something that fit his personal style a bit better than the cloth masks everyone else was wearing. So, he upcycled his old airsoft mesh mask using an impressive 104 NeoPixels to create his NeoPixel LED Face Mask.

The NeoPixels are based on the popular WS2812b LEDs. These are individually addressable RGB LEDs with a pretty impressive glow. [splat238] purchased a 144 NeoPixel strip to avoid having to solder each of those 104 NeoPixels one-by-one. He cut the 144-LED strip into smaller segments to help fit the LEDs around the mask. He then soldered the power and data lines together so that he could still control the LEDs as if they were one strip and not the several segments he cut them into. He needed a pretty bulky battery pack to power the whole thing. You can imagine how much power 104 RGB LEDs would need to run. We recommend adding a battery protection circuit next time as these LEDs probably draw a hefty amount of current.

He designed his own controller board featuring an ESP8266 microcontroller. Given its sizable internal memory, the ESP8266 makes it easy to store a variety of LED patterns without worrying about running out of programming space. He’s also hoping to add some WiFi features in later revisions of his mask, so the ESP8266 is a no-brainer. Additionally, his controller board features three pushbuttons that allow him to toggle through different LED patterns on the fly.

Cool project [splat238]! Looking forward to the WiFi version.

Continue reading “A Face Mask That’s Functional And Hacker-Certified”

Capture The Flag, Along With The Game Data

With events of all sizes on hold and live sports mostly up in the air, it’s a great time to think of new ways to entertain ourselves within our local circles. Bonus points if the activity involves running around outside, and/or secretly doubles as a team-building exercise, like [KarelBousson]’s modernized version of Capture the Flag.

Much like the original, the point of this game is to capture the case and keep it for as long as possible before the other team steals it away. Here, the approach is much more scientific: the box knows exactly who has it and for how long, and the teams get points based on the time the case spends in any player’s possession.

Each player carries an RFID tag to distinguish them from each other. Inside the case is an Arduino Mega with a LoRa shield and a GPS unit. Whenever the game is afoot, the case communicates its position to an external Raspi running the game server.

If you haven’t met LoRa yet, check out this seven-part introductory tutorial.