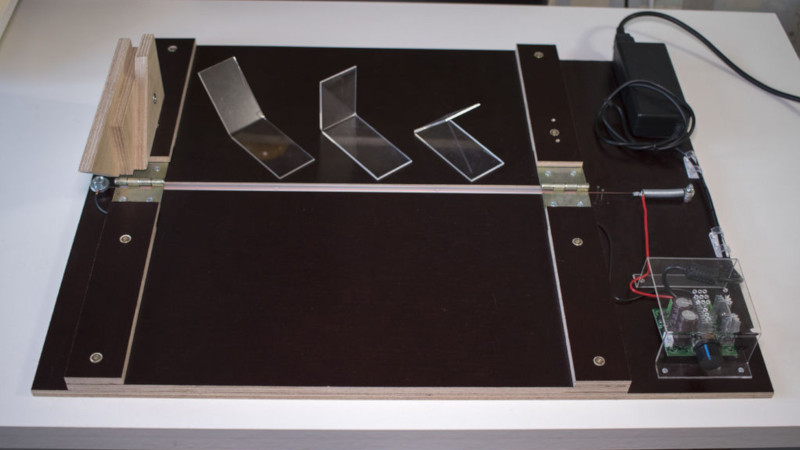
Acrylic is a popular material. It’s easy to find, attractive, and available in all manner of colors, thicknesses, and grades. Being a thermoplastic, it’s also simple to apply heat and form it in various different ways. If you’re wanting to build parts out of sheet acrylic, you might find a purpose-built bender useful. [DIY Perspective] built just such a tool to get the job done.
Plywood is used as the base of the tool, and several off-the-shelf hinges are used to make the folding apparatus. Stops are cut out of scrap wood to allow the bender to accurately recreate angles of 45, 90, and 135 degrees. Heat is supplied via a nichrome wire, powered by a laptop power supply and a PWM controller. This allows the temperature of the wire to be controlled, to avoid melting or otherwise damaging the acrylic being bent.
If you find yourself routinely working with acrylic, you might find this tool useful to have around the workshop. Vacuum forming may also be relevant to your interests. Video after the break.


Has HaD covered this one before?
The black folding fiber board with a V-notch looks familiar.
Very nice and clean build. I’ve built a similar one a couple of years ago https://photos.app.goo.gl/YajTVPyrLgonod7p6
https://hackaday.com/2014/03/06/make-a-plastic-bender-using-stuff-you-already-have/ very similar. gave me deja vu too.
I made one last year after reading that too.
Added a ruler screwed on the left to have accuracy and repeatability.
You can find very cheap Kanthal wire in vape shops (if you can stand that sweet smell more than 10 secs ;o), the longer the wire is, the more power it needs, for a 50 cm wire, it needed a small 24 v LED power supply.
Can someone figure out how you would use this to make the Z-bends of the housing for the pwm controller?
Give me a few and I’ll upload a quick Sketchup image of how that would work.
Do you mean @ 07:05 in the video?
You first do the middle 2 bends.
Then you heat one of the outer bends, and if the acrylic is hot you put the short ent to be bent on a flat surface.
Repeat for the 4-th bend.
I see a few (small) improvements which can be made to the setup of the video above:
– Make it asymmetric. Make one of the flaps short (a few cm) so Z-bends can me made on the machine. *1).
– Make it so the hinge can be folded 180 degrees, for easier storage.
– Add a piece of wood or a steel ruler with same length as the material to be bent to make the bend (even more) even.
*1). If one side is short then you can first do the 2 middle bends into a U-shape. then you can put it “upside down” in the bender for the 2 outer edges.
Nichrome Wire Calculator
http://www.jacobs-online.biz/nichrome/NichromeCalc.html
Jacobs
http://www.jacobs-online.biz/nichrome_ribbon_wire.htm
:
I’m sure almost anyone working with acrylic already knows – but for the new-to-the-gamers…
If you want to improve the look of the cut edges, take your cut but unbent sheet and stick it in the middle of a phone book with the edge JUST barely protruding. (With practice, you can dispense with the book, just putting the edge upright.)
Get a small propane or butane torch, and ‘dance’ it over the edge.
If it burns, you’ve hit it too hard (why you’re using a practice chunk, right?!).
It should just barely melt. It gives a great looking glass like rolled over edge.
Another newbie tip: If you’re wondering how to time your bends – if it ‘boils’ (gets little bubbles in it), you’ve gone too far. Nothing will fix it, just don’t go that long next time!
I wonder if putting a variable timer circuit on this would be a good add-on? Use an Arduino or something to drive a relay. Maybe a few push buttons to drive it at some common time intervals that worked for your needs. You could come up with a chart of time vs thickness, to make more consistent results.
What’s a phone book?
It was an ancient device from the before time. It contained words and numbers. Nobody really knows what they were for. Some suspect it was for law enforcement to inflict pain, while not leaving bruise marks.