When I went to a hacker camp in the Netherlands in February I was expecting to spend a few days in a comfortable venue with a bunch of friends, drink some beer, see a chiptune gig, and say “Ooh!” a lot at the exciting projects people brought along. I did all of those things, but I also opened the door to something unexpected. The folks from RevSpace in the Hague brought along their portable forge, and before long I found myself working a piece of hot rebar while wearing comically unsuitable clothing. One thing led to another, and I received an invite to come along and see another metalworking project of theirs: to go form ore to ornamental technology all in one weekend.
From Dirt To Space is a collaboration between Dutch hackerspaces with a simple aim: to take iron ore and process it into a component that will be launched into space. The full project is to be attempted at the German CCCamp hacker camp in August, but to test the equipment and techniques a trial run was required. Thus I found myself in a Le Shuttle car transporter train in the Channel Tunnel, headed for the Hack42 hackerspace in Arnhem where all the parties involved would convene.
First, build a blast furnace
![A blast furnace, with associated chemistry. OpenStax [CC BY 4.0 ]](https://hackaday.com/wp-content/uploads/2019/04/blast-furnace-diagram.jpg)
Iron ore takes the form of iron oxides, and to make metallic iron it must be reduced — the oxygen atoms must be stripped away. This is performed in a blast furnace. These are vertical furnaces charged at the top with a mixture of crushed ore and carbon. With careful control of the air pumped into the bottom of the furnace, the carbon burns incompletely to produce a large amount of heat.
The furnace will reach a temperature somewhere over 1500 Celcius, and very hot carbon monoxide (CO) gas is produced. This hot CO passes up through a layer of ore and forms the reducing agent, stripping away the oxygen from the iron to form carbon dioxide, or CO2. At the top of the furnace any remaining CO burns off when it reaches fresh air, meanwhile the iron will coalesce as molten metal and collect in the bottom of the furnace as a mass of hot metal referred to as the bloom.
There are also impurities such as silicates in the iron ore which melt into a glass-like substance referred to as slag, which should form a layer floating on top of the bloom. There will usually be a flux such as crushed limestone added to the ore to make the slag more liquid, and the ore will also be roasted beforehand to drive off any water and other volatile compounds.
In its chemistry the process is surprisingly simple, but in its operation there are a huge quantity of variables that can cause it to fail. The purpose of the weekend was to gain experience and identify those parts which would present problems.

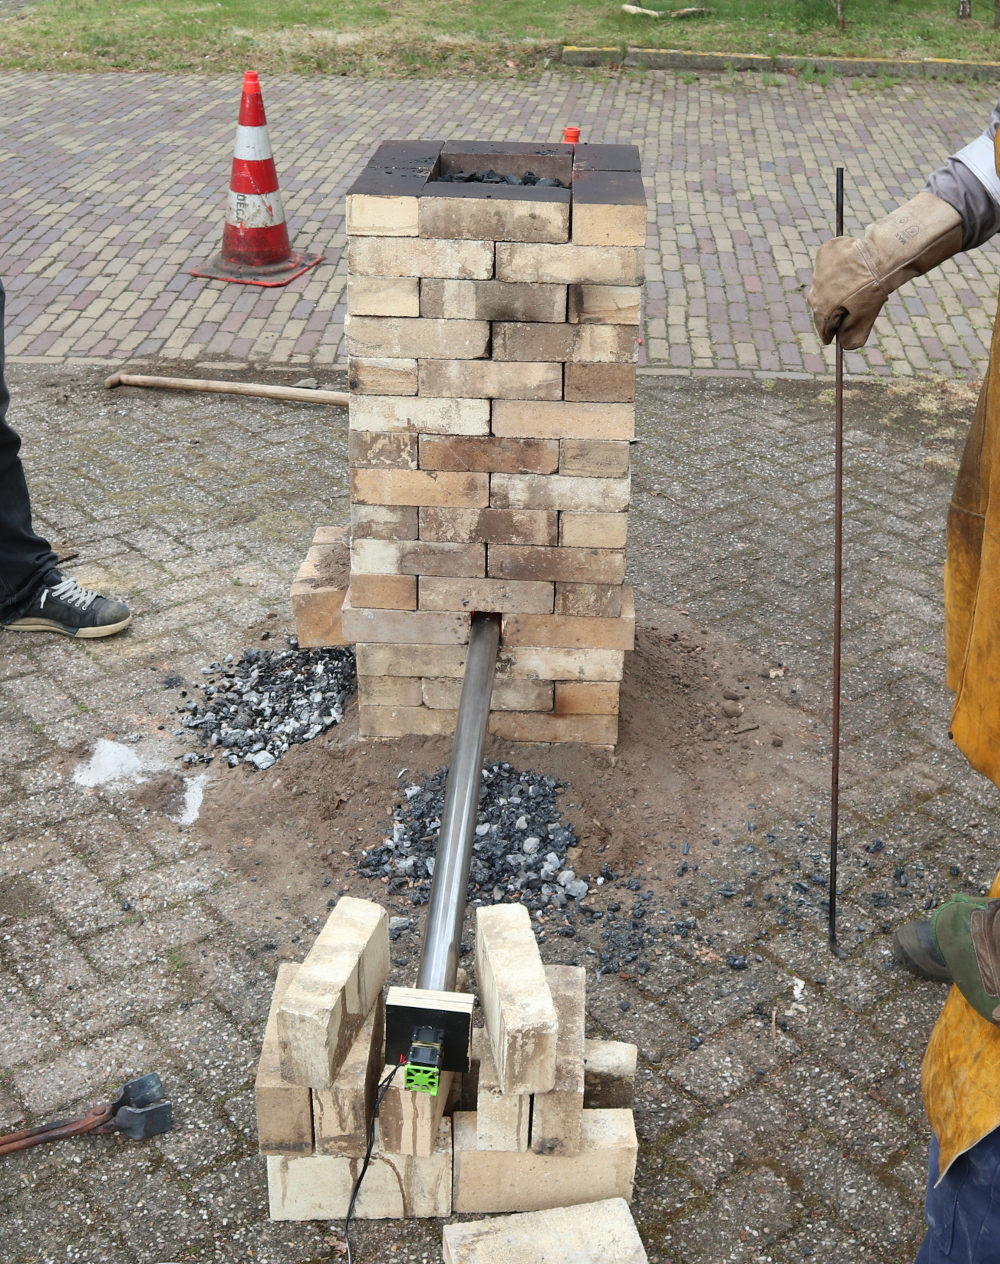
The furnace built for the weekend behind Hack42 was a simple enough affair, a vertical chimney of firebricks on a bed of sand, with a well in the bottom for any iron to collect, three easily removable bricks in the side to allow for slag evacuation, and a small gap between the bricks on one side for the air injector, or tuyere. This was simply a stainless steel tube with a couple of high-capacity processor fans blowing air through it, it seems that a hazard of home blast furnaces can be too much air injected. The fuel was barbecue charcoal rather than the coke you’d expect in industry, and unusually the ore was not mined haematite or magnetite, but bog ore — accretions of iron oxides and hydroxides precipitated by bacterial action on iron-rich groundwater — from a farm in the northern Netherlands. This ore had been through the roasting process in the RevSpace kiln, so was in brittle and easy-to-crush black lumps rather than the solid stones that usually emerge from the ground. The first task of the day was to crush both ore and charcoal with mallets to lumps about 10mm across, then it was time to begin lighting and charging the furnace.
Smelting: a Pyromaniac’s Delight
Lighting a blast furnace of this size is surprisingly easy, it was started with some smaller wood and a blowtorch, followed by some firewood to preheat it and build up a good fire in the bottom. They used a charge of wood pellets before turning on the air supply with the aim of creating a layer of fine charcoal in the very bottom through which the molten iron could seep, this proved to be a mistake as the pellets coalesced together as they burned and had to be cleared with a poker through the air hole. With the fire well under way it was time to charge the furnace with equal numbers of 1 kg measures of both charcoal and ore, a process that continued to keep it full over the whole time it was in operation.
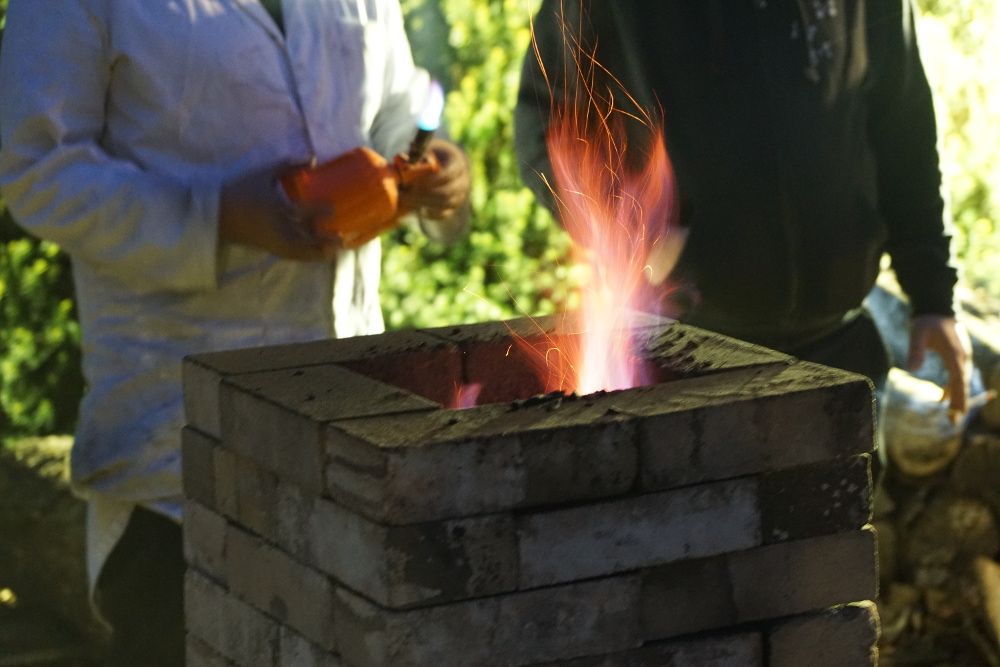
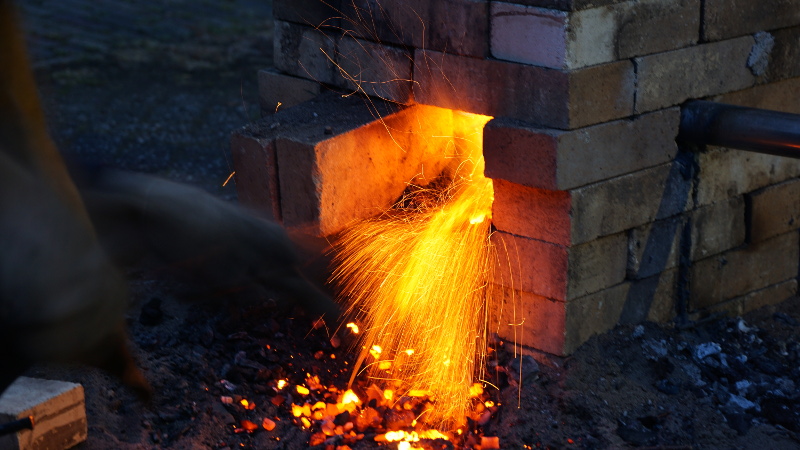
As the fire really took hold it was obvious that it was burning as we intended it to. The audible note changed to more of a high-pitched roar, and the black soot which had collected during the early firing in the furnace mouth burned away when the heat reached the top. A pinkish flame indicated the presence of carbon monoxide, and it was visible how the red iron oxide (Fe3O4) ore was being turned to black iron oxide (FeO) in the mouth of the furnace. We had to be careful to stay upwind of the furnace, as even with the flames it was producing significant quantities of poisonous CO.
The firing proved to be more problematic than anticipated. Some sand had been added as a flux to make the slag easier to handle, but it still appeared to be clumping in the hot zone of the fire and needed regular dislodging with the poker. This became a regular process, sometimes accompanied by an impressive river of red-hot molten slag and at others by solid lumps of red-hot slag. We were pleased to find a few pea-sized pieces of iron in the slag, at least something was working.
Breaking it down and retrieving some iron
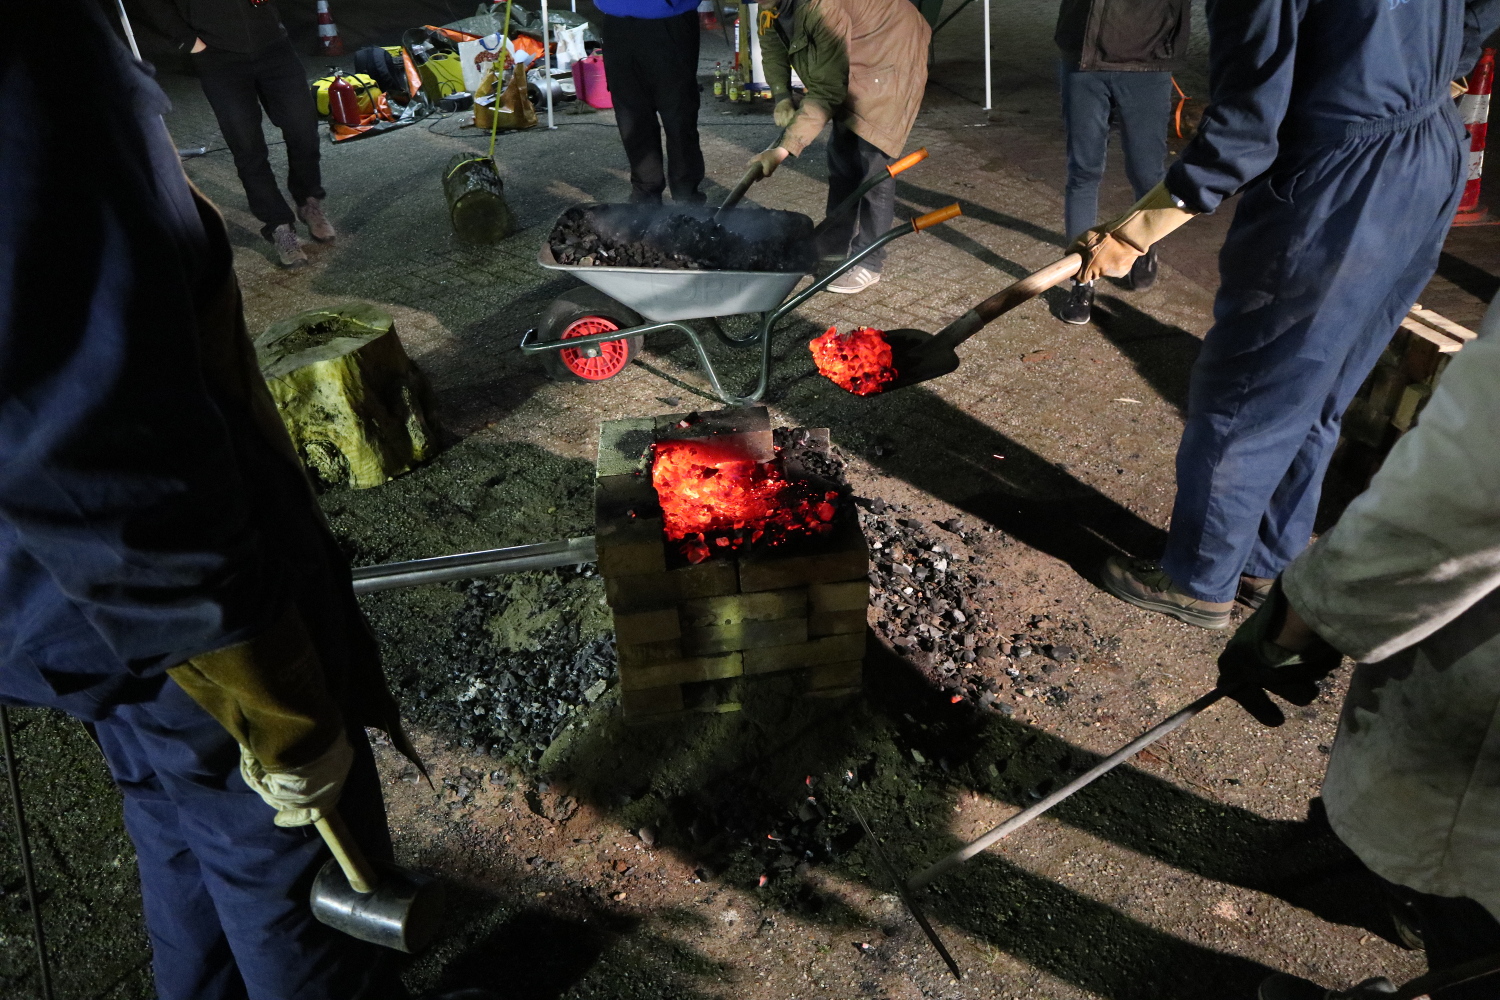
This process continued throughout the day, which by coincidence was the Netherlands king’s birthday and a day of national celebration. Dutch delicacies were consumed, and as a contribution to the festivities in the spirit of international harmony I’d brought along a gallon of my cider. It was clear meanwhile that the furnace wasn’t running as smoothly as we’d have liked, and in the evening the air supply was switched off and the slow process of dismantling the furnace began.
The hot ore, ash, and slag were shoveled away layer by layer, and as it was stripped away we could see at first hand how the burn had been structured. In the bottom we didn’t find the large bloom we’d hoped for but something closer to several golf-ball-sized lumps of iron as well as a significant quantity of slag. It was clear that we’d reached the right temperature because there was some fusing evident in the firebricks closest to the tuyere, but it was also clear that the hottest area had been rather small and concentrated to that side. The next step will be to work the iron to drive out impurities and try to bring it together into one mass. If continued for long enough, this would have created an impure wrought iron.
What does a day with a blast furnace teach you?

So, what did we learn, and what will the Dirt to Space team do differently next time? The discussion centered around the tuyere, and how its job should have been to project enough air into the centre of the furnace. A revised design was proposed, involving firing several ceramic tuyeres with a nozzle designed to produce more of a jet of air from all sides. To smelt iron at all in such a furnace is something of a success, and whether or not they perform another test before the summer camp it’s sure that next time it can only be more successful. Meanwhile I know that my August visit to Germany will involve taking part once more in the feeding and care of a small blast furnace. I love our community!
As a final note, I would like to extend my thanks to the Hack42 folks for being such pleasant hosts, to the RevSpace folks for bringing their forge and other kit, and to all the other friends who turned up and made it such an excellent weekend. And to my friend Martina, in whose much-nicer-than-mine car we wafted in style across the continent.
Header image: Tapping the slag. © Martina Short, used here with permission.


I loved watching it from the sideline, was an interesting sight to see. Too bad it did not turn out the way they hoped to be.
Sure they’ll improve on it next time.
This amateur’s observation from your writing.
Bog ore, maybe not high enough Fe content considering the impurities?
Was the sand for the slag also preheated to drive off the H20?
10 mm ore and lime, too large of pieces for the this small of furnace?
Walking before running, has Hack42 made iron the way it was done before the blast furnace was invented?
Keep the blacksmith articles coming Jenny!
All may be valid points. This was their first try, so to achieve any iron is a result.
And yes, more on its way.
Bog Iron is an excellent ore for basic smelting. The main “problem” here is expectation. The furnace here, while technically a “Blast” furnace as it is force fed, is more accurately described as a “Bloomery” furnace. The difference is really one of scale and efficiency rather than any fundamental design difference, although large scale bloomeries can be natural draft. A yield of 10 percent pure Iron would be an excellent result for a first effort with a bloomery, up to 20 percent for a refined design. The majority of the iron is reduced to elemental iron but bound up in the slag, in a form sometimes called “Sponge Iron”. The outputs would be molten Iron, Sponge Iron, and Iron rich slag (Fayalite). The Sponge Iron can be re-melted to recover more iron, or forge worked if it is pure enough.
Sounds to me like the furnace performed as it should. If they want rivers of molten Iron and slag, they just need to scale way up.
To clarify – the reason it doesn’t produce molten iron in any great quantity is because it operates at too low a temperature. The ore will reduce to elemental iron through a chemical process quite happily at 1000 – 1100C, remaining solid but fragmented throughout the process. This is hot enough to weld the fragments together, but below the melting points of Fayalite (1200C) and Iron (1535C), resulting in a spongy mass of pure iron, silicon, charcoal, unreduced Iron oxide etc. Some areas of the furnace in the air blast will rise above these temperatures, resulting in some melting, and some of the near liquid iron will absorb excess carbon, dropping its melting point down to the 1150 – 1200C, resulting in more melting. Some of the cast iron downb in the air blast will get decarburised back to steel and re-solidify. At the end there is a hodge-podge of cast iron, steel, melted and solidified slag, un-melted silica compounds, welded elemental iron, iron oxide and charcoal, in a big lump called a bloom.
To get pure molten iron and slag – add more heat, but be prepared for cast iron.
Plus, I was under the impression the “more heat” is in the form of pre-heated CO rich gas which you could achieve through a pre-burner stage. Having CO available is crucial to the reduction reactions.
I don’t think they wanted rivers of molten iron, but they hoped for a bigger lump thereof.
But yes, valid points. It was obvious though that the hot zone wasn’t large enough and more tuyeres to spread it across the cross section of the furnace would improve matters.
The wood that you use for the charcoal makes a big difference, hornbeam was used extensively, in the early days of the industry.
I don’t know what the wood was, in that it was commercial charcoal of the type sold for barbecues and the like.
If they have the time, they’d probably get better results by making high quality charcoal themselves from the right type of wood. The barbecue stuff is very often terrible quality, contains lots of rubbish and is often not fully carbonized. It certainly helps to pick through it and remove any lumps that don’t have that nice sharp ringing sound when handling. Poor quality of the charcoal could contribute significantly to the amount and consistency of the slag. Alternatively, it’s possible to just buy cokes in bags. (If in/for germany, a random google searchs led to: https://www.brennstoffe.kaufen/feste-brennstoffe/#koks. There might be cheaper options out there, but roughly €200 euros for 300 Kgs including sales tax and delivery sounds about right and probably not much more expensive than using barbecue charcoal. Bought cokes will certainly require hammering to smaller size, size 3 is still a bit large for that furnace used.)
If you’ve got an hour and three quarters to spend, you can go way, way back to basics in Africa:
https://youtu.be/RuCnZClWwpQ
There is one I saw on PBS-Nova I think that was twice as tall in Africa and started with the clay fired blow pipes and animal skin bags to blow thru them. There were no valves in those blow bags, two per blow pipe. Got an idea what 2 bags and a short pipe looks like? For the next many hours the men stomp and lift feet on the bags in alternating rhythm and make love to the furnace. Then it (metal) comes.
I’ve seen this done on the British mainland also in a video on youtube as a reenactment… I forget where. Might not be the exact same method with two bags as I recall seeing more than one video now that I think about it where only one was used. Seems they dug a whole in the ground and built up the furnace/bloomery.
Nice try! Always wanted to try this but have not yet. Somewhat bigger furnace as a minimum is usually indicated even for a cupola for melting scrap, and sand may have robbed heat as Ren said above from water but also as the melting temp is much higher than lime. Loss of heat or introduction of coller air through holes between bricks?
Very cool… they made iron from fire and dirt!
A larger furnace would be helpful in heat retention, which would lead to higher interior temps. However, it is isn’t a too big of an issue. I’ve melted steel in furnaces that measured only 20 cm by 20 cm by 41 cm and also in some much larger furnaces. The biggest issue is getting blast penetration throughout the cross section of the furnace in combination with the right amount of air. Adding a few more tuyeres will help with increasing the melt zone inside the furnace. Another thing they may consider is angling the tuyere, that will help increase the melt zone size.
The type of wood used in the charcoal doesn’t matter a whole lot. Hardwood charcoal has a higher energy content, but softwood charcoal (pine) burn faster and hotter but is less energy dense. I make my own for furnace experiments and use everything from aspen and pine to russian olive. Stuff purchased from the store should do the trick though.
Lee Sauders and Skip Williams are the guys I read from when I started into steelmaking. They’ve got some insights that might help. I’d also recommend Rehder’s The Mastery and Uses of Fire in Antiquity. It has become my go to for quick reference and insight.
https://www.leesauder.com/smelting_research.php
https://www.tf.uni-kiel.de/matwis/amat/iss/kap_a/advanced/aa_2_5.html
You guys did some amazing work though. It took me a while to get to that point, but it is exhilarating. Keep up the good work.
Exactly the conclusion they came to.
And yes, for a first try everyone was pretty chuffed to have produced any iron at all. I’m looking forward to their next effort.
Articles like this are inspiring. In my opinion we’ve reached such a level of technological development that we’re losing the knowledge of where does all this technology comes from, at least outside of specialized companies.
Wondering if they know somewhere not to distant where they can mine, or even maybe on the surface find other than say railroad track beds, coal. Not sure where coke could be foraged.
The key ingredient you are missing is heat. Large blast furnaces use heat exchangers (large boxes of loosely piled fire-brick – a/ heated by flue gas and b/ heating inlet air, periodically switched a-to-b and b-to-a.) You could try that.
I suggest using a tall clay tile chimney liner as your furnace, filled perhaps half way, with the top end 80 or 90 % closed.
Pile fire bricks around it so that the area of the gap is about 10 % of the area of the chimney liner. Something like 1/4 inch or 5 mm between liner and bricks. This should act as a counter-current heat exchanger. For safety, this should be supported from all sides.
Build this, base as before, with fire bricks spaced to give only a few % of the chimney liner area, to act as tuyeres, and as a base to hold everything up. Build a plenum above and around this, sealed with clay. Mount a small steel squirrel-cage fan centred on a cut-out in a steel sheet, to match the inlet to the fan impeller. This should be a loose bearing. The sheet separates the hot air from the exchanger above and the blast air to the tuyeres in the plenum below. A point sitting in a cup can be used as a bottom bearing, and adjusted for a reasonably close fit between sheet and fan impeller. Dimensions will change as it heats up. Mount a small motor on a long shaft, shielding it from excess heat. Match the motor with the appropriate AC or DC variable speed drive (perhaps a drill or from a sewing machine.) Increase the gap between the bottom of the chimney liner and the bottom layer of fire brick leading into the fan, for more even air-flow.
If you find that you have problems with some of the tuyeres clogging, try separate fans and plenums on all 4 sides, or
reducing the area of the tuyeres and raising the fan rpm. You could also use a multistage blower from a vacuum cleaner.
If you build some thermocouples into critical places, you can use the readouts to follow how things are going, but I don’t
see you trying to measure the temperature of molten slag or iron directly, other than by opening a window and using a
hand-held infrared pyrometer such as the PCE -895 that can measure up to at least 1600 C. You could also use bits of
brass, aluminum, lead, or solder to see if you reached their melting points.
Thermocouples will tell when you get close to steady state, I expect it will take a long time for all the bricks to heat up to
a reasonably constant temperature. Keep adding charcoal/ore/sand mix to maintain fill level. Alternatively, adding separately in layers may be significant.
You have a high surface-to-volume ratio, compared to the big blast furnaces. Adding a larger proportion of charcoal may compensate. Coke, being harder, may have an advantage keeping gas flow more open and uniform. I don’t know if my suggestions will work, but I would be interested in the results.
Even if all else fails, you built a “blooming” blast furnace – in both senses of the word!
I failed to remember one key point from a lecture I heard 50 years ago. I did a little digging and found:
Carbon monoxide from the flue gas is burned in “stoves” that are used to heat the air to the blast furnace.
See after “Hot blast” in:
https://en.wikipedia.org/wiki/Blast_furnace
You are going to need something like two adjustable furnace fans for the stoves. I suggest something like old hot water tanks, with the tops cut off, cut open at the bottom, and lined with fire clay. Build fire boxes at the bottom, with solid support for a loose filling of fire bricks on top.
Air flows through one stove to the tuyeres of the blast furnace, and flue gas from the blast furnace is fed to the burner of
the other stove, where it is burned to heat the cold stove and vented. Once this stove is hot, the gas flows are switched.
I suggest using one fan to always feed air to the hot stove and the other to feed air to the cold stove burner, and switching the air flows, so that you can optimize flows and temperatures.
Some strategically placed thermocouples, a peep-hole sighted through a tuyere, and an infrared pyrometer would help, too.
You will need some simple valves that seal well at high temperature. Uncontrolled ignition of mixtures of flue gas and air can cause gas explosions. If the tops of the stoves and the blast furnace seal well, but are only held in place by gravity,
they should vent any gas explosion relatively safely. You should attach the tops with a length of slack chain, to keep them from flying too far.
Hot piping needs to be lined and well sealed. Remember, carbon monoxide can be deadly. Consult with a physician – a
cylinder of breathing oxygen may be a good idea.
Similarly, with the blast furnace. If cut and re-assembled near the bottom, it would enable recovery of batches of slag and iron. You could try tapping it, as well. The top needs to be loose/removable, but you may want an air-lock to enable
continuous feeding, too.
A rod with an “L” or a small plate at the bottom, run through a snug hole in the top of the furnace could be used to feel the
level inside the blast furnace.
Good luck!