It’s been just over a year since E3D whetted our appetites for toolchanging printers. Now, with the impending release of their first toolchanging system, they’ve taken the best parts of their design and released them into the wild as open source. Head on over to Github for a complete solution to exchanging, locating, and parking tools on a 3D printer.
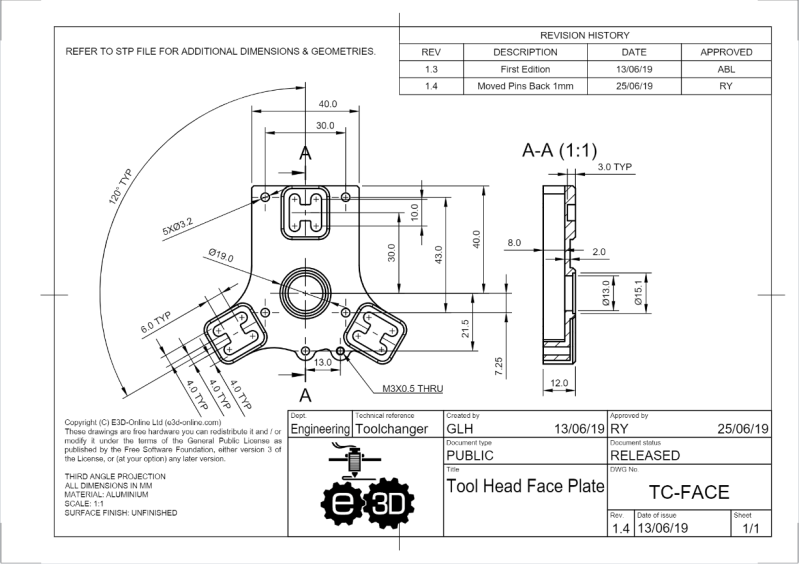
For anyone interested in fabricating the design, the files are in a format that you can almost re-zip and email to a manufacturer for quotes. As is, the repository offers STP-style CAD files, a complete set of dimensioned drawings, exploded views, and even a bill of materials. Taken as a whole, the system elegantly solves the classic problems that we’d encounter in toolchanging. Locking tools is done with a spring-based T-bar that swivels onto an wedge-shaped groove on the back of each tool plate. Locating tools is done so with a 3-groove kinematic coupling fabriacted from dowel pins. With these problems solved and presented so cleanly, these files become a path by which we can establish a common means for exchanging tools on 3D printer systems.
It’s worth asking: why develop an exceptional design and then release it for free? I’ll speculate that E3D has done an excellent job over the years establishing a well-recognized standard set of stock parts. Nearly every 3D printer builder is bound to have at least one spare V6 hotend sitting idle in a disassembled pool of former-3D-printers. With tool-changing positioned to become another step forward in the space of possibilities with 3D printing, setting the standard for tools early encourages the community to continue developing applications that lean on E3D’s ecosystem of parts.
In the last 30 years, 3D printing has transformed away from a patent-trolling duopoly to a community-friendly group of contributors that lean on each other’s shoulders with shared findings. It’s a kind gesture to the open-source community of machine builders to receive such a feature-complete mechanism. With that said, let’s start rolling the toolchanger hacks.


Pardon my ignorance but why would you want to do an FDM 3d printer tool change? Drag knife, laser module, different nozzle for different materials?
I’m no expert but maybe to be able to change to different extruder for different plastic types, ie. one extruder with an hardened nozzle for composite. one for flex, etc…
Multi material printing. Some printers already have two or more print heads for that. With a tool changing setup you could have a couple more. And without dealing with all the crutches that enable multi material printing with a single extruder.
1. Print multiple types of filament on the same job or change colors without operator intervention
2. Print larger parts that would require more than 1 spool of filament
3. Use leftover partial spools of filament. e.g. I have 3 partial spools too small for a job I could use all 3 partial spools.
4. Because I can. This is Hackaday after all ;-)
I am sure there are other reasons
Because I can is the most valid reason to do almost everything
Paige no!
For point 4 I would love to give you a “like” if I only could…
different materials for sure, but a laser module would be interesting to see how one could mix additive and subtractive together. You could also do the same material in different nozzle sizes.
A drag knife doesnt make sense to combine with anything else and the platforms are generally too small to do any decent sized cuts.
But i think the big one is different materials and different colors. Right now to switch colors with a single hotend you have to purge all of the plastic by pushing the next material/color through, this causes alot of waste as you have to make sure that all of the old color has been pushed out and there is no contamination from the mixing of the two materials/colors still left in the hotend. Having changable tools gets rid of that waste and also the wear and tear on the nozzle from it.
I think, two differently sized nozzles and smart slicing can halve the printing time, while keeping the details and infill ratio.
On top of what other people have already said, tool changers like this add the ability to mix in some pick and place electronics to embed them inside prints, subtractive manufacturing tools like mills, cameras for an automated inspection of the print progress. I think it’s more about expanding on the FDM machine, rather than just adding more FDM capabilities to it.
There are also possibilities for part insertion as well (ex: an attachment to drop in bearings, or magnetic pieces, or hex nuts, or threaded inserts, followed by taping or extruding on top. Another possibility is a glue extruder, or UV cured polymer.
Pick&place, camera, little and big bore for different parts of model, dissolvable support material. There are many options for different applications. My last one was standard (but very good) FDM, and head that we designed for very fast application of PVC highly filled with crystals of salt. No tool changer though, elevator style mechanism.
I am quite curious about what goal PVC filled with salt is intended to achieve. Dissolve the salt to get porosity?
Joshua, it is great news that E3D released blueprints for the toolchanger. On the other hand, I hope it doesn’t stop the great work you have been doing on the topic. Many of us are looking forward to your releasing more details. This is definitely the most exciting development in open source hardware design.
Thanks for your eagerness and kind words. Don’t worry; I’m not stopping any time soon. I am working towards a platform that’s compatible with both tool plates, however.
I’ll say that I’m about two months away from a full open source platform release, so stay tuned!
Having several extrusion channels also makes it possible to have several nozzle diameters, for example to fill the inside of the parts quickly and without precaution, without sacrificing the fineness of the details on the walls.
I saw this system working at 3DMeetup Sverige, and it’s undoubtedly quality engineering.
However, the very principle of a tool changer leads to a massive mechanical system, and a very significant switching time. From the outset, this is not suitable for a really fast printer.
Several light hot-ends on the same effector may be more relevant, if the switching is very fast, and if the whole system is clean enough to avoid oozing and therefore the use of a purge tower….
A tool changer really doesn’t have to be massive or heavy, especially with the new smaller motors, and the with Joshua Vasquez had been doing with cable driven changers, both of which are extremely lightweight. A lot lighter than a second hotend on the same head.
Tool changing is not slow at all, a lot of people seem to think this and I’m not sure why. A change takes just a few seconds. Layers take multiple minutes, the actual penalty for using tool changing is a just a few percent in most circumstances.
I don’t know if you could really just “send this out” for manufacturing… it looks like all the drawings are missing the gd&t which I feel would be critical for the performance of something like a toolchanger. Guess that’s probably in the non-public drawings?
use a +/- 0.1mm tolerance on all of that and you would be fine. A quick skim through and I didn’t see anywhere saying to use hardened dowels and balls for it which is fairly important for kinimatic systems.
Any chance one of you knows the part number for the “rails” that they use for the X and Y axis?