Raspberry Pi Catches The Early Bird

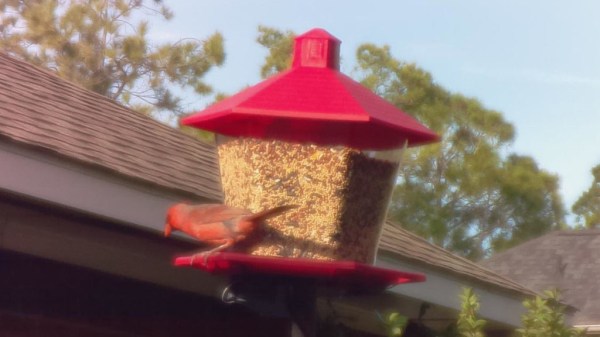
If you live in an area with high bird activity, setting up a bird feeder and watching some hungry little fellows visit you can be a nice and relaxing pastime. Throw in a Raspberry Pi with some sensors and it can also be the beginning of your next IoT project, as it was the case for [sbkirby] with his Bird Feeder Monitor project.

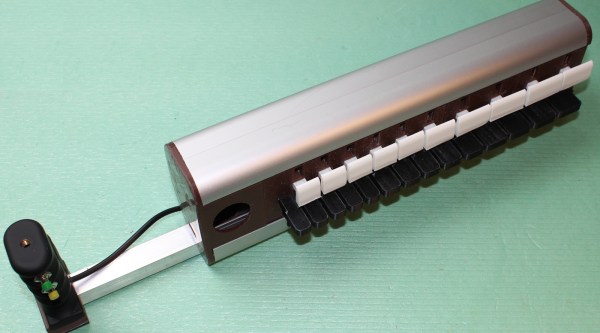
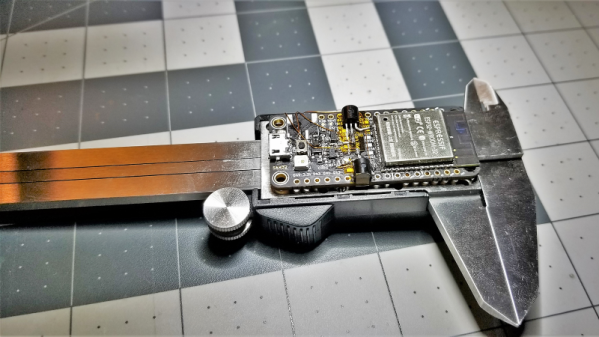
To track the arrival and departure times of his avian visitors, [sbkirby] attached a set of capacitive touch sensors to each side of his bird feeder, and hooked them up to a Raspberry Pi Zero W via a CAP1188 breakout board. The data is published via MQTT to another Raspberry Pi that serves as backend and stores the data, as well as to an optional additional camera-equipped Pi that will take a picture of each guest along the way. Taking into account that precipitation might affect the sensor readings, he also checks the current weather situation to re-calibrate the sensors if necessary, and also to observe a change in the birds’ presence and eating behavior based on weather conditions.

It seems that sensor-based animal feeding will always serve as inspiration for some new projects, whether feeding the animal itself is the goal, like most recently this fish feeder has shown, or whether the eating behavior is monitored and used for further research such as this squirrel-based weather forecast system.

Understanding Elliptic Curve Cryptography And Embedded Security

We all know the usual jokes about the ‘S’ in ‘IoT’ standing for ‘Security’. It’s hardly a secret that security in embedded, networked devices (‘IoT devices’) is all too often a last-minute task that gets left to whichever intern was unfortunate enough to walk first into the office that day. Inspired by this situation, All About Circuits is publishing a series of articles on embedded security, with a strong focus on network security.

In addition to the primer article, so far they have covered the Diffie-Hellman exchange (using prime numbers, exponentiation and modular arithmetic) and the evolution of this exchange using elliptic curve cryptography (ECC) which prevents anyone from brute-forcing the key. Barring any quantum computers, naturally. All three articles should be understandable by anyone, with a simple, step-by-step format.

The upcoming articles will cover implementing security on microcontrollers specifically.  For those who cannot wait to learn more, Wikipedia has a number of articles on the topic of Elliptic Curve Cryptography (comparing it to the more older and still very common RSA encryption) specifically, as well as the Elliptic-Curve Diffie-Hellman key agreement protocol as discussed in the All About Circuits article.

A detail of note here is that the hardest problem in secure communications isn’t to keep the communications going, but to securely exchange the keys in the first place. That’s why a much much computationally expensive key exchange scheme using an asymmetric (or public-key) cryptography scheme  is generally used to set up the second part of the communications, which would use a much faster symmetric-key cryptography scheme, where both parties have the means to decode and encode messages using the same private key.

All the math aside, one does have to wonder about how one might denote ‘secure’ IoT. Somehow ‘SIoT’ doesn’t feel very catchy.

Sprucing Up A Bell & Howell Model 34 Oscilloscope

We’ll admit it, in an era when you can get a four channel digital storage oscilloscope with protocol decoding for a few hundred bucks, it can be hard not to see the appeal of analog CRT scopes from decades past. Sure they’re heavy, harder to use, and less capable, but they just look so cool. Who could say no to having one of these classic pieces of gear on their bench?

[Cody Nybo] certainly couldn’t. Despite the fact that he already has a digital scope, he couldn’t pass up the chance to add a Bell & Howell Schools Model 34 from circa 1973 to his collection. It needed a bit of TLC before it could be brought back into service, but now it’s all fixed up and ready to put in some work. Not bad for a piece of gear with nearly a half-century on the clock.

The restoration of the Model 34 was aided by the fact that [Cody] got the original manual and schematics for the scope in the deal, which he was kind enough to scan and upload for the rest of the class to enjoy. Those of you who have worked on older electronics can already guess where the scope needed the most love: all the capacitors needed to be swapped out for fresh ones. He also found a few resistors that were out of spec, and the occasional bad solder joint here and there.

Even if you’re not looking to repair your own middle-aged oscilloscope, his pictures of the inside of Model 34 are fascinating. The scope was sold as a kit, so the construction is surprisingly simple and almost entirely point-to-point. Of course, there’s something of a trade-off at work: [Cody] says it won’t display much more than 2.5 MHz before things start getting wonky. But then again, that’s a more than reasonable frequency ceiling for audio work and most hobbyist projects.

Oscilloscopes have come a long way since the days when they had to draw out their readings on a piece of paper. While newer devices have all but buried the classic analog scope, a beauty like this would still have a place of honor in our lab.

MIDI-Gurdy, MIDI-Gurdy, MIDI-Gurdy Man

The hurdy gurdy is the perfect musical instrument. It’s an instrument with a crank, and a mechanical wonderment of drone strings and weird chromatic keyboards. No other musical instrument combines the sweet drone of bagpipes with the aural experience of an eight-year-old attempting to play Hot Cross Buns on a poorly tuned violin.

Now, the hurdy gurdy is going digital. The Digi-Gurdy is [XenonJohn]’s entry into this year’s Hackaday Prize, and it’s exactly what it says on the tin: it’s a musical instrument that drones on and on, with keys plunking out a melody.

If you’re not familiar with a hurdy gurdy, this video is a varily good introduction. It’s a box with somewhere between four and six strings mounted on the outside. The strings vibrate by means of a wooden wheel powered by a crank. There’s a keyboard of sorts along the body of the instrument that ‘fret’ a single string providing the melody; all the other strings are drone strings that sound continuously. I think it was in, like, a Led Zeppelin video, man.

While it’s a slightly complicated build to make an analog hurdy gurdy, delving into the digital domain is easy: [XenonJohn] is building a hurdy gurdy that simply outputs MIDI commands with some buttons and a Teensy 3.6 microcontroller. The parts are 3D printed, and since this hurdy gurdy is completely digital, you can change the tuning of the drone strings without actually tuning them. Awesome.

Hacked Calipers Make Automated Measurements A Breeze

Now, digital calipers with wired interfaces to capture the current reading are nothing new. But the good ones are expensive, and really, where’s the fun in plugging a $75 cable into a computer? So when [Max Holliday] was asked to trick out some calipers for automating data capture, he had to get creative.

[Max] found that cheap Harbor Freight digital calipers have the telltale door that covers a serial connector, making them a perfect target for hacking. A little Internet sleuthing revealed the pinout for the connector as well as some details on the serial protocol used by most digital calipers: 24-bit packets is six four-bit words. [Max] used his SAM32, a neat open-source board with both a SAMD51 and an ESP32 that can run CircuitPython. An inverting buffer interfaces the serial lines to the board, which is just the right size to mount on the back of the caliper head. It’s hard to tell how [Max] is triggering readings, but the SAM32 is mounted as a USB device and sends keystrokes directly to a spreadsheet – yes, with the ESP32 it could have been wireless, but his client specifically requested a wired setup. Taking multiple readings is easy now that the user never has to swap calipers for a pen.

Cheap calipers like these are pretty hackable – you can add Bluetooth, turn them into DROs for a milling machine, or even make them talk.

Project Egress: [Fran] Makes A Latch

[Fran Blanche] is on the team of elite hackers that has been offered a chance to contribute to [Adam Savage]’s Project Egress, a celebration of the engineering that got humanity to the Moon 50 years ago this month. By the luck of the draw, she landed a great assignment: building a replica of one of the fifteen latches that kept the Apollo Command Module hatch dogged down against the vacuum of space, and she’s doing a great job documenting her build with some interesting videos.

The first video below is mostly her talking through her design process, materials choices, and ideas about fabricating the somewhat intricate pieces of the latch. All 44 makers involved in the project get to choose what materials and methods they’ll use to make their parts, and [Fran] decided to use wood. Her first inclination was to use oak and brass, a nice combination with an 80s vibe, but in the second video, which covers more of the initial fabrication, she explains her switch to walnut. Unfortunately, the only CNC option she has is a Shaper Origin, which presents some difficulties; the handheld tool requires some complicated fixturing to safely machine the small parts needed, and its inability to read STL files means that [Fran] is stuck with a complicated software toolchain to drive the tool.

There are more videos to come as [Fran] gets further into the build, and we’re looking forward to seeing how her part and the rest of the makers’ builds come out.

Continue reading “Project Egress: [Fran] Makes A Latch”

E3D’s Love Letter To Toolchanging 3D Printers

It’s been just over a year since E3D whetted our appetites for toolchanging printers. Now, with the impending release of their first toolchanging system, they’ve taken the best parts of their design and released them into the wild as open source. Head on over to Github for a complete solution to exchanging, locating, and parking tools on a 3D printer.

For anyone interested in fabricating the design, the files are in a format that you can almost re-zip and email to a manufacturer for quotes. As is, the repository offers STP-style CAD files, a complete set of dimensioned drawings, exploded views, and even a bill of materials. Taken as a whole, the system elegantly solves the classic problems that we’d encounter in toolchanging. Locking tools is done with a spring-based T-bar that swivels onto an wedge-shaped groove on the back of each tool plate. Locating tools is done so with a 3-groove kinematic coupling fabriacted from dowel pins. With these problems solved and presented so cleanly, these files become a path by which we can establish a common means for exchanging tools on 3D printer systems.

It’s worth asking: why develop an exceptional design and then release it for free? I’ll speculate that E3D has done an excellent job over the years establishing a well-recognized standard set of stock parts. Nearly every 3D printer builder is bound to have at least one spare V6 hotend sitting idle in a disassembled pool of former-3D-printers. With tool-changing positioned to become another step forward in the space of possibilities with 3D printing, setting the standard for tools early encourages the community to continue developing applications that lean on E3D’s ecosystem of parts.

In the last 30 years, 3D printing has transformed away from a patent-trolling duopoly to a community-friendly group of contributors that lean on each other’s shoulders with shared findings. It’s a kind gesture to the open-source community of machine builders to receive such a feature-complete mechanism. With that said, let’s start rolling the toolchanger hacks.