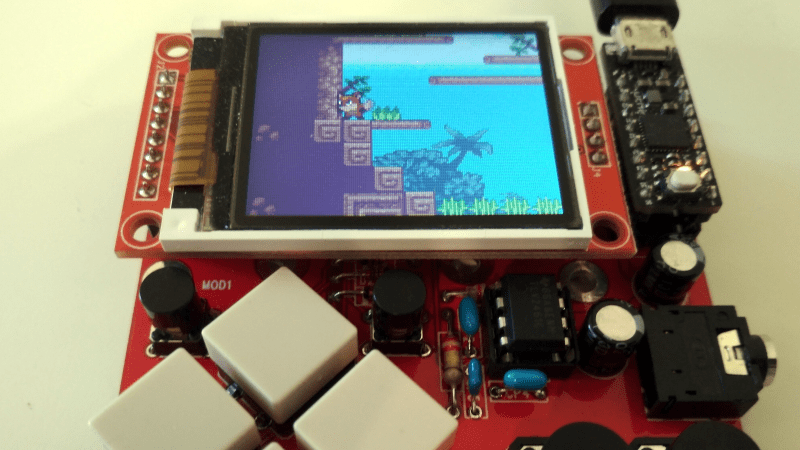
Sure, you can play a bunch of retro games on a Raspberry Pi, but if you’re really hardcore, you build your own retro console and write your own games for it. [Nicola Wrachien]’s entry into this year’s Hackaday prize is his DIY Cortex M0+ game console and the platform game he wrote to test the hardware.
The board that [Nicola] is using is the uChip, a small DIP board based around a ATSAMD21 (the same chip that runs the Arduino Zero). That, along with a 160×128 TFT LCD screen, makes up the bulk of the hardware. A carrier board holds both of these as well as several buttons and an OpAmp.
The ATSAMD21 chip has decent hardware DMA that [Nicola] is using to get the frame rate needed. Since the DMA hardware and the CPU can work at the same time, while the DMA is handling one chunk of graphics, the CPU is working on the next chunk. Using this system, [Nicola] is able to get a better framerate than originally designed. Take a look at [Nicola]’s webpage for more details on the algorithm used.
In order to create a level in the platformer that [Nicola] made to show off the console, [Nicola] created a full blown level editor in Java. Using the editor, you can place the tiles and sprites and set their behaviours. The map can then be exported in an optimized format for loading on to the hardware and into the game.
A video showing off the game is after the break. There’s no shortage of great DIY consoles on the site — check out this impressive vector console, or if RetroPie is more your thing, take a look at this DIY Zelda-playing device.


Impressive! Today we can build at home stuff that made companies like nintendo multimillionaires…
very impressive! The gameplay speed and fluid graphics on that hardware makes me wonder.. if this can be made commercially under $10..
This could be made into a super-cheap gameboy.. the level editor/SDK looks quite polished – it can easily create a sub-culture of kids making their own games and playing it on the go, putting them up in a site and share..
They sell DSO130 oscilloscope kits with buttons, 2 PCB, color LCD and a STM32F303 (M4) for $11 and case for another $2.50 on aliexpress. So trimming off some of the parts and adding LiPo battery could make it a portable gaming system say for $15.
The hardware is trivial now that you can buy these modules and assemble them like solderable Lego bricks, but creating a compelling SDK and a good firmware is still difficult.
I think that every aspiring EE in the past decade or so has gone through this. Cortex-M chips and SoCs like the ESP32 have enormous power and potential, so you get excited and put together a DIY handheld. It works, but then you realize how difficult it is to write a software platform for your device. A 160×128 16bpp framebuffer is only 40KB of RAM, but that’s significant for an MCU.
So after your toy programs and games work well, you realize that you’re next revision will need a ‘larger’ chip with more peripherals, some external RAM, maybe a microSD or USB slot for NVM, etc.
And once those work, you realize that your software will need niceties like a filesystem and an RTOS to manage everything that needs to happen.
It’s a fun progression, and I encourage everyone reading this to design your own handheld. It’s easy, cheap, and if you have no prior experience it is a good way to convince the procrastinating part of your brain to finally learn the basics of how to use a free EDA suite.
And if you include a battery and auxiliary UART/I2C/SPI/etc connectors, you’ll be able to use it for much more than games.
If there was a way to up-vote your comment, I’d do so. I myself learned software development in this manner. First I solve the problem, taking pride in my new algorithm and then when I had to make it user-friendly, comes in the UI and the entire concept of UI loop. As I get more user feedback, it gets more complex with saving option, printing outputs and before I know it – I’m making my own semi-framework.
The dude is one of the uChip creator – it didn’t catch on Kickstarter, most probably because the price was too steep compared to other such dev-boards there. I hope he gets good coverage with this project.
why not fpga? power less
Very cool that he could get such performance out of a M0+. The graphics and flow are certainly impressive. It’s clear he put a lot of thought and hard work into it.
Kudos.
While the original uChip did not meet its 23K goal on Kickstarter it did get 20K of pledges. I’d say a pretty good number. Itaca went ahead and built uChip anyway and sells it on their website.
https://shop.itaca-innovation.com/
But you also have another chance to get it through Kickstarter. We are bundling the uChip with our BASIC for the SAMD21G18 on a new Kickstarter project.
https://www.kickstarter.com/projects/703885653/basic-compiler-for-arduino-zero-boards
If you don;t want to use BASIC, you can always overwrite it.