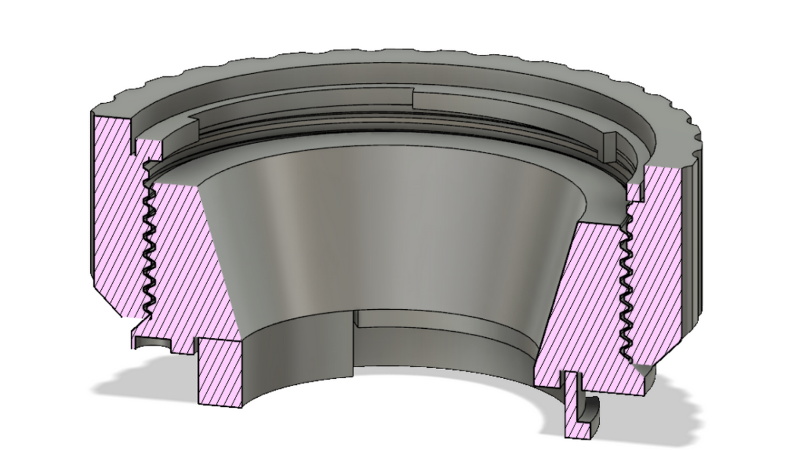
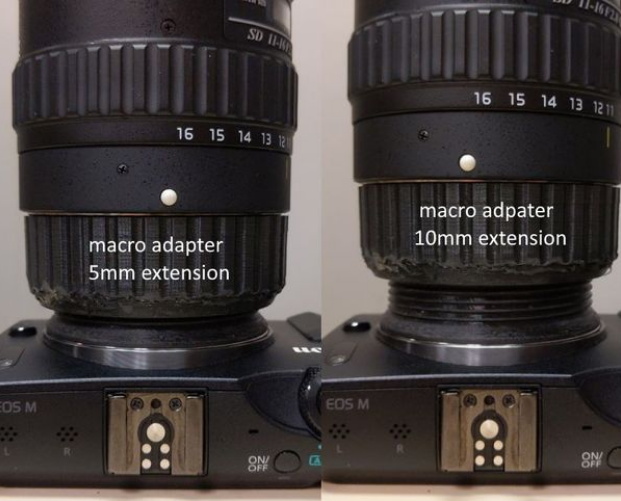
When you hear the term “extension tube”, you probably think of something fairly long, right? But when [Loudifier] needed an extension tube to do extreme close-ups with a wide-angle lens on a Canon EF-M camera, it needed to be small…really small. The final 3D printed extension provides an adjustable length between 0 and 10 millimeters.
 But it’s not just an extension tube, that would be too easy. According to [Loudifier], the ideal extension distance would be somewhere around 3 mm, but unfortunately the mounting bayonet for an EF-M lens is a little over 5 mm. To get around this, the extension tube also adapts to an EF/EF-S lens, which has a shorter mount and allows bringing it in closer than would be physically possible under otherwise.
[Loudifier] says the addition of electrical connections between the camera and the lens (for functions like auto focus) would be ideal, but the logistics of pulling that off are a bit daunting. For now, the most reasonable upgrades on the horizon are the addition of some colored dots on the outside to help align the camera, adapter, and lens. As the STLs and Fusion design file are released under the Creative Commons, perhaps the community will even take on the challenge of adapting it to other lens types.
For the polar opposite of this project, check out the 300 mm long 3D printed extension tube we covered a few weeks back that inspired [Loudifier] to send this project our way.


The electrical connections should not be too hard. I made a reverse lens-mount including electrical connections using an old broken EF-S lens and an old SLR body. The spring loaded connections block can sometimes be simply lifted out.
The 0-10mm extension is adjusted by screwing the front of the adapter in and out, rotating the entire lens relative to the camera body. You could adjust the thread pitch and use some short wires that wrap around the adapter body, but then the extension would be too sensitive. I think a short push-pull extension with a ribbon cable would be easier to build.
With Canon lenses you can put lens on camera, set aperture, press “aperture preview” button, keep it pressed and remove lens. Aperture on lens will stay in the set position. Autofocus is not really useful in extreme closeup applications so missing electrical contacts are not really a huge deal.
Autofocus can be useful if you’re not doing extreme closeups – e.g. like if you’re using a short extension tube like this one. I regularly use autofocus with a 13mm tube on a full-frame Canon.
Plus it’s useful if you’re using longer tubes and focus stacking.
Just what I need, plastic shavings from an 3d printed thread in my cams body going to the sensor and lens inside….
Plastic shavings? Ah you must be new here or not understand what 3D printing is.
I agree- every time you turn that thread it’s going to produce plastic dust and it will inevitably end up on the camera’s sensor. It might be acceptable to just make a series of spacers in 1 mm increments, but mounting the lens on the extender and the extender on the camera will probably also generate plastic dust that will end up on the sensor. I think this is the sort of thing best done in metal…
Dust hasn’t been a problem so far. And I even sanded the threads a little to get them to fit properly, generating a ton of tiny particles. 😱
The project satisfies my two goals. 1) Build something useful that you can’t buy. 2) Be cheap.
For the price of a little PLA and super glue I have an adapter that lets me attach a 10 year old lens (that I bought used) to a 7 year old camera (that I also bought used) and take photos that would be impossible otherwise. I like cheap camera gear that I can play with without worrying about breaking stuff or impressing pixel-peepers. I’m not a professional and Instagram scales everything down to 1080×1080 anyway.
Dust in the lens and on the sensor will affect the image, but that is the least of your problems, particles falling in to the shutter mechanism will cause it to fail. Maybe even not fail completely, but at first affect the shutter speed and exposure. Just saying, be prepared :)
Shouldn’t be an issue if properly burnished, this is one of those times that 3d printing actually makes some sense. Machining to meet those internal dimensions would b a bitch with out quite a bit of layout work & rotary table