A Teeny Tiny 3D Printed Macro Extension Tube

When you hear the term “extension tube”, you probably think of something fairly long, right? But when [Loudifier] needed an extension tube to do extreme close-ups with a wide-angle lens on a Canon EF-M camera, it needed to be small…really small. The final 3D printed extension provides an adjustable length between 0 and 10 millimeters.

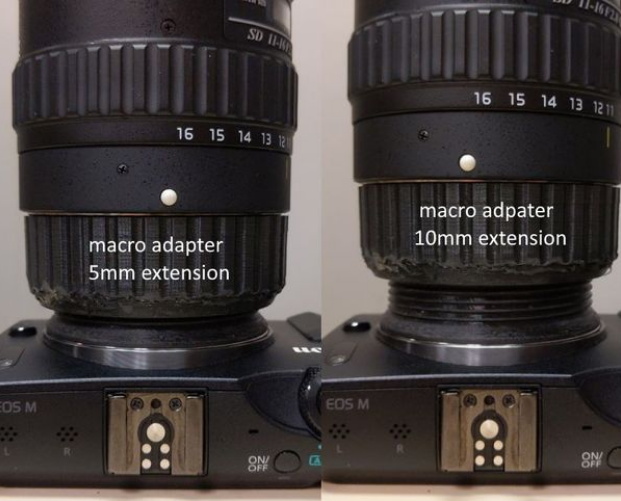
But it’s not just an extension tube, that would be too easy. According to [Loudifier], the ideal extension distance would be somewhere around 3 mm, but unfortunately the mounting bayonet for an EF-M lens is a little over 5 mm. To get around this, the extension tube also adapts to an EF/EF-S lens, which has a shorter mount and allows bringing it in closer than would be physically possible under otherwise.

[Loudifier] says the addition of electrical connections between the camera and the lens (for functions like auto focus) would be ideal, but the logistics of pulling that off are a bit daunting. For now, the most reasonable upgrades on the horizon are the addition of some colored dots on the outside to help align the camera, adapter, and lens. As the STLs and Fusion design file are released under the Creative Commons, perhaps the community will even take on the challenge of adapting it to other lens types.

For the polar opposite of this project, check out the 300 mm long 3D printed extension tube we covered a few weeks back that inspired [Loudifier] to send this project our way.

TinyGo Brings Go To Arduino

Go — a modern programming language with roots at Google — is one of the new generation languages that would like to unseat C (and C++) for what we think of as traditional programming. It is only for PCs, though, right? Not so fast! TinyGo provides a compiler that — in their words — is for small places. How small? They can target code for the Arduino Uno or the BBC micro:bit. It can also produce code for x86 or ARM Linux (both 32- and 64-bit) as well as WebAssembly. They claim that a recent project to add ESP8266 and EPS32 support to LLVM will eventually enable TinyGo to target those platforms, too.

As you would expect, there are some subtle differences between TinyGo and the full-blown version. The compiler handles the entire program at once which is slower but offers more for optimization. Certain optimizations for interface methods are not used in TinyGo, and global variable handling changes to accommodate moving data from flash to RAM efficiently. TinyGo passes parameters in registers.

Continue reading “TinyGo Brings Go To Arduino”

Eagle Reborn: F-15 Simulator From A Wreck

This story started all the way back in September 12, 1981, when an F-15C aircraft’s landing attempt at Soesterberg Airbase during an airshow went completely FUBAR and the airframe was scrapped. The forward fuselage section was sold and eventually ended up with [Gene Buckle] who began work on creating a fully accurate F-15C simulator using these parts. He has blogged about his progress since 2009 over at the project website.

The F-15C was number 80-0007, which at the time of the crash had flown only 9.5 hours total, making it a very early retirement for an incredible fighter jet. But now the Eagle is back, or at least part of it: [Gene] managed to get the whole system into a state where the instrumentation and controls work again, using the original computer systems and instruments where they were still usable. You can find the YouTube video embedded after the break as well.

Detailed technical information on the F-15 series and this simulator build can be found on the project site, which is awesome both for F-15 fans and those who are into really accurate simulators.

Continue reading “Eagle Reborn: F-15 Simulator From A Wreck”

Mechpen: SCARA Drawbot For The Big Picture

It’s not uncommon to find us doodling on paper as an aid to thinking, for recreation, or simply because we’re bored. But, this kind of manual labor is so last century. It’s 2019, and we should have robots to fill our notebooks with cross-hatched illustrations. Well, [Alex Weber] is way ahead of us on this account: the outstanding SCARA drawbot he created can be unleashed to draw all manner of things at his command.

The robot, named Mechpen, and pronounced “McPen”, is of a SCARA (Selective Compliance Assembly Robot Arm) design, with two parallel axes controlling the x-y movement of the arm. Robot design is always a series of trade-offs; in this case, [Alex] has sacrificed some accuracy to achieve a long reach. Two NEMA 23 stepper motors reside in the base, along with all the electronics. This makes the base a heavy 15 kg, which is good as it helps stabilize the arm during movement. The arm uses a mix of off-the-shelf and custom hardware, most of which is dotted with holes drilled to reduce the mass of the moving parts. Two 700 mm sections of the arm made from carbon fiber tubes give the drawbot a 140 cm reach — long enough to fill an A0 paper with its beautiful mechanical doodling.

The brains behind the arm are two-tiered. An Einsy RAMBo board, designed for 3D printers, controls the stepper motors. Above that, a Raspberry Pi runs Octoprint to control the ‘bot. This choice turned out to be very convenient for working around a mechanical issue: the elbow flexes too far in the Z-axis. The difference in pen height between the elbow at 90 vs 180 degrees was 20-25 mm; too much to fix with just a spring-loaded pen. The solution: use a bed-leveling algorithm designed for 3D printers. A VL6180X distance sensor measures the distance to the paper over a number of grid points, then the software moves the servo up and down accordingly while drawing to keep the pen on the paper.

Some custom-written software converts SVG graphic files to gcode suitable for printing, allows selection of different stroke and fill types, and separation of different colors into individual gcode files to be plotted with different pens.

Definitely check out the video of Mechpen in action, after the break.

Continue reading “Mechpen: SCARA Drawbot For The Big Picture”

Open Source Smart Smoker Brings The Heat (Slowly)

Conceptually, cooking on a grill is simple enough: just crank up the flames and leave the food on long enough for it to cook through, but not so long that it turns into an inedible ember. But when smoking, the goal is actually to prevent flames entirely; the food is cooked by the circulation of hot gasses generated by smoldering wood. If you want a well-cooked and flavorful meal, you’ll need the patience and dedication to manually keep the fuel and air balanced inside the smoker for hours on end.

Or in the case of the Smokey Mc Smokerson, you just let the electronics handle all the hard stuff while you go watch TV. Powered by the Raspberry Pi Zero and a custom control board, this open source smoker offers high-end capabilities on a DIY budget. Granted you’ll still need to add the fuel of your choice the old fashioned way, but with automatic air flow control and temperature monitoring, it greatly reduces the amount of fiddly work required to get that perfect smoke.

[HackersHub] has been working on Smokey Mc Smokerson for a few months now, and are getting very close to building the first complete prototype. The initial version of the software is complete, and the classy black PCBs have recently arrived. Some simulations have been performed to get an idea of how the smoke will circulate inside of the smoker itself, built from a 55 gallon drum, but technically the controller is a stand-alone device. If you’re willing to makes the tweaks necessary, the controller could certainly be retrofitted to  commercially available smoker instead.

Ultimately, this project boils down to tossing a bunch of temperature sensors at the problem. The software developed by [HackersHub] takes the data collected by the five MAX6675 thermocouples and uses it to determine when to inject more air into the chamber using a PWM-controlled fan at the bottom of the smoker. As an added bonus, all those temperature sensors give the user plenty of pretty data points to look at in the companion smartphone application.

We’ve actually seen a fair number of technologically-augmented grills over the years. From this automotive-inspired “turbocharged” beast to a robotic steak flipper built out of PVC pipes, we can confidently say that not all hackers are living on a diet of microwaved ramen.

BornHack 2019, A Laid-Back Hacker Camp In A Danish Forest

This is a fantastic summer for hacker camps and I was very happy to make it to BornHack this year. This week-long camp attracts hackers from all over Europe and the mix of a few hundred friends and soon-to-be friends who gathered on the Danish island of Fyn delivered a unique experience for the curious traveller.

The camp takes place at the Hylkedam Danish scout camp, located in a forest amid the rolling Danish famland not too far from the small town of Gelsted. It’s a few kilometres from a motorway junction, but easy enough to find after the long haul up from the UK via the Channel Tunnel. As an aside, every bored cop between France and the Danish border wanted to stop my 20-year-old right-hand-drive Volkswagen on UK plates, but soon lost interest after walking up to the passenger side and finding no driver. It seems Brits are considered harmless, which is good to hear. Continue reading “BornHack 2019, A Laid-Back Hacker Camp In A Danish Forest”

3D-Printed Film Scanner Brings Family Memories Back To Life

There is a treasure trove of history locked away in closets and attics, where old shoeboxes hold reels of movie film shot by amateur cinematographers. They captured children’s first steps, family vacations, and parties where [Uncle Bill] was getting up to his usual antics. Little of what was captured on thousands of miles of 8-mm and Super 8 film is consequential, but giving a family the means to see long lost loved ones again can be a powerful thing indeed.

That was the goal of [Anton Gutscher]’s automated 8-mm film scanner. Yes, commercial services exist that will digitize movies, slides, and snapshots, but where’s the challenge in that? And a challenge is what it ended up being. Aside from designing and printing something like 27 custom parts, [Anton] also had a custom PCB fabricated for the control electronics. Film handling is done with a stepper motor that moves one frame into the scanner at a time for scanning and cropping. An LCD display allows the archivist to move the cropping window around manually, and individual images are strung together with ffmpeg running on the embedded Raspberry Pi. There’s a brief clip of film from a 1976 trip to Singapore in the video below; we find the quality of the digitized film remarkably good.

Hats off to [Anton] for stepping up as the family historian with this build. We’ve seen ad hoc 8-mm digitizers before, but few this polished looking. We’ve also featured other archival attempts before, like this high-speed slide scanner.

Continue reading “3D-Printed Film Scanner Brings Family Memories Back To Life”