
You’ve designed PCBs. You’ve cut, drilled, Dremeled, and blow-torched various objects into project enclosurehood. You’ve dreamed up some object in three dimensions and marveled as the machine stacked up strings of hot plastic, making that object come to life one line of g-code at a time. But have you ever felt the near-limitless freedom of designing in fabric?
I don’t have to tell you how satisfying it is to make something with your hands, especially something that will get a lot of use. When it comes to that sweet cross between satisfaction and utility, fabric is as rewarding as any other medium. You might think that designing in fabric is difficult, but let’s just say that it is not intuitive. Fabric is just like anything else — mysterious until you start learning about it. The ability to design and implement in fabric won’t solve all your problems, but it sure is a useful tool for the box.

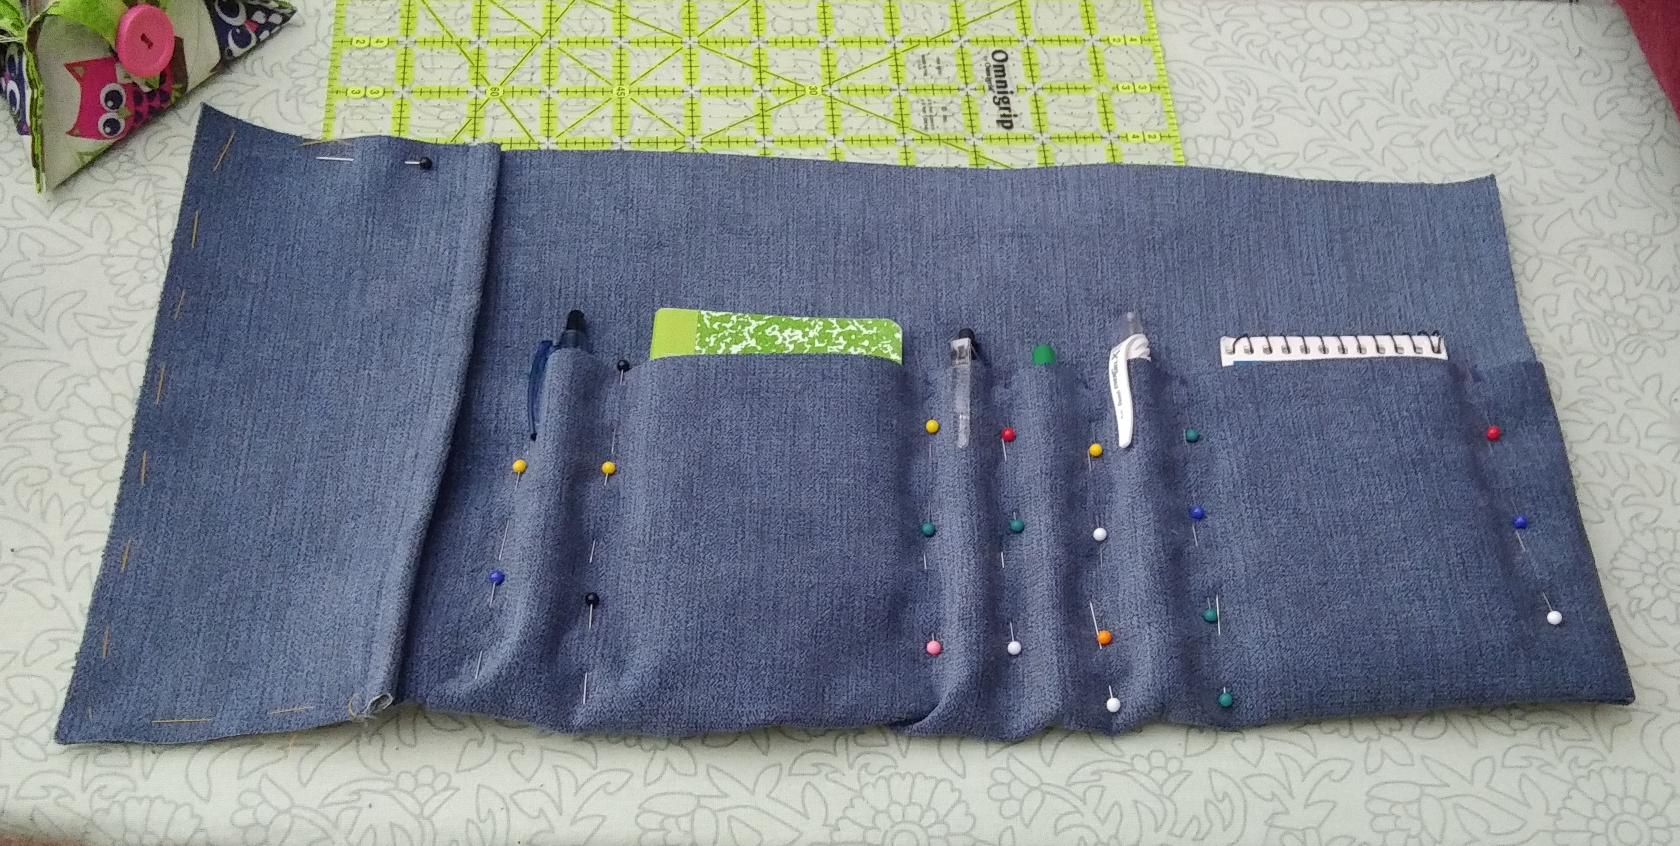
To prove it, I’m going to take you through the process of designing something in fabric. More specifically, a tool roll. These two words may conjure images of worn, oily leather or canvas, rolled out under the open hood of a car. But the tool roll is a broad, useful concept that easily and efficiently bundles up anything from socket wrenches to BBQ utensils and from soldering irons to knitting needles. Tool rolls are the best in flexible, space-saving storage — especially when custom-designed for your need.
In this case, the tools will be pens, notebooks, and index cards. You know, writer stuff. But the same can just as easily organize your oscilloscope probes. It’s usefully and a great first foray into building things with fabric if this is your first time.
Pin Down Your Ideas

When I sat down to design and make this tool roll, I already had an idea of where it would be used and what would be going in it. No matter what ends up in your tool roll, some things are universal. They all store tools in some way or another — usually with pockets and/or elastic bands to hold things in place — they roll or fold up for convenient transport, and snap, buck, or tie closed. Beyond that, the sky’s the limit. Mine has a pocket, for instance.
“The whole thing is pockets,” you might say. Technically, the whole thing is custom tool sleeves. I’m talking about a catchall pocket for the amorphous stuff of life, like notes, receipts, or free envelopes of Fun Dip sitting out on the table at work.
First and foremost, it’s my tool roll and no one else’s. Keep this mantra in mind when designing yours, and you’ll have yourself a useful, beautiful thing.

Tally Up Your Tools
Alright, so what are your tools? You don’t have to know exactly what will be going in there at this stage. A general idea is great. Once you have a grip on the tool list, consider the environment it will be used in. Mine is going to spend all of its time either rolled up in my purse, or open flat on a desk. The biggest threat it will face is a bit of spilled coffee and the occasional crumb.
This is a good time to start thinking about fabric choices. If I made this tool roll out of thin cotton or some kind of knit fabric like t-shirt material, it wouldn’t last nearly as long. If I made it out of leather, it might last a lifetime.
I chose a ‘middle ground’ fabric because the things I’m going to fill it with — pens, small notebooks, and index cards — are all fairly lightweight. Nothing will be dirty, oily, or particularly sharp.
A mechanic’s tool roll is probably going to get dirtier than a roll full of knitting needles, although a guerilla knitter who lives to yarn-bomb public structures might object to that. Both the mechanic’s and the knitter’s tool rolls are likely to have sharp objects, so lining the pocket area with leather will make it last a long time.
 You Can’t Spitball Without Paper
I like to start designing with pen and paper. First, I describe the thing as best as I can. I think, I draw pictures, I ask questions. This is the first chance to really turn the project over in your mind and avoid costly mistakes. Paper is cheap. Most quality fabric is not.
Describe what you want to make, and really think about what you want to achieve. Let the features creep in now. They can always be pruned later.
Don’t sleep on drawing pictures! This is not the time to lament your lack of artistry. Use something like PowerPoint if you need crisp shapes. Thinking with pictures helps tremendously. You probably already knew that.
Prototyping Gets You What You Want with Fewer Do-Overs
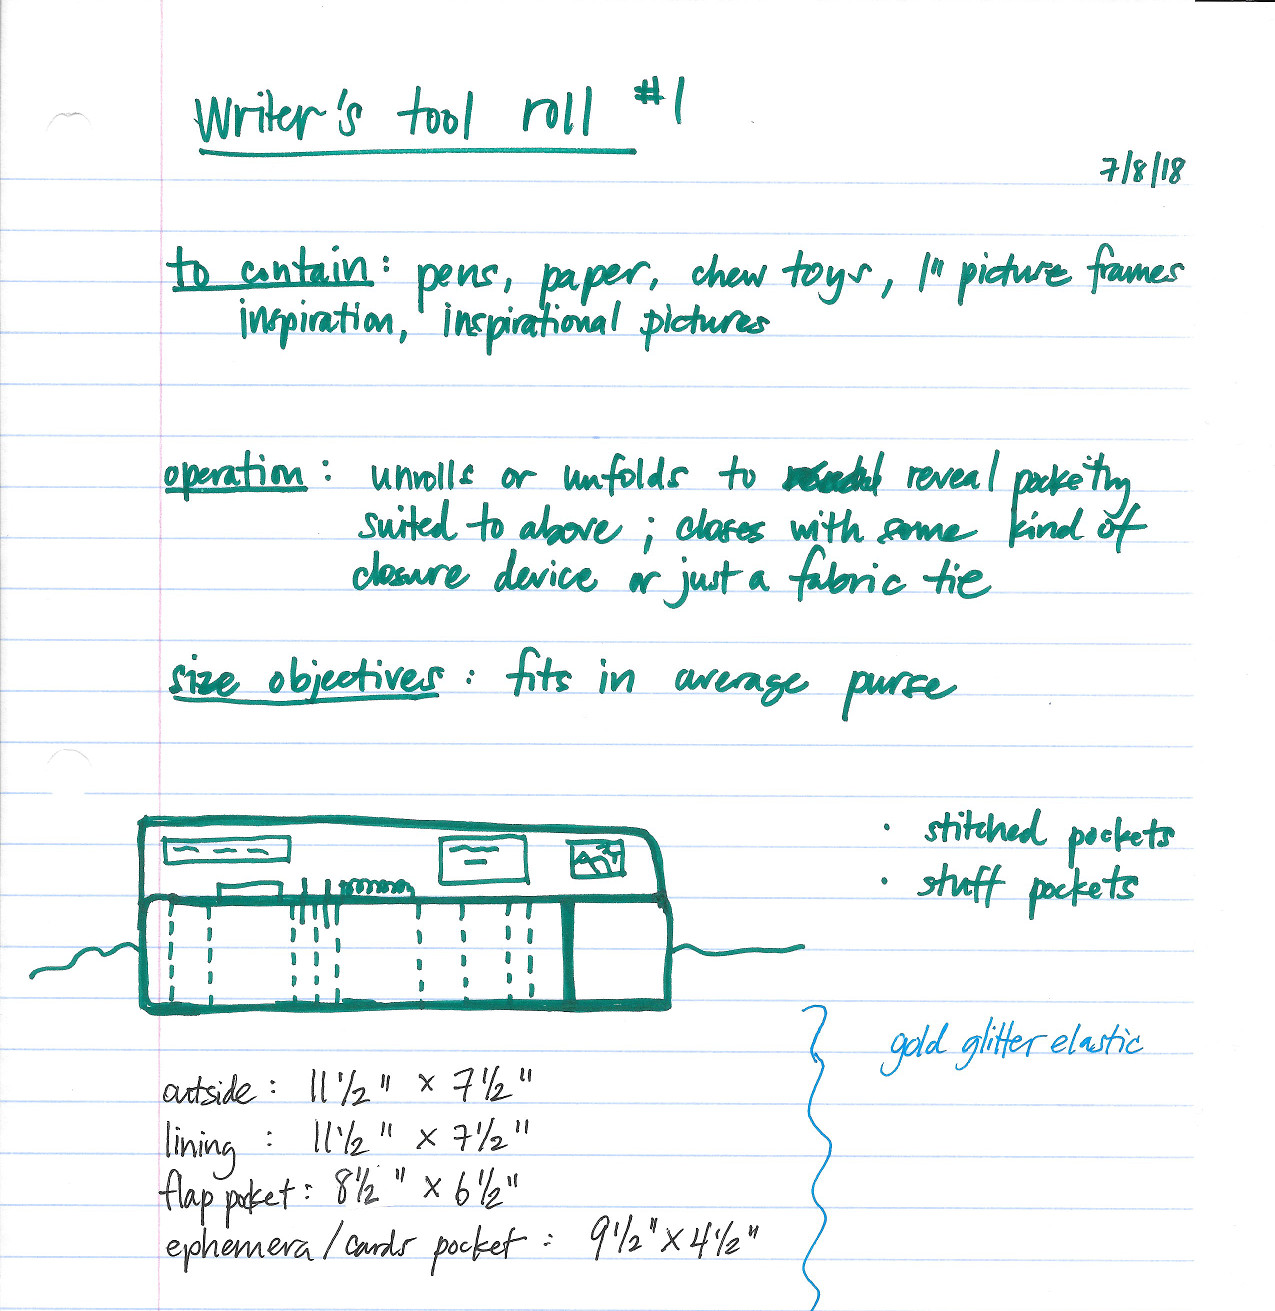
If at all possible, I make a prototype out of notebook paper or cardboard from the recycling bin, tape, and a long-arm stapler. It’s a fast, cheap way to get the project off of the page and into reality.
This is a good time to start pruning back the features. By the time I made the paper prototype, I had way fewer tool pockets, and I’d killed off the idea of clear window pockets for pictures.
Since all my writer tools are pretty lightweight, I can actually use the prototype for a day or so to really nail down the details. Doing this made me realize that I wouldn’t actually use the earbuds pocket, and I concluded that the elastic X wasn’t going to work out. There’s no substitute for experience.
Even so, paper prototypes have their limits. It wouldn’t work at all for something that needs to drape over curves, like an article of clothing or a car cover. People who make clothes will often “make a muslin“, which means sewing up a full prototype from an inexpensive cotton fabric called muslin. This first draft is useful for adjusting fit, and that’s easier to do because there’s no color or print to distract from the lines underneath.
If you can spare the time, sleep on your design and look it over again in the daylight. Iterating in fabric can be time-consuming and expensive, so this is the time to make sure you know what you’re after and the steps it will take to achieve it.
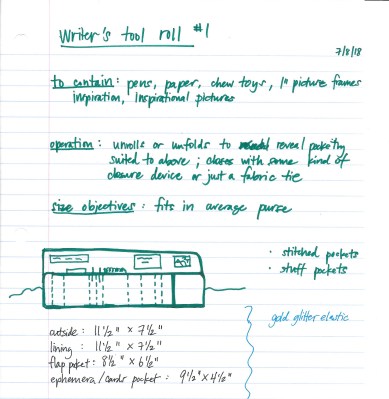
 Don’t forget to think in 3D. No matter what your tool roll looks like or what fabric you end up with, one thing you must do is account for the girth of each tool when planning the size of the piece that becomes the tool sleeves. Sure, you could sew them all down flat. But as soon as you put tools in, the back will pucker up. Put a few more in and it won’t be flat anymore.
Fabric 3D is a different animal, because you really have to think about what will be on the inside vs. the outside as you put the pieces together. Most seams are sewn with the right sides of the fabric facing each other, and then the seam is either opened flat or turned right side out.
Don’t forget the seam allowance. The number one rookie mistake in any kind of sewing is forgetting the seam allowance when cutting out fabric for a project. Seam allowance is fabric that will be lost in the joining of the pieces. It’s measured as the distance between the edges of the fabric pieces and the line of stitching used to join them. Some patterns include the seam allowance in the pieces already, and some don’t, and any pattern maker worth their marking chalk will tell you whether it does or doesn’t.
Quarter-inch seams are pretty standard, although 5/8″ is widely used in apparel making. Decide your seam allowance in advance, and keep it consistent. It’s disappointing to make this mistake with cheap fabric, and devastating to screw up fabric that’s $60 a yard.
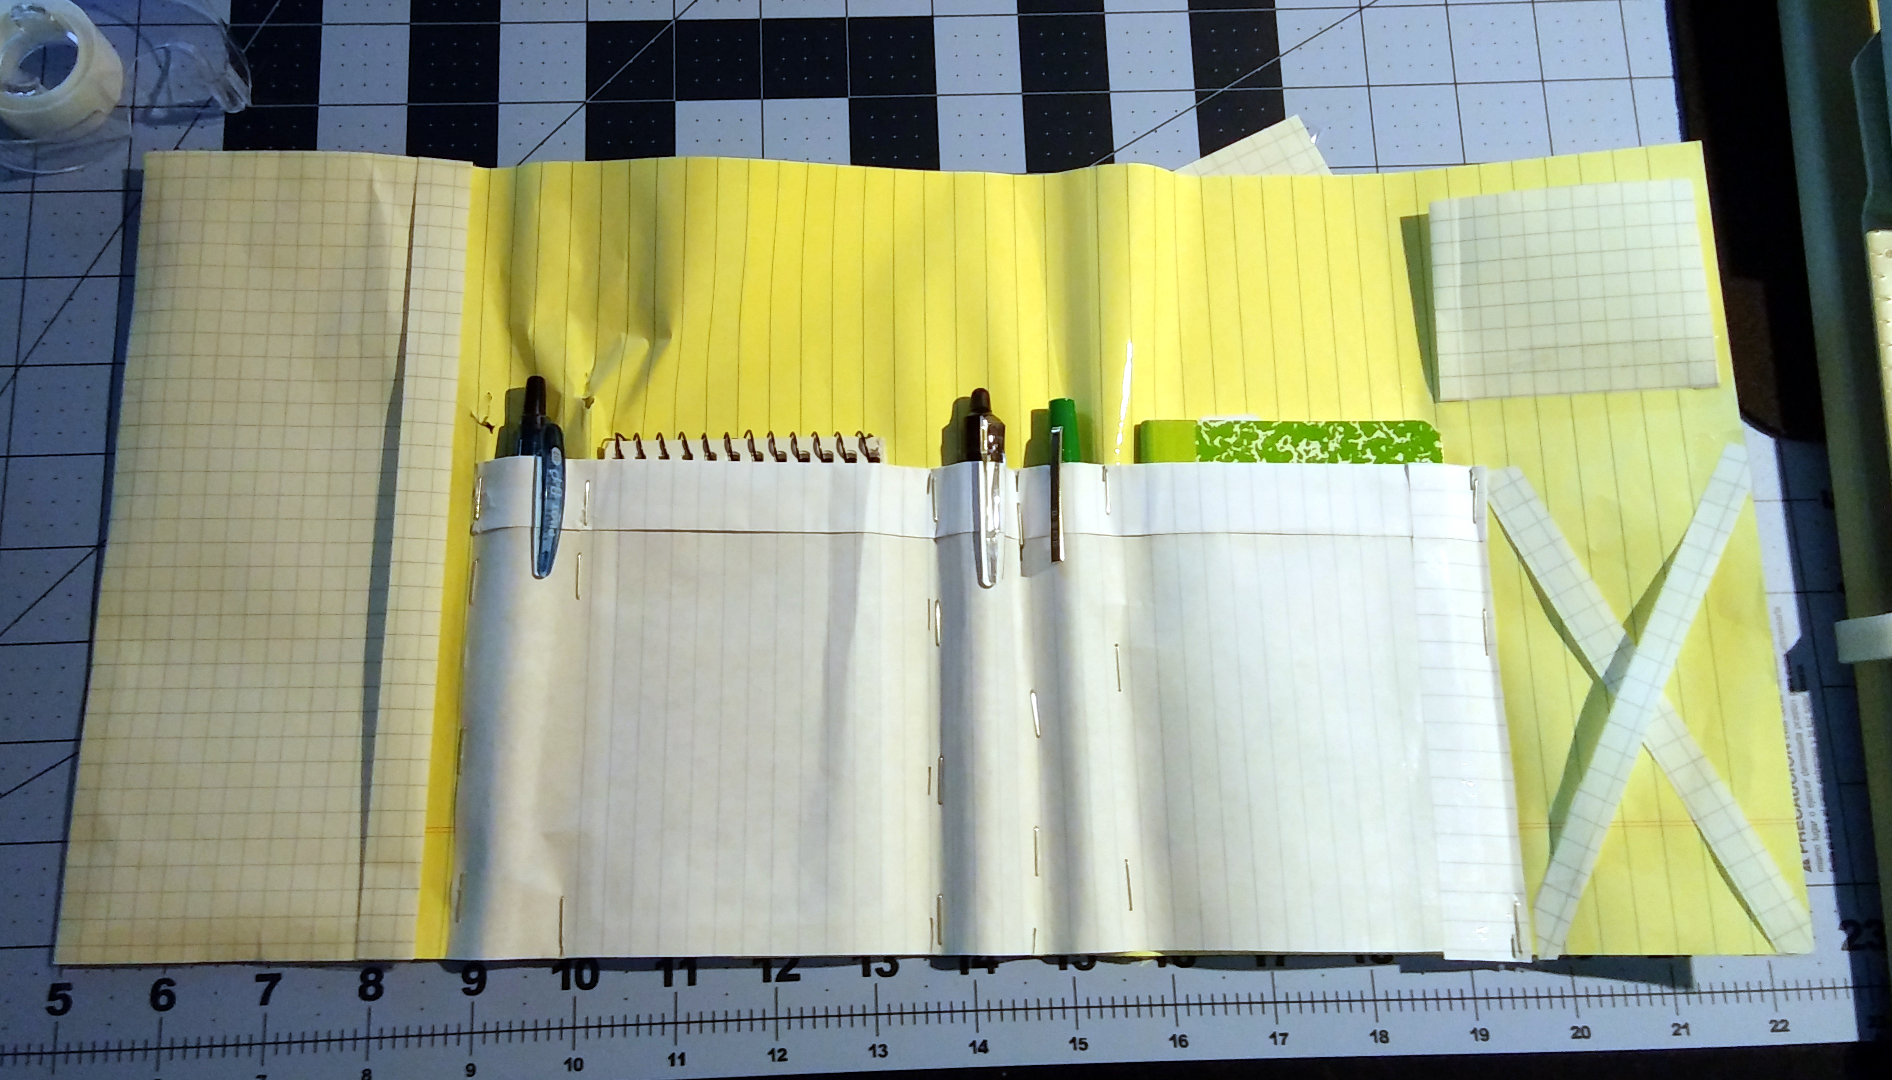
Go Shopping for Fabric!
Prepare yourself to spend a decent chunk of time at the fabric store. If you want help choosing fabrics and you aren’t quite sure how much you need, avoid going on the weekends, or get there when they open. The cutting counter workers love talking about projects and helping out, but weekend afternoons get extremely busy all year long. Bring your plans!
If you don’t want to spend a lot, wait in line, or just want practice material, look for the remnants bin. These are pieces of fabric that are a yard (36″) or less, and they will usually be super cheap. Or better yet, go to a thrift store! Most of them have a section for material. Even if they don’t, they’ll have some bed sheets. That’s a lot of fabric to play around with for a pretty low price.
If you’ve ever bought a tool roll, it was probably made out of canvas or leather. A word of warning if you go that route: make sure your thread injector can handle heavy fabrics, and that you have the appropriate needle. Layers of canvas and leather add up quickly.
I made my writer’s tool roll out of home decor chenille, a soft but sturdy fabric that might have otherwise covered a throw pillow or a low-use chair. It feels a lot like corduroy without a wale. The ties that keep it closed are made from some chambray cotton I already had. Chambray is typically used for button-down work shirts and summer apparel.
 Finishing Touches
Putting it all together is easy, but there are a few things to keep in mind.
When you sew up the tool pockets, don’t just remember the girth factor. Use it! Working from one side to the other, insert each tool the way you want it and pin around it. Don’t take a tool out until it’s time to sew its pocket. Protip: don’t ever let fabric you’re sewing hang off the table. Gravity plus the weight of the fabric will screw up your seam, especially if there’s a bunch of tools in there. Use your head: if your tools are really heavy, take them out after pinning around them.
You will want to backstitch heavily at the top of each pocket, where the tool goes in and out. This is where it will get the most stress. If your machine can do a zig-zag stitch that’s tight enough to pass for a bar tack, go for it.
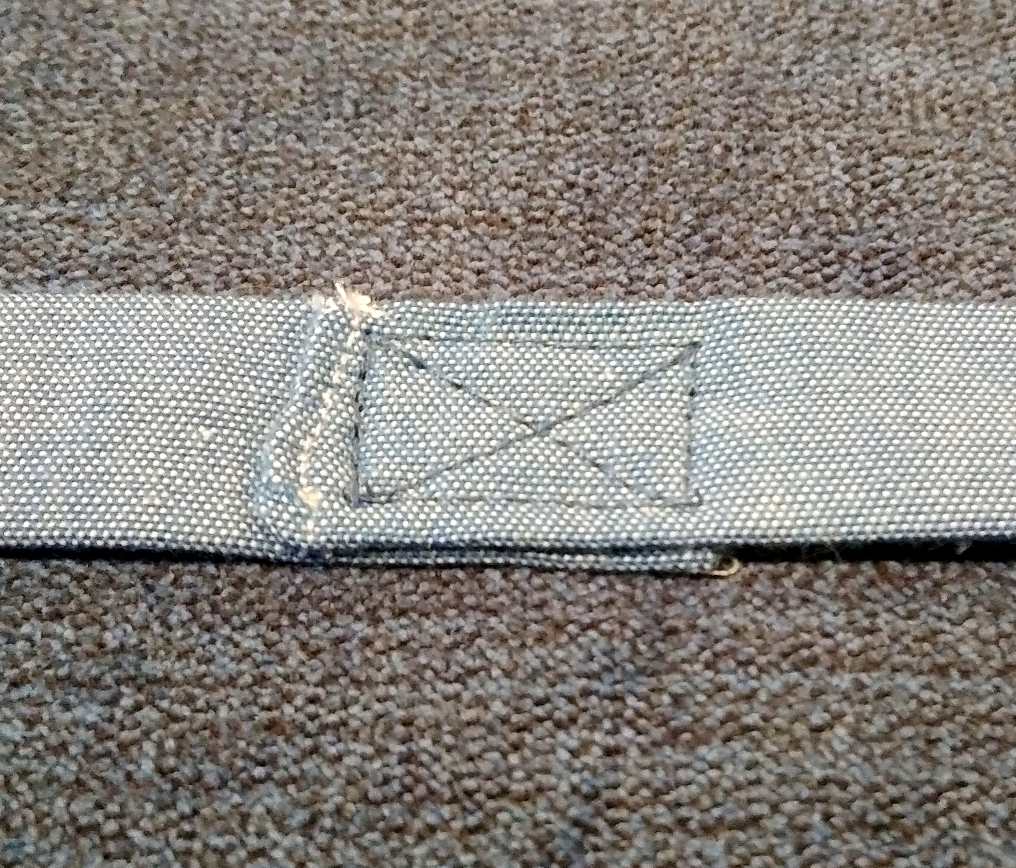 Since the straps live on the outside, they’ll see a lot of wear and tear. Sewing them down in a simple boxed X pattern will secure them without a lot of bulk.
The interesting thing about a tool roll is that you don’t need to buy a pattern. Their function implies almost limitless forms. You just need to know what tools you want to include, and have a good idea of where you’ll be using it.
Self drafting is a bit like designing your own PCB. It’s far more rewarding than following a pattern, because you end up with something special that’s tailored to your exact needs. That kind of complete control can be scary or intimidating. But it doesn’t have to be. Doing some pre-work before you ever cut fabric can make the difference between a useful thing that gives you a sense of pride, and another unfinished object that fills you with shame.
[“Coding Horror” logo image © 1993 from Code Complete, Stephen C. McConnell]


A sewing machine is just a specialised rivetter after all.
(That was what I told myself when I took on the job of completing a wedding dress for a friend of a friend when their grandmother had run out of time and skill)
nah, it’s a thread injector
How was the wedding dress in the end?
The bride seemed perfectly happy, I have a photo somewhere of her wearing it at the wedding (this was some time last century :-)
I thought he wanted to know how the rear of the bride looked in the wedding dress.
B^)
If you want a nice tool-bag, take old jeans and cut off a length of the leg to have a tube of fabric, then use an office stapler to close one end, then flip it inside out. Just add handles and you’ve got yourself a handy bag for carrying your greasy wrenches.
A common “bucket” for fencing staples is made by cutting the toe and sole off of an old cowboy boot and plugging the bottom with a round piece of wood. A leather thong (get your minds out of the gutter) is then tied to the boot straps for a handle.
“get yoir minds out of the gutter” this from the guy that “thought he wanted to how the rear of the bride looked in the wedding dress.”
I would mention the “WANT YOU WANT” section, but by the time anyone reads this it will be fixed.
We’re not that fast! (Thanks.)
I use a lot of small tools that I put in cups or shot glasses – or pile up. I’m going to have to try this.
I have made several “tool rolls” for all sorts of things, yes wrenches and teaching aids for classes, silverware, notebooks and reference cards and the list goes on and on, some clear vinyl many from 8 oz canvas etc.
I once made a tool roll for something, maybe it was common tools for my Datsun pickup.
I have no idea what happened to it.
My wife is the one that owns the sewing machines in my family. Anytime I’ve come too close she reminds me that she has thousands of sharp steel points at hand ready to use at a moment’s notice.
Any other options I can use to make tool pouches that don’t involve sewing? Do those brads used in jeans work well enough? What is needed to use those?
Could always do the sewing by hand, maybe not as consistent as a sewing machine but can certainly produce a functional tool pouch even with not a lot of experience. If you’re a function over form type of person you could even consider using a stapler..
Glue, like one of the flavors of Goop, applied appropriately to folded seams or hems would probably hold together well.
Tried that with tent canvas (simple hot glue). Worked like a charm (made prototypes of motorized cushions and stuff) but I would recommend to stitch the mentioned reinforcements at the top of a pouch for a long-living tool roll.
Buy your own sewing machine, use a hand stitcher / sewing awl, fabric glue for light duty, copper rivets, staples, use plastic (pvc sheet like for inflatables) and weld the seams, kydex and rivets.
It all depends on how you want the pouch to function.
If you don’t own your own sewing machine then you are a tool short in your collection.
You could make a CNC one? https://www.youtube.com/watch?v=KcHUKqY422M
+1
Sewing machines fit for the purpose of throwing together a few tool pouches can be had at just about any thrift store for very little money. You only need the most basic, straight stitch machine available – zigzag stitching and buttonhole attachments are definitely not necessary features. Bring a small square of fabric with you and test it will work before you buy one, but be careful of ancient frayed or brittle rubber insulation on the wires! Your spouse also might offer to serve you as a consultant. Use their expertise!
Older iron bodied machines from the 1950s era are ideal for this kind of work. They’re strong enough to pierce multiple layers of denim and sew a straight stitch, though that’s about all they can do. They’re durable as anything, (My mother still quilts daily on her 195x “Sew-Mor”.) And crappy wiring and worn out motors can be easily replaced.
There are also dirt cheap (~$100) new machines available at all the big chain department stores (Target, Walmart, Jo-Ann Fabrics, etc.) that are 100% plastic out of China. They’re nice and simple, good for learning on, and will sew light woven fabrics just fine. But they lack the horsepower needed to punch through layers of heavy, rough fabrics. Avoid the inexpensive computer controlled machines, as they sacrificed power for under-engineered servo controlled needle movements. Also note the plastic bodies can be easily stained by greasy tools.
But any sewing machine will take up a lot of storage space, and if your spouse already has one (or more,) you should at least ask her to acquaint you with it and save the money.
The rivets found in in jeans pockets can only reinforce corners; they can’t replace the stitching.
I second the Thrift/op shop sewing machine. I got my 1956 vintage Singer for AUD$20 because it was “dropping stitches”. Being the handy type, as most here probably are, I figured “hey, it’s just a machine. I can fix it”. Ended up just needing the blunt needle replaced and to actual be threaded properly (thread tensioner anyone?). Make sure to give them a good clean and oil first too. Avoid any with a lot of mechanical noise too. Parts can be hard to find for these older machines.
As mentioned above, a decent used sewing machine can often be found very cheaply.
For occasional use or small projects using heavy materials, I can also highly reccomend a Speedy Stitcher. They’re much slower than a sewing machine, but take up very little space and from what I recall they are fairly cheap.
SWMBO (She Who Must Be Obeyed) has a multi-thousand dollar “sewing computer”,
I am not allowed to touch it until I take the same classroom courses she has taken.
I am allowed to buy various attachments for it throughout the year.
I am allowed to use her old “sewing machine” down in the basement for my projects.
My family is a bit inverted- my wife is more likely to chop the wood while I operate the sewing machine….
I’m not a sewer by any means I just treat the sewing machine like any other tool – my MIG just wouldn’t work on fabric.
Garage sales at a deceased estate are a great place to pick up good machines for next to nothing if your wife won’t let you use hers.
My old treadle machine is great for thick vinyl – nice and slow
Commercially-made tool rolls are also widely available and inexpensive. I have 2 large ones from “Bucket Boss” and a smaller one that I got at a local Asian specialty store, in addition to some custom ones I have made for specific sets of tools.
One key advantage is that the tools are held snugly and padded with fabric (or leather, or vinyl) which cuts down on rattling and clinking and clanking from traditional toolboxes. My car toolkit is in a tool roll.
What’s missing and not mentioned is a flap over the tools. This will prevent them from falling out in any positiin and orientation. But it makes access also a bit less convenient: If the Flap is sewn “closed”, you have to fold it back for access to the tools while it will close automatically when rolling up. An “open” sewn flap makes access easier but needs more care/effort when.rolling up.
If the roll is always held upright or the content is light enough or has sufficient friction (like the pens and paper in this sample), you can skip the flap.
Some notes:
If you add inner flaps to hold items in place, you can add snaps to ensure separate sections are secured. Snaps can also be added above a flap to hold it open.
If you add a loop or grommets to the end of the roll, you can hang it up, while one on the side will make a good handle.
A rool can have multiple rows of pouches.
A symmetrical tool roll (two rows of pouches that face each other, with a clear strip down the center) which has a length equal to the perimeter of a container can be draped over its edge, making the tools available both on the inside and the outside. Another option is to have several straps along the edge which link to snaps/velcro/etc. on the opposite edge, allowing you to ‘tent’ the roll so it can stand on its own. In both cases, if you can accordian-fold the center piece and snap/velcro/etc. said folds into place, then you can have your items standing proud of the roll for easy access.
Consideration must be given to the relative stiffness of the backing and pouch materials. For example, if you use a thick leather backing, all of the depth of the items will need to come out of the pouch material and much more of that will be needed than the backing material..
The same system can be used to make tool ‘books’, where three stiff pieces of backing comprize the ‘covers’ and ‘spine’. Often, a zippered piece fills in the last three sides. This is trickier to design and make, but can be very useful for sets of small tools.
I have a set of nut drivers (probably Craftsman, from back in the day) that came in one of these, Agreed it’s a great way to keep a set together, and find the one you need quickly.
I never got around to sewing mine. I prototyped it with safety pins, and just ran like that for a few weeks to make sure I had included everything I wanted.
But during that time, as tasks changed, I found myself adding and removing tools and pouches, and doing so on a fairly regular and continuing basis. It never “stabilized” to where I wanted to stitch it — the safety pins were holding just fine, and their added versatility was a real asset!
Tried tool rolls, usually denim. Every year you’ll be sewing up a new tool roll. They’re great for single application tool kits like a motorcycle tool kit, or single fixed collections like a wrench set, but there is no way suited to rolling up the whole shop as things keep changing and you’ll be sewing more than hacking. The fact that denim today is not at all the denim of yesteryear means the new ones don’t hold up well either.