If you’re looking for a fancy LED lamp, the Internet can provide in spades. There are all manner of flashy-this and glowing-that, often with wild and impressive designs made with high-end tools. However, when it came time to decorate the apartment, [thebigpotatoe] wanted to build something simple that anyone could attempt. From this, the Super Simple RGB WiFi Lamp was created.
The body of the lamp consists of a plank of wood. It may not sound like much, but thanks to a nifty design, it actually comes out looking remarkably stylish. The plank is fitted with aluminium angle on the back, and a strip of WS2812B LEDs are wrapped around the perimeter of the board. An ESP8266 NodeMCU is fitted to run the show, and powered from a mains supply to allow it to run all day.
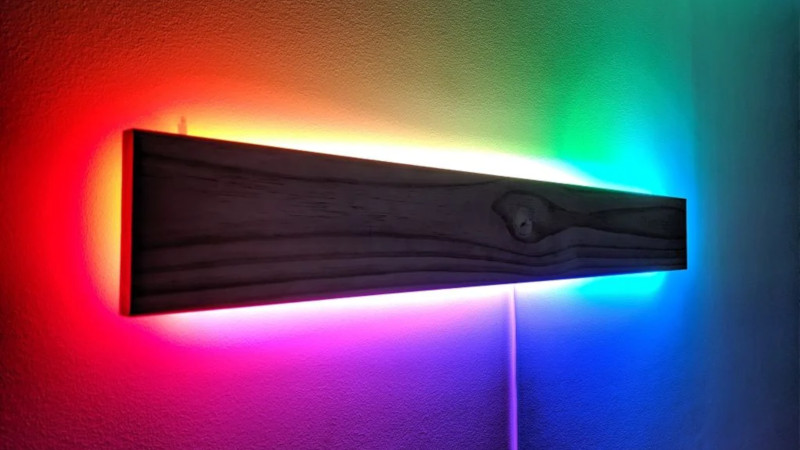
The trick here is that the LEDs are mounted on the back of the board, where they are out of direct sight. The light from the LEDs is projected onto the wall the lamp is mounted on, giving a nice smooth effect without requiring any dedicated diffusers. There’s a series of animations coded in, which look great, particularly when the animations wrap around the end of the lamp.
It’s a great addition to the apartment’s feature wall, and goes to show that you don’t need world-beating crafting skills to make a great piece for your home. You can even go all out, and light your whole room this way. Video after the break.


That is a clever idea
Great idea. Love it.
This could be very useful.
(remember that the colour of the paint on the wall will come into play; I wonder how far a colour shift setting could adjust for wall colour)
Add a “Natural Sunlight” mode, that simulates sunrise through to sunset.
I don’t know if the CRI of the LED strip is capable of producing light that should help those that suffer from SAD (seasonal affective disorder). Perhaps that could another mode.
Up/Down colour mode: One colour out the top, another out the bottom. Useful for night, with a white out the top and something in the red range out the bottom, for lighting that doesn’t impair sleeping a short while later.
Awesome ideas!
The colour shift of the lights is an interesting one. I’m sure if someone needed it would be tempting to integrate. If I’m honest though i wasn’t focusing on the colour correctness for this reason. So long as I could produce a full rainbow that looked nice and looped well I was happy.
For the modes, I only gave myself a week to get this project done and I was struggling to think of modes after coming home from long days at work. I’ll add some notes into my code to implement these two modes since all the supporting time management software is already written. Thanks for the ideas!
Sorry, but he has made this much harder than it needs to be. There are strip kits available that come with a wifi controller already, in a nice neat package, already wired up, and for less money, that actually anybody could use. Using the NodeMCU adds additional complexity that is entirely unnecessary simply for the sake of adding some nerdiness for a simple plank lamp.
I am not sure you are aware, but you are on a website that is focused on people sharing projects they made themselves. I would guess that there are commercial alternatives to most things, but that isn’t really the point.
Um, yes…However, you still build the lamp, and the article explicitly states to make it as easy as possible for anyone to build. I think you are confused
TheWizard, I think you’re confused actually. TadPole stated it clearly. This site is for sharing things built by people, not sharing things they bought. If you want to comment on pre-packaged products, Amazon is a great place to do so. This person used their skills to build something themselves, and then program it themselves with quite a few neat effects that are arguably well thought-out. I have an LED strip of the kind you mention, and it’s NOT the same. The color choices are limited to what’s on the remote, the modes are VERY limited, the brightness control is extremely coarse (10 clicks from dimmest to brightest), and there are no customization options.
Please, in the future, if you cannot find something constructive to say about what’s been built, then perhaps consider not saying anything at all. Feedback on things people build is appreciated, whether it’s “Awesome!” or suggestions on how to do things better next time.
“Buy it instead!” is not constructive.
amazon, that was a nice touch :)
A major feature of the lamp in the article is the multicolor mode. Almost all of the kits cannot address the LEDs individually so they cannot do more than one color at once. Not even the pricy Philips Hue ones. For that functionality something like NodeMCU is needed.
I made my (non-RGB) LED strip wall lights this way. I used an H cross-section shaped shower curtain rail to spread out the heat a bit. Saved a ton of money compared to the shop bought kits!
For one strip.
The ones I’ve seen, the light quality is poor.
Offered one as a gift, turned it down.
His wrap makes it effectively four strips: top, bottom & sides. Each separately addressable, and each LED addressable, great for developing different modes.
This I’m going to build.
P.S.
Enhance it a tiny bit with a reflective back on the wood to max light level. Particularly useful if you use a dark wood, or want to eliminate interference from the colour cast of a coloured wood. (can you tell I’m choosing which wood already…)
The beauty of the WS2812’s is they are on board constant current sources for each LED. Makes colour correction too easy.
I Actually had the idea of gluing some foil on the back of the timber before mounting the LED’s and aluminium for that extra refelectivity, but decided against it so that the light was more diffused. Although i didn’t test this.
If you have any ideas while making be sure to post a comment over at either the GitHub or Instructables page and I can potentially get around to adding them in!
Anyone had a play with setting neopixels into resin for underwater user?
If you prefer a version for the whole room, take a 1x1cm cable canal and screw it into the wall ~10cm below the ceiling. Glue a warmwhite LED-strip on top and an RGB or WS2812 on the bottom. Then get some ~5-8cm wide, thin wood/plastic panels and glue them to on the front (you can use the cabel canals lid so it’s easy to remove). I used 2*5.5m warmwhite (60LEDs/m) and 2*5.5m RGB with 2*60W power-supplys (bright enough ;) and LED controllers hidden behind the curtain where the cable runs down to the socket ) https://martinries.de/wp2/?p=1794 . Changing the light via Alexa-Scenes (‘Alexa, movienight!’) works like a charm.
The pictured lamp probably looks awesome when changing according to the music. Maybe add a mic?
Nice job, end result looks pretty awesome in the pictures. Pretty easy and simple to out together that way. How did you go for colour change over such a large distance of LED’s?
A future plan for this light will be integrating some for of music control, just when is the case.
When I did this a couple of years ago, I used skirting board upside down instead of the cable channel.
missing the audio reactive mode
It’s on its way ;)