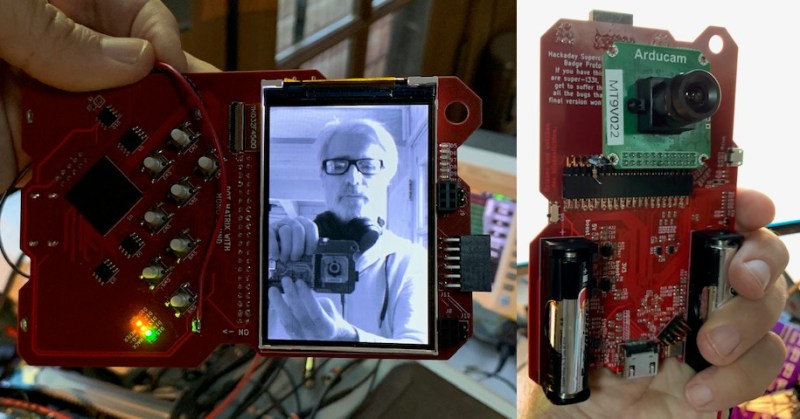
Look upon this conference badge and kiss your free time goodbye. The 2019 Hackaday Superconference badge is an ECP5 FPGA running a RISC-V core in a Game Boy form factor complete with cartridge slot that is more open than anything we’ve ever seen before: multiple open-source CPU designs were embedded in an open system, developed using the cutting-edge in open-source FPGA tools, and running (naturally) open-source software on top. It’s a 3,000-in-one activity kit for hardware people, software people, and everyone in between.
The brainchild of Jeroen Domburg (aka Sprite_TM), this design has been in the works since the beginning of this year. For more than 500 people headed to Supercon next week, this is a source of both geeky entertainment and learning for three action-packed days and well beyond. Let’s take a look at what’s on the badge, what you need to know to hack it, and how the design serves as a powerful development tool long after the badge hacking ceremonies have wrapped up.
The Big Story is Openness
Over the past few years several people have asked to design a Hackaday conference badge around an FPGA, but only this year did we think the time was right. FPGAs have finally achieved an all-encompassing level of openness as several open source toolchains are maturing and the RISC-V core delivers an powerful and modern instruction set architecture to the open source ecosystem.
This is a huge project, and Jeroen has been doing an unbelievable amount of heavy lifting, but to support the effort a large badge team as rushed in to aid in stabilizing the design, rooting out and fixing bugs in the toolchains, designing workshops around the badge to help teach FPGA principles, and writing C programs that run on top of it all.
This is not to be understated — working with this hardware as a distributed engineering team is a celebration of open truly means. The end result is that you can poke and prod almost any level of the system from the solder and silicon up.
The Hardware
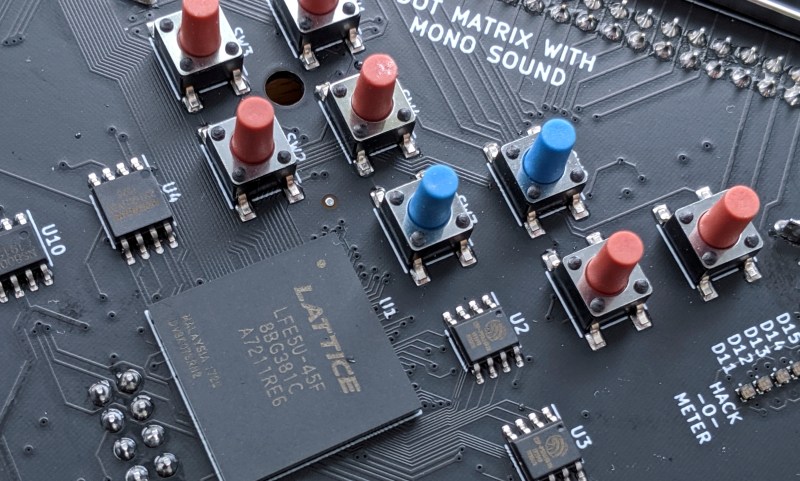
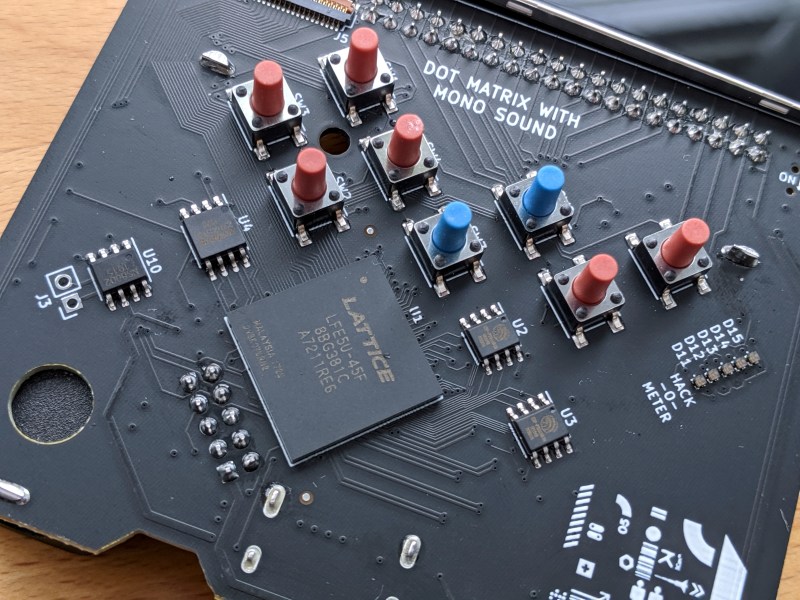
I suspect it’s the gritty details you’re after so here’s the chip rundown. The FPGA is the Lattice LFE5U-45F, an ECP5 with 45k LUTs. For the uninitiated, that’s a huge chip — the biggest would be the 85k but this is still more than you will likely ever need in three days of hacking. (I’d love it if you proved me wrong.) Supporting that chip are two Lyontek LY68L6400 64 Mbit SPI SRAM chips and a Winbond W25Q128JVSIQ 128 Mbit NOR flash chip. In theory you could just barely run Linux on this badge; seeing someone hang extra DDR memory off of the cartridge slot would be a great hack to make Linux purr would be fun, wouldn’t it?
In keeping with the Game Boy form factor, you’ll find a beautiful 480 x 320 color LCD display and eight user buttons arranged in the familiar D-pad/select/start/B/A layout. There is mono sound available on J3 and we’ll have speakers on hand for you to add with just two solder points. A “hardware” synthesizer inspired a little by the SID chip is fresh in the repository for you to play with.
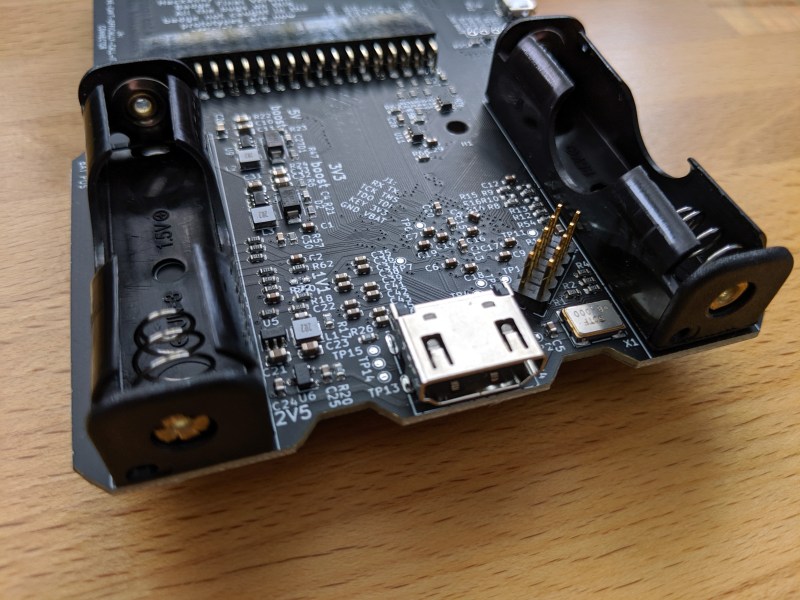
On the rear side of the badge you’ll find a USB port for loading your software. FPGA bitstreams can be flashed via the DFU bootloader, and compiled RISC-V C programs are even easier to load because the badge enumerates as USB mass storage.
One of the most titillating inclusions is an HDMI port at the bottom of the badge. We hope to put the badge hacks up on the big screen — this is begging to be a demoscene showcase. On the front, just above the screen, there are two add-on connectors with an IRDA module and an unpopulated PMOD footprint in between. On the back is a 40-pin 2.54 mm female breakout header, and every person who gets a badge will also get a protoboard cartridge that includes a flash memory chip and plugs right in. That’s right, the Death Star cartridge slot is fully operational and the badge can load games (or any other programs) written to the chip on the breakout cartridge. There is also a JTAG connector between the two AA battery holders for flashing the FPGA directly, should anything go wrong.
The final production version of the badge hardware is breathtaking. The beauty of the matte black solder mask as the canvas for a miniature metropolis of support components and a salting of silk screen labels — both practical and amusing — add up to a pleasing aesthetic.
The Software
In this case, the software is the hardware for this project as the FPGA must be programmed for anything to work. It’s all open all the way down to the transistors. The two main parts of the architecture are the System on Chip (SoC) and the Initial Program Loader (IPL). The SoC is FPGA gateware that creates the CPUs and all their peripherals, servicing everything from buttons and audio, to HDMI and the cartridge connector. The IPL is a system software that runs on top of this and implements the best graphics tricks from a range of classic gaming consoles. If you saw it on an SNES, you can do the same thing on this badge.
It’s hard to overstate how empowering an FPGA really is. The badge has numerous LEDs on it which are not directly controlled by the RISC-V processor. Instead, Jeroen has implemented a PIC microcontroller core in the SoC to handle the low-level driving duties. Need an extra timer or other “hardware” peripheral? Implement it on the FPGA and hook it into the RISC-V core. Hang some wacky hardware off of the cartridge connector and build whatever adapter you need using the gates inside the chip itself. Your CPU shouldn’t bother itself with bit-banging or cycle-counting. That’s what programmable logic is for.

The IPL software “OS” layer delivers great power to anyone looking to write C games and other programs. It takes compiled .elf files from the flash chip on the badge or on the expansion cartridge, adds them to a menu system, allowing the user to run them. If you just want to program games, you don’t even have to worry about the FPGA underneath it all. It’s just another microprocessor, or four.
The SDK for writing in C is packed full of goodies. There’s functionality for a background image, two tile layers that display 16 x 16 pixel tiles from a 16 x 32 tilemap with a 16-color palette. On top of it all is a sprite layer. Not only can these all run concurrently, but you can scale and skew them with hardware-driven speed that far outpaces what you’d normally accomplish with a single CPU. Sprite_TM has essentially built his own custom GPU here, and you are invited to use it.
What You Need to Know; What to Bring With You
Jump in feet first and try something new with this badge. If you’ve been sitting on the FPGA sidelines, now’s the time to dabble in it, and a few hundred people registered for the beginner FPGA workshops using the badge are planning to do just that. If you’ve never written a tile-based game before, now’s your chance to write that Frogger clone you’ve had on your project list. The beauty of a top-to-bottom open project is that you can get in on whatever floor you’re comfortable.
First and foremost, you need to bring a Laptop and a micro USB cable. You have a much better time if you arrive with the toolchain pre-installed. There’s good news on this front, as Sean Cross has put together a dependancy-free toolchains for Linux, Mac, and Windows. Just head to his repo, download the archive for your OS, and make sure the folder with the binaries is in your path. It comes with all the open source goodness: yosys and nextpnr-ecp5 for FPGA development, dfu-util and riscv-gcc for C work.
Those planning to spend a substantial chunk of their time in the badge hacking area may want to pack more. Extra AA batteries, rechargeables or disposable, are a very very wise choice here. Make sure to pack your USB-to-Serial cable so that you can printf your way out of any trouble. If you’ll be working with the FPGA you should bring along any PMOD boards you have on hand. As mentioned, your badge will have a prototyping cartridge so work on your schematic, or even assemble some prototypes ahead of time. Bring along anything you think you’d like to hang off this beast.
The amount work that went into this piece of hardware art is staggering, and Jeroen will tell the full story of that during his talk at the Hackady Superconference on Saturday, November 16th. If you can’t be there, head over to Hackaday’s YouTube page and check out the live stream. If you are one of the lucky ones who scored a ticket before they sold out, the next part of the adventure is all yours. We’re excited to be a part of the open FPGA revolution. See you at Supercon!


How do I get one such badge?
If you have a Supercon ticket, you will get a badge when you check in. If you don’t have a Supercon ticket I think you’ll have to wait for the hardware repo to be published (shouldn’t be too long) and roll your own.
Thanks but no thanks. Few of us have the skill set and tools to solder a BGA monster like that ECP5.
Either someone produces it for mere mortals or it’s user base will never exceed more than a couple hundred peeps.
Well you could go to your local phone/laptop repair shop and have them solder the BGA. Everything else you should be able to solder with a steady hand at weird angles.
I mean…that’s kind of the point. It’s a conference badge that signifies you attended an event. It’s not meant to be a commercial product.
not quite. That kind of ‘signifying’ isn’t really part of the HAD ethos. Past HAD conferences have sold badges on Tindie. I bought one in the past. I’d probably buy this one as well if it was available. This one is open so maybe I’ll just have to make one myself.
My understanding is that reflow soldering is easy, and doesn’t require a lot of equipment. I’ve seen it done with a hotplate and a heatgun, although I will admit that what was soldered weren’t BGA parts, but I’ve also seen videos of people doing it with toaster ovens.
Hand soldering surface mount parts is generally pretty easy. I bought a stereo microscope for it, but I wound up just using a head mounted magnifier for most of the stuff I’ve done. If you reflow the BGA part, the rest could be done by hand with a soldering iron and a pair of tweezers in three or four hours.
Of course, I’d rather buy it fully assembled, but I think I could manage building a kit if it came to that.
What I like about Jeroens projects are that they’re not just impressive technical achievements, but they’re *fun*, never tedious. Did Espressif sponsor this? Is Jeroen working for Lattice now?
Nope, this is not a sponsored project and (as far as I know) Jeroen’s not on the Lattice payroll. But he does seem to have packed an incredible amount of effort into this passion project and it shows!
Can you get a badge without going?
Only I if you manufacture it yourself.
Part of me wants to grab the dimensions to 3d print a badge before I go. The other part just…. wants to admire the raw beauty of the PCB….
*badge case. Silly Justin, read before you post. Seriously though, this badge looks amazing!
Case would definitely be my first project to, with some proper buttons (maybe even cast).
I can’t attend the Supercon, so I sure hope some OSH kit vendor (Crowd Supply??) makes this badge available. It’s a sweet combination of devices with enough LUTs to do some major projects. Interactively zoomable Mandelbrot anyone?
I want one, I would pay hard currency if anyone out there does do a production run. I think there are a great many hackers out there who would happily buy an open source fpga dev board like this – the gameboy form factor is just a cool bonus, this thing is way more than yet another 2d games dev board!
Unless it’s just me? I have a bunch of cool open source toys waiting for that fantasy of “more spare time for hacking. This badge could collect dust next to my arduboy and my gp32x Wiz :-)
[Analogue](https://www.analogue.co/) (they make high-end FPGA based game consoles) are planning on releasing a $200 [gameboy form-factor handheld](https://www.analogue.co/pocket/) next year.
Here’s a quote from their marketing copy:
“Pocket is designed for development. We added a second dedicated just for developers to develop & port their own cores.With access to Analogue’s proprietary hardware and scalers – we think developers are going to do some amazing things.”
Geez, everyone’s copying Sprite_TM’s ideas these days ;-)
Need PCB gerbers or 3d model to design enclosure, please.
Your case last year was awesome. Give it a shot: https://github.com/Spritetm/hadbadge2019_pcb
Like! (Mods, didn’t mean to report that. Also maybe swap “report” and “reply”, also sorry lefties.)
I’ve done this by accident, maybe a cancel button? So you have to click “report” followed by “confirm”
Hey, great!
One question tho; A lot of the 3d models for parts like switches and the BGA part don’t seem to be part of the standard KiCAD distribution, and Googling isn’t turning them up.
Can somebody point me at a source for these models? It would make my life a lot easier…
So far, I’m looking at:
The buttons: SW_PUSH_6mm_H9.5mm.wrl Maybe it is the same as last year’s badge? Notes give a Taobao link, I suppose I should look it up…
The connector for the screen (FH26W-45S-0.3SHW(60)) seems to have no model even listed, and there is not even a part on the board for the screen, so it seems.
Found the part number (ZYX Technology LQ032ALJV01) in the BOM notes, so I guess I’ll try to find specs from there.
The USB connector on J2: Connector_USB.3dshapes doesn’t contain USB_Micro-B_Amphenol, just other brands.
HDMI (!?) on J4 has no model. Seems to be Boom Precision HDMI-001.
The power switch doesn’t have a 3d model. I had to search to find what I think is a model number “Hroparts K3 12965”. I guess I have to build that one.
The BGA (not that important to model around, but nice for completeness): Lattice_caBGA-381_17.0x17.0mm_Layout20x20_P0.8mm_Ball0.4mm_Pad0.4mm_NSMD.wrl
The battery holders don’t have 3d models or model numbers, but they seem pretty generic, so maybe I can just use a standard one from something else and hope it fits.
The 3d Receiver at U12 has no 3d model set. Seems to be RPM973-H11
Finally, speaker attached to J3, it would be good to know the part number
Since I don’t have a board to measure, the more of these models I can source correctly means a better chance that my 3d model will actually fit the board and it’s parts. They have me signed up for a *LOT* of volunteer hours during the show, so I won’t have much any time to update it once I actually get a board to play with…
Didn’t get a response here, so I posted the issue on the Github. It would be kind to at least get the models that are linked from the project.
With some measurements from Sprite™, some models from the manufacturer, a few things I googled, a few wrong parts that were “close enough” and a few wrong parts that I scaled to hold the place, I finally have a complete board model.
I don’t have a lot of days left, but I’ll try to come up with a 3d printable enclosure before the show.
Hey Tim, do you mind sharing some of that data? I was considering trying my hand at a model as well.
This is great news but, it could be better if they develop in Rust with all the benefits of a modern C based language.
The entire thing is open, top-to-bottom; there’s nothing stopping you from porting Rust to it and having a go at the thing. Seeing that C probably is way more commonly used under the HAD audience than Rust (also, because I haven’t managed to find time to mess with Rust myself), we decided to use C.
Wow, looks awesome. Can’t wait to get my hands on one!
*a SNES
Depends on how you pronounce it. My guess is that Mike pronounces it as ‘es-en-ee-es’.
Why do people keep using those crappy push buttons for such projects? There’s a lot of much better buttons available that would be more suited to the task.
Speaking of crappy, does it have SAO connectors?
B^)
Looks like two above the screen
Depends. The small tact switches that teenage engineering uses for their pocket operators are nice and responsive. I ordered some off amazon, thinking they would be similar, and they were comparatively garbage. I’ve always wondered who their exact supplier is for their mini-pots and switches.
What buttons would you use instead? Are there good < $0.50/pc, easily sourced buttons out there? Are you criticizing the appearance or the performance? Don't all these momentary buttons just have tactile domes underlying them? I would be genuinely curious to know about better options out there.
Since it’s 100% open source… do you mind sharing the BOM cost?
The LUTs are 4-bits wide for anyone curious to map to other FPGAs they may have experienced.
I was going to do the same thing for another con. Oh well.
I hope someone makes an image for it that loads CHIP8 ROMs off of SAO boards. That would be super fun and really drop down the barrier to entry.
Still needs a filter for the sound… something simple like
hpf = input – lpf – bpf * (1/Q)
bpf += hpf * cutoff
lpf += bpf * cutoff
cutoff = 2 * sin(cutoffFreq / sampleRate * PI)
(filter is stable if cutoff is in 0..1 range and Q is > 0)
That’s on the end of a very long to-do list. At least a lowpass is.
But we gotta leave something left for people to do at the con…
Hi, I know it’s late as hell, but I was wondering if there is a way or a place to look for last minute general admission tickets for the Superconference in the unlikely case someone give it up ?
This thing looks amazing! What is the hole (M1) between the D-pad buttons for? Is it just for a #4-40 screw for mounting, or is there some kind of thumbstick that could be mounted there?
I had a vague idea that people may want to 3d-print an actual D-pad, and that they’d need a mounting hole for that. There’s nothing that comes with the badge that is supposed to go there, but I’d be interested in seeing what people can come up with.
What a hero!
Hey! Does anyone know where to get that camera module? I want to do an imaging hack too
Ask David Williams nicely: in the hack chat for the Supercon ( https://hackaday.io/messages/room/280647 ) he said he had a few extras.
Wait tickets are sold out?
Ooooh yeah, months ago really. Early bird tickets were sold out within the first hour.
Just out of curiosity, what would it take to replace the FPGA in the circuit with a version of the larger one?
BGA rework. In theory, you have the ’85 which is iirc pin-compatible with the ’45 if you pick the right package (BGA381 iirc) but, well, it’s a BGA. Given good hot air rework gear, a microscope and enough flux I think it’d be doable, though.
I see I wasn’t clear. I meant in the design since it seems likely that I’d have to make my own. After all, if I have to make one myself, why not spend the extra $20 and get the bigger part? It sounds like that would work, as long as I got the 381 pin (ball? I don’t know about BGA terminology) version.
I think the Lattice literature mentions that all ECP5 FPGAs in the same package are drop-in compatible with eachother, so you should be good.
Want! Is anyone doing a group buy/build for those who couldn’t make it to the event? If not, I’d be interested in starting an order with PCBWay and just splitting the costs :)