
Trent Fehl is an engineer who has worked for such illustrious outfits as SpaceX and Waymo. When he got into baking, he brought those engineering skills home to solve a classic problem in the kitchen: keeping a sourdough starter within the ideal, somewhat oppressive range of acceptable temperatures needed for successful fermentation.
A sourdough starter is a wad of wild yeasts that you make yourself using flour, water, and patience. It’s good for a lot more than just sourdough bread — you can scoop some out of the jar and use it to make pancakes, waffles, pretzels, and a host of other bread-y delights. A starter is a living thing, a container full of fermentation that eats flour and has specific temperature needs. Opinions differ a bit, but the acceptable temperature range for active growth is about 60 F to 82 F. Too cold, and the starter will go dormant, though it can be revived with a little love. But if the starter gets too hot, all the yeasts and bacteria will die.
 While there are of course commercial products out there that attempt to solve this problem of temperature control, most of them seem to be aimed at people who live in some wonderland that never gets warmer than 80F. Most of these devices can’t cool, they only provide heat. But what if you live in a place with seasons where the climate ranges from hot and humid to cold and dry?
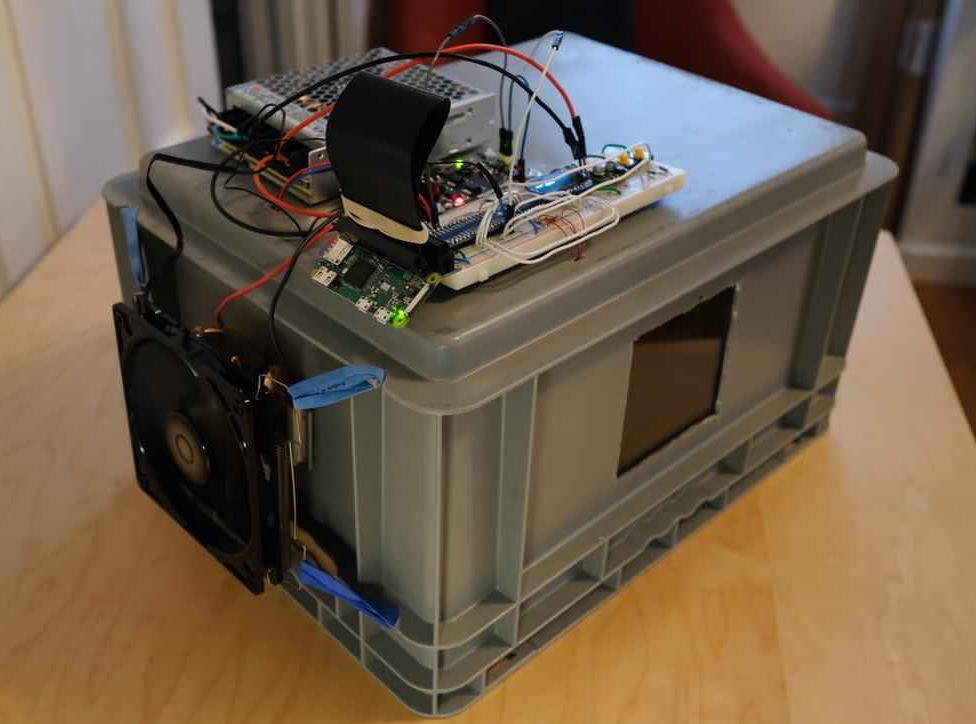
The answer lies within Chamber, a temperature-regulated haven Trent created that lets these wild yeasts grow and thrive. It uses a Peltier unit to heat and cool the box as needed to keep the mixture fermenting at 26°C /78.8°F.
Thanks to the Peltier unit, Trent can change the temperature inside the chamber simply by alternating the direction of current flow through the Peltier. He’s doing this with an H-bridge module driven by a Raspberry Pi Zero. When it starts to get too warm in the chamber, the fan on the outside wall vents the heat away. A second fan inside the chamber pulls warm air in when it gets too cold.
Trent says that Chamber performs really well, and he’s recorded temperatures as low as 60F and as high as 82F. He mostly uses it for sourdough, but it could work for other temperature-sensitive food sciences like pickling, growing mushrooms, or making yogurt. We think it could be ideal for fermenting kombucha, too.
Chamber works well enough that Trent has put further development on the back burner while he makes use of it. He does have several ideas for improvements, so if you want to help, check out his website and Github repo.


This would be perfect for cultivating grain spawn jars for mycology
A friend once told me they ordered a wine cabinet for their lab as it was cheaper than lab equipment designed for that job.
I bake sourdough bread in the tropics. I successfully control the temperature with a proofer (Brod & Taylor). My greatest challenge is controlling hydration of the flour because of the extremely high humidity. My starter is made of 50% rye and 50% whole wheat.
So, you were making LSD?
No, ergot is hallucinogenic but different from LSD. If I remember history properly, it was more accidental, though LSD was too.
This would be a real easy project if you had a peltier based travel cooler that’s not being used.
You just solved my “problem”, thank you, sir!
Fermenting all grain beer might be possible.
we just leave it on the bench – and that has more temperature stability and range than this boxes one of 16C to 28C!
16C and 82C are 2 of my “favorite” Celcius temps!
Just transpose their digits and they are Fahrenheit temps!
You blew my mind.
Maybe you mean 16C and 28C..
Yes! Yes, I did!
Thank you!
I had to read your response twice (and my comment twice) before I saw my mistake.
16C ~= 61F
28C ~= 82F
Seems like a lot of fuss. I have worked with sourdough for decades. If you are a professional baker with a shop using sourdough every day – OK maybe useful. For the rest of us, using the sourdough daily in bread, muffins, etc. etc. Can make you gain a lot of weight unless you have a LARGE family with lots of active hungry kids, or a football team. I am happy to put mine in the fridge for wafer weeks to let it go dormant, then revive it when I feel like baking. Makes great, and fast tea biscuits, especially using a food processor to mix.
I’m with you Janet. Let it go to sleep in the fridge and wake it up when you need it.
” I am happy to put mine in the fridge for wafer weeks”
“wafer weeks”? Please explain.
I’ll tell you where it is useful for me. I like to bake sourdough in the morning. If I leave it out on the counter overnight, it’ll be over proofed by the time I wake up. If I put it in the fridge, it is too cold and it won’t have proofed enough by the time I wake up.
With something like this, I could find an appropriate temperature, mix and stretch the dough before going to bed and have it ready to put in the over in the morning when I wake up.
I’ve made a much larger version for beer fermenters. I was able to get away with a single 65W peltier and there’s two parts that are key for performance.
1) Peltiers can only move significant watts when their temperature differential is low. The ambient air is only a small fraction of that, the larger temperature gradients come from heatsink to air interface. Getting oversize heatsinks around 0.1C/W thermal resistance makes a massive performance difference.
2) Thick insulation massively reduces the heat load you are trying to deal with. I have 3 inch thick foam on mine.
I would be interested to hear more about your solution. I’ve thought about using peltiers for fermentation management instead of a big glycol setup at home.
82º is not the high boundary, this guy’s information is poor. Yeasts won’t die until mid 90s. I use refrigerators and a thermometer. Pretty easy to cool the dough, and then pull it out.
One of the projects I’ve worked on drove the Peltiers very hard (borderline too hard – they sometimes melted down).
The conventional method of air cooling a finned heat sink mounted to a Peltier is to mount a fan that blows into the heat sink. The problem is that the Peltier injects heat into the heat sink in the center of the heat sink – exactly where air flow is lowest at the fan hub. There is excellent air flow at the edges of the heat sink, but that’s not where the heat is.
The an alternative mounts a blower (such as Digikey 603-1363-ND) directly on top of the heat sink fins, confining airflow to between the fins. A rounded duct is needed to direct air from the edge of the blower into the fins on one side of the sink, confine airflow to the fins, and let the air exhaust from the other side of the sink. This results in excellent air flow across the entire face of the sink, even the center of the sink where the Peltier injects heat.
overkill on a proofing box. stay out of my kitchen
Back in 2007/2008 I did this for no-milk yogurt and other incubated foods http://ovosodo.blogspot.com/search/label/OpenWARM