3D Printable Stick Shift For Your Racing Simulator

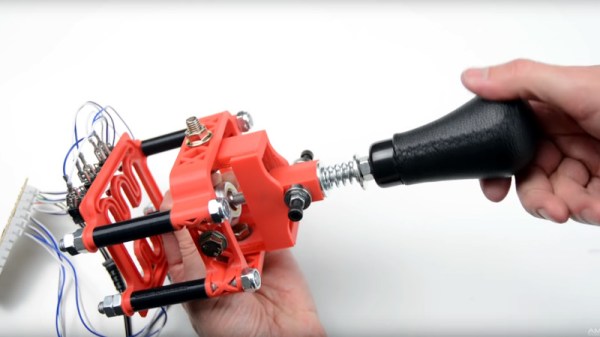
If you don’t get enough driving in your real life, you can top it off with some virtual driving and even build yourself a cockpit. To this end [Noctiluxx] created a very nice 3D printable stick shifter you can build yourself.

The design is adapted for 3D printing from an older aluminium version by [Willynovi] over on the X-Simulator forums. Every version uses an off-the-shelf ball joint for the main pivot, below which is a guide plate with the desired shift pattern.  Each position has a microswitch, which can be connected to a USB encoder from eBay which acts as a HID. The position is held in the Y-axis position by a clever spring-loaded cam mechanism above the ball joint, while the X-position is held by the bottom guide plate. The gear knob can be either 3D printed or the real deal of your choice.

This design is the perfect example of the power of the internet and open source. The original aluminium design is almost a decade old, but has been built and modified by a number of people over the years to get us to the easy to build version we see today. [amstudio] created an excellent video tutorial  on how to built your own, see it after the break.

For more awesome cockpits check out this one to fly an actual (FPV) aircraft, and this dazzling array of 3D printable components for your own Garmin G1000 avionics glass cockpit. Continue reading “3D Printable Stick Shift For Your Racing Simulator”

It Turns Out, Robots Need Tough Love Too

Showing robots adversarial behavior may be the key to improving their performance, according to a study conducted by the University of Southern California. While a generative adversarial network (GAN), where two neural networks compete in a game, has been demonstrated, this is the first time adversarial human users have been used in a learning effort.

The report was presented at the International Conference on Intelligent Robots and Systems, describing the experiment in which reinforcement learning was used to train robotic systems to create a general purpose system. For most robots, a huge amount of training data is necessary in order to manipulate objects in a human-like way.

A line of research that has been successful in overcoming this problem is having a “human in the loop”, in which a human provides feedback to the system in regards to its abilities. Most algorithms have assumed a cooperating human assistant, but by acting against the system the robot may be more inclined to develop robustness towards real world complexities.

The experiment that was conducted involved a robot attempting to grasp an object in a computer simulation. The human observer observes the simulated grasp and attempts to snatch the object away from the robot if the grasp is successful. This helps the robot discern weak and firm grasps, a crazy idea from the researchers that managed to work. The system trained with the adversary rejected unstable grasps, quickly learning robust grasps for different objects.

Experiments like these can test the assumptions made in the learning task for robotic applications, leading to better stress-tested systems more inclined to work in real-world situations. Take a look at the interview in the video below the break.

Continue reading “It Turns Out, Robots Need Tough Love Too”

Fail Of The Week: Thermostat Almost Causes A House Fire

Fair warning: any homeowners who have thermostats similar to the one that nearly burned down [Kerry Wong]’s house might be in store for a sleepless night or two, at least until they inspect and perhaps replace any units that are even remotely as sketchy as what he found when he did the postmortem analysis in the brief video below.

The story begins back in the 1980s, when the Southern New England area where [Kerry] lives enjoyed a housing boom. Contractors rushed to turn rural farmland into subdivisions, and new suburbs crawled across the landscape. Corners were inevitably cut during construction, and one common place to save money was the home’s heating system. Rather than engage an HVAC subcontractor to install a complicated heating system, many builders opted instead to have the electricians install electric baseboards. They were already on the job anyway, and at the time, both copper and electricity were cheap.

Fast forward 40 years or so, and [Kerry] finds himself living in one such house. The other night, upon catching the acrid scent of burning insulation, he followed his nose to the source: a wall-mounted thermostat for his electric baseboard. His teardown revealed burned insulation, bare conductors, and scorched plastic on the not-so-old unit; bearing a 2008 date code, the thermostat must have replaced one of the originals. [Kerry] poked at the nearly combusted unit and found the root cause: the spot welds holding the wires to the thermostat terminal had become loose, increasing the resistance of the connection. As [Kerry] points out, even a tenth of an ohm increase in resistance in a 15 amp circuit would dissipate 20 watts of heat, and from the toasty look of the thermostat it had been a lot more than that.

The corner-cutting of the 1980s was nothing new, of course – remember the aluminum wiring debacle? Electrical fires are no joke, and we’re glad [Kerry] was quick to locate the problem and prevent it from spreading.

Continue reading “Fail Of The Week: Thermostat Almost Causes A House Fire”

Making Custom 3D Printed Slide Switches

For a little over a year now we’ve been covering the incredible replicas [Mike Gardi] has been building of educational “computers” from the very dawn of the digital age. These fascinating toys, many of which are now extremely rare, are recreated using 3D printing and other modern techniques for a whole new generation to enjoy and learn from.

He’s picked up a trick or two building these replicas, such as this method for creating bespoke slide switches with a 3D printer. Not only does this idea allow you to control a custom number of devices, but as evidenced in the video after the break, the printed slider sounds absolutely phenomenal in action. Precisely the sort of “clunk” you want on your front panel.

Of course, [Mike] doesn’t expect anyone to create this exact switch. He’s designed it as part of his Working Digital Computer (WDC-1) project that he’s documenting on Hackaday.io, so it has a rather specific set of design parameters. But with the steps he outlines in the write-up, you should have no problem adapting the concept to fit your specific needs.

So how does it work? One half of the switch is a track is printed with indents for both reed switches and 6 x 3 mm disc magnets. The other is a small shuttle that itself has spaces for two of the same magnets. When it slides over the reed switches they’re activated by the magnet on one side, while the magnet on the other side will be attracted to the one embedded into the track. This not only gives the switch detents that you can feel and hear while moving it, but keeps the shuttle from sliding off the intended reed switch.

If you like this, you’ll absolutely love his mostly 3D printed binary encoder that we featured recently. With his track record, we’re excited to follow the WDC-1 project as it develops, and thrilled that [Mike] has brought it to Hackaday.io.

Continue reading “Making Custom 3D Printed Slide Switches”

Engineering Your Way To Better Sourdough (and Other Fermented Goods)

Trent Fehl is an engineer who has worked for such illustrious outfits as SpaceX and Waymo. When he got into baking, he brought those engineering skills home to solve a classic problem in the kitchen: keeping a sourdough starter within the ideal, somewhat oppressive range of acceptable temperatures needed for successful fermentation.

A sourdough starter is a wad of wild yeasts that you make yourself using flour, water, and patience. It’s good for a lot more than just sourdough bread — you can scoop some out of the jar and use it to make pancakes, waffles, pretzels, and a host of other bread-y delights. A starter is a living thing, a container full of fermentation that eats flour and has specific temperature needs. Opinions differ a bit, but the acceptable temperature range for active growth is about 60 F to 82 F. Too cold, and the starter will go dormant, though it can be revived with a little love. But if the starter gets too hot, all the yeasts and bacteria will die.

While there are of course commercial products out there that attempt to solve this problem of temperature control, most of them seem to be aimed at people who live in some wonderland that never gets warmer than 80F. Most of these devices can’t cool, they only provide heat. But what if you live in a place with seasons where the climate ranges from hot and humid to cold and dry?

The answer lies within Chamber, a temperature-regulated haven Trent created that lets these wild yeasts grow and thrive. It uses a Peltier unit to heat and cool the box as needed to keep the mixture fermenting at 26°C /78.8°F.

Thanks to the Peltier unit, Trent can change the temperature inside the chamber simply by alternating the direction of current flow through the Peltier. He’s doing this with an H-bridge module driven by a Raspberry Pi Zero. When it starts to get too warm in the chamber, the fan on the outside wall vents the heat away. A second fan inside the chamber pulls warm air in when it gets too cold.

Trent says that Chamber performs really well, and he’s recorded temperatures as low as 60F and as high as 82F. He mostly uses it for sourdough, but it could work for other temperature-sensitive food sciences like pickling, growing mushrooms, or making yogurt. We think it could be ideal for fermenting kombucha, too.

Chamber works well enough that Trent has put further development on the back burner while he makes use of it. He does have several ideas for improvements, so if you want to help, check out his website and Github repo.

Continue reading “Engineering Your Way To Better Sourdough (and Other Fermented Goods)”

Commercial Circuit Simulator Goes Free

If you are looking for simulation software, you are probably thinking LTSpice or one of the open-source simulators like Ngspice (which drives Oregano and QUCs-S), or GNUCap. However, there is a new free option after the closing of Spectrum Software last year: Micro-Cap 12. You may be thinking: why use another closed-source simulator? Well, all the simulators have particular strengths, but Micro-Cap does have very nice features and used to retail for about $4,500.

The simulator boasts a multipage schematic editor, native robust digital simulation, Monte Carlo analysis, 33,000 parts in its library, worst-case and smoke analysis, Smith charts, and it can even incorporate spreadsheets. There’s a built-in designer for active and passive filters. Have a look at the brochure and you will see this is a pretty serious piece of software. And now it’s at least free as in beer.

Continue reading “Commercial Circuit Simulator Goes Free”

Titanium Coating Is Actually Pretty Straightforward

[Justin] enjoys tinkering in his home lab, working on a wide variety of experiments. Recently, he’d found much success in coating objects with thin layers of various metals with the help of a DC sputtering magnetron. However, titanium simply wouldn’t work with this setup. Instead, [Justin] found another way.

As it turns out, coating with titanium is quite achievable for even the garage operative. Simply run current through a titanium wire, heating it above 900 degrees in a vacuum. This will create a shower of titanium atoms that will coat virtually anything else in the chamber. [Justin] was able to achieve this with little more than some parts from Home Depot, a vacuum pump, and a cheap glass jar. He was able to produce a nice titanium oxide finish on a knife blade, giving that classic rainbow look. Coating crystals was less straightforward, but the jet black finish achieved was impressive nonetheless.

[Justin] plans to upgrade his vacuum rig further, and with better process control, we’d expect even better results. The earlier work is also very relevant if you’re interested in creating fine coatings of other materials. Video after the break. Continue reading “Titanium Coating Is Actually Pretty Straightforward”