It is always tricky setting the infill for a 3D printed part. High infill parts are strong but take longer to print, while low infill prints take less time, but are weaker internally and in danger of surface layer droop between the infill pattern. [Stephan] has a better answer: gradient infill. You can see a video below and find his Python code on GitHub.
The idea is simple enough. In most cases, parts under stress see higher stress near the surface. Putting more material there will make the part stronger than adding plastic in places where the stress is lower. [Stephan] has done finite element analysis to determine an optimal infill pattern before, but this is somewhat difficult to do. Since the majority of parts can follow the more at the edges and less at the center rule, gradient infill makes sense except for a few special cases.
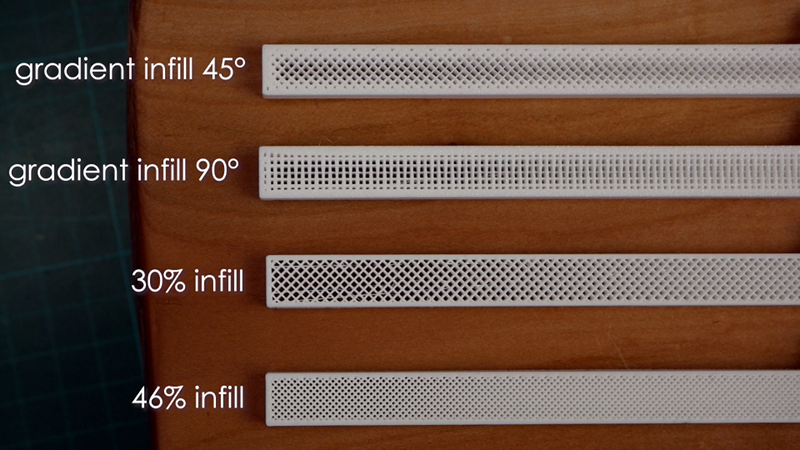
Of course, the real question is: how do you create parts with this type of infill? Some slicers have infill settings that can almost get you there. However, the setup for them isn’t easy. For example, KISSSlicer’s paid version will take a grayscale image to set the infill density. [Stephan] noticed, though, that Cura — and probably most other slicers — put comments in the G-code to show where different features such as infill start. By changing the extrusion amount during infill, you can use the same basic pattern, but still, get the gradient you want.
He wrote a simple program to postprocess the G-code before it is sent to the printer. He computes the distance from the outside of the part and based on that changes the amount of extrusion. This works because of an unusual type of infill he uses that is already in small line segments. However, for more conventional infill patterns, the lines are long, so his program has to chop the lines into shorter segments and then apply the algorithm. This makes for a larger file, of course.
There are a few stipulations. You need to have walls print before infill and you need to be set for relative extrusion. If your slicer doesn’t emit comments to mark where infill starts and stops, that’s going to be a problem. Even then, if the comments aren’t the same as Cura’s, you’ll probably need to change the code to suit. Or just use Cura for slicing.
The test results were good. The parts were stronger, although in some cases, simply increasing the infill would get you the same result. As [Stephan] notes, it may not be perfect, but it is useful for many parts.
We aren’t strangers to postprocessing G code. For some jobs, you just need to make your own G-code, anyway.


Code for PrusaSlicer is on the way:
https://github.com/prusa3d/PrusaSlicer/pull/3517
oss gives the power toe the people (-:
As long as they TOE the line?
B^)
Does the gradient exist in Z or is it only on X/Y direction?
My understanding of the way it’s been implemented is that the gradient is in X/Y only, as it’s parsing existing GCode perimeter/infill comments to post-process things. I suspect an implementation baked into the slicer itself (as @Thorsten mentions above) would be better able to implement it in X/Y/Z.
It feels like a good implementation of this (either thinning extrusion rates or changing infill geometry) could yield a decent improvement in strength/weight. Possibly at the expense of a fair bit of computation in slicing, but most likely worth it. I did wonder if it’d be possible to distribute points around the interior of a part based on proximity to the shell, then fill with voronio cells? Well beyond my abilities, but feels like it would mimic bone structure
It looks like someone on github has made a voronoi infill generator: https://github.com/tjwill95/voronizer which I think is a great idea. I’m wondering if freecad’s openmesh generator, for doing finite element analysis, could be used to produce infill as a function of stress and have nearly ideal infill generation.
Stephan says in the video that, as this is a g-code post-processing, there is no information about the model on the Z axis, so it’s limited to the XY plane. And he even says that he hopes that slicers offers this type of infill directly, so that the Z axis is also included in the infill calculations.
Simply genius. Seems almost like common sense. How comes we didn’t come up with this sooner? :-D
This is roughly like using an I-beam or other cross-sectional formed shape for an optimum strength/material use application rather than a solid chunk of material. If you really want to go down a rabbit hole, you can dive into generative design that adapts the infill in specific, high-stress areas.
I’d like to screw around with fractal structures for infil, like maybe .. https://en.wikipedia.org/wiki/Sierpi%C5%84ski_triangle or others with a hexagonal cell. Even if it’s not fractal, or something definitely more Barnes-Wallis or Buckminster-Fuller.
Slic3r (and therefore PrusSlicer) already has the Hilbert Curve as an infill type: https://manual.slic3r.org/expert-mode/print-settings#infill-patterns
FYI this isn’t new. Cura has had this option for a number of years. Check out the Cubic Subdivision infill pattern. This 2 year old post on Reddit shows the infill pattern: https://www.reddit.com/r/3Dprinting/comments/61osx6/bonelike_infill_setting_in_cura_more_infill_near/
try as i might i cant seem to get new versions cura to talk to my printrbot. probably means i need to replace the printrboard with something newer. or flash the firmware. its a project in of itself none the less.
This has some interesting implications for GRIN dielectric lenses.