When you’re 3D printing parts, it’s easy to create pieces with all manner of complex geometry. However, you’re often stuck dealing with unsightly layer lines and other surface imperfections. [reitter_m] chooses to get around this through the use of a tumble polisher of his own design.
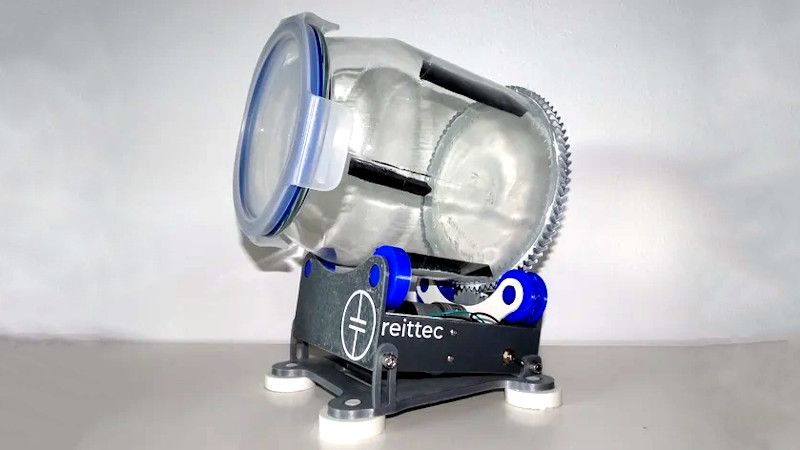
The polisher uses a drum made out of a glass jar sourced from IKEA. A 3D printed gear is printed to size, and then fitted around the outside. This allows the drum to be turned by a motor fitted into the base of a 3D printed cradle. A simple gear motor is used to spin the drum nice and slowly, powered by a 12 V, 500 mA supply.
It’s a build that uses readily available parts, and should be a cinch to recreate by anyone with a 3D printer. The later revision uses an even more common IKEA jar, making it even easier to copy the build no matter where you are in the world. It even uses herringbone gears which gives it a very offbeat look. We’ve seen other hacked tumbler projects too, like this one built around an old case fan. Video after the break.


I needed one of these. This is cool and useful as well as simple. Nice!
I use those IKEA glass jars as vivariums for my smaller theraphosidae. Versatile stuff.
It is cool to DIY, and it looks like a wonderful build. Kudos to reitter_m for that.
But for those of you saying “I’d like to have one of these”, if you don’t feel like a build, you can buy them pre-made. Look up “rock tumblers” and you can find them in all manner of sizes.
They are weirdly expensive though, my guess is that’s why he started this project.
Yes, they even turn up in thrift stores and at yard sales, maybe even in the toy areas, Nat Geo, Smithsonian, NSI all did kids or family kits that came in flashy boxes and bright colors.
No need for gears. Rubber rollers work just fine. See every rock polisher ever made.
Also when tumbling metals there is a soap that you add to the mix that helps with the process. A lot of rock shops carry all the supplies needed for this.
https://contenti.com/polishing-n-finishing/tumbling/media-n-soaps
True, you can probably get really redneck simple with it, couple of skateboard trucks, plastic protein jar from a weightlifting bro, maybe lined with dollar store car floormat if you want it to last, drive it off a tape mechanism pinch roller wheel if you don’t load it up too much. Stick your everyday scavenged DC motor from 9.6V power tools or whatevs on it with the pinch roller drilled and jammed on shaft for more grunt.
You can get both rotary and vibratory tumblers from Harbor Freight for around $50 when they have a sale. The rotary belts used to break a lot but the quality has improved in recent years. The filament for the 3D printed parts here probably cost more than that.
50$ is like 2kg of filament. This looks like 250g max
You can get them on Amazon for around $20.
I have tried this with rock polishing media, stainless steel media, walnut and corncob media, and ceramic chunks. I used drums and vibrating polishers. None of them worked worth a darn on PLA. More before/after photos please!
funny, that’s exactly what I thought. I’ve experimented with ABS and noticed no significant effect. It turned out to be not as a wonder device as you might expect. The fact that the 3D printed object is very light doesn’t help either. So I’m hoping for more info. You would expect with ABS being soft, it should do something, but it doesn’t. I’m very sure I did lot’s of things wrong… But in the end, 5 minutes with a piece of sand paper was a lot quicker.
Other then that this project is a very nice and clean build.
the idea of using a cheap (perfectly sealable) glass jar is brilliant. It allows you to observe what’s happening and I’m thinking taking up this project again, because the appeal of a polishing method other then sandpaper is appealing. So thanks for the inspiration.
Or a pretzel / cheese puff / whatever snack jar could be used. Glass containers were designed for people like me to drop.
By the way, I tried wet and dry. No difference after more than 24 hours. I wondered about attaching weights to the parts, or inside parts if I tumble an assembled thingy.
I’m replacing the controller in my printer and hope I can tune it to the point of not needing additional finishing. Maybe an extruder setup with a long enough nozzle to do the true 3D.
I’m trying to do this very thing. Right now I’m using the heaviest brass screws I could find, so that there’s more energy as things bounce about. I’m quite curious to see if other folks have found methods that work!
Also, the only before and after pics are of flat surfaces that could be sanded in no time. Lets see it work on something that would actually be hard to sand.
There are some before/after photo’s on source page (thingiverse), but they are taken with different lightning. Also the objects look way to big to fit in the tumbler in the first place. So i’m with you.
I needed a big tumbler for a project. As usual I had to improvise. I wound up using a heavy 5 gallon bucket that driveway sealant came in. I cut a couple squares about 8″ wide and drilled a hole in the center of them. I used 4 bolts to secure one piece to the outside of the lid with the center hole over the center of the lid, and the same only on the outside of the bottom of the bucket. I had a piece of all thread that was about a foot longer than the bucket. I ran that through the bucket and used a nylock nut and a fender washer to keep the lid fastened to the bucket and I made a U shaped frame out of some scrap 2×4 One end of the all thread poked out of the top of each side of the U. Last I mounted a perch for my electric drill on one side of the U so the chuck was alighted with the end of the rod. Hint, chuck up the rod and screw the perch under the drill. I put little plywood tabs on each side so the drill could not rotate more than a couple of degrees, and put a re-usable tie wrap around the trigger and pulled it to the speed that I wanted. It worked like a charm, held a lot, could not pop open, and took literally all of a half hour to throw together, oh, and it was totally made of junk I had kicking around the fort.
I followed that somehow perfectly. Well described. I expected some sort of 45 degree gearing or something but driving it from the end with a drill is genius if not a little unwieldy. I already have a harbor freight vibratory tumbler and a USA made rock tumbler with walnut media all purchased for 5 bucks at a yard sale for finishing cnc’d 6061 aluminum but if I ever need 5 gallons worth of room
i got plenty of old drills around.
What did you use inside? sand? Thankyou!!