Vibratory Rock Tumbler Bounces On Printed Spring

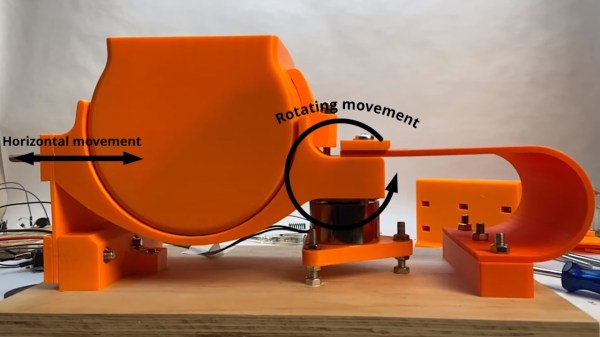
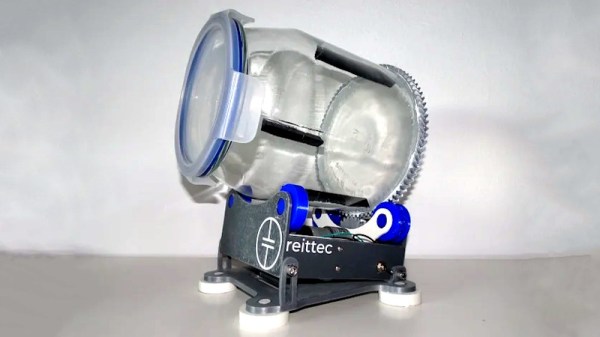
If you’re reading Hackaday, there’s a good chance you had a rock tumbler in your younger days. Hell, we’d put odds on a few of you having one rumbling away in the background as you read this. They’re relatively simple contraptions, and a common enough DIY project. But even still, this largely 3D printed rock tumbler from [Fraens] is unique enough to stand out.

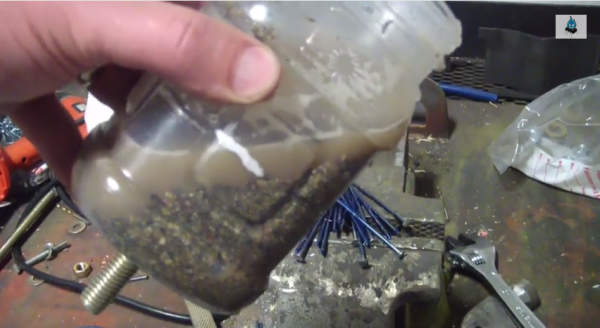
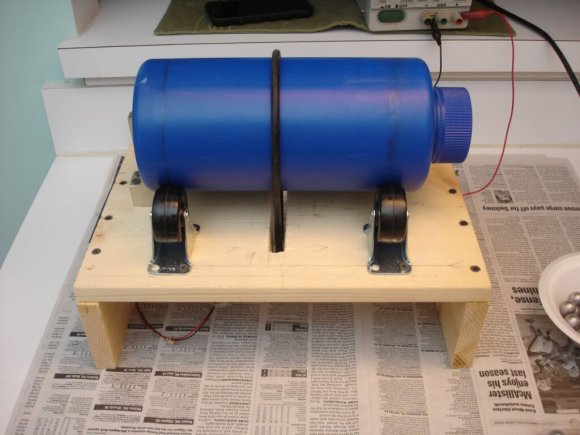
To make a basic rock tumbler, all you really need to do is rotate a cylindrical chamber and let physics do its thing. Such contraptions are known as, unsurprisingly, rotary rock tumblers. But what [Fraens] has put together here is a vibratory tumbler, which…well, it vibrates. If this was Rockaday we might go farther down this particular rabbit hole and explain the pros and cons of each machine, but the short version is that vibratory tumblers are more mechanically complex and are generally better suited to fine finish work than rotary tumblers which take a brute force approach that tends to round off the rocks.

Continue reading “Vibratory Rock Tumbler Bounces On Printed Spring”

Tumble Polisher Smooths Parts With Ease

When you’re 3D printing parts, it’s easy to create pieces with all manner of complex geometry. However, you’re often stuck dealing with unsightly layer lines and other surface imperfections. [reitter_m] chooses to get around this through the use of a tumble polisher of his own design.

The polisher uses a drum made out of a glass jar sourced from IKEA. A 3D printed gear is printed to size, and then fitted around the outside. This allows the drum to be turned by a motor fitted into the base of a 3D printed cradle. A simple gear motor is used to spin the drum nice and slowly, powered by a 12 V, 500 mA supply.

It’s a build that uses readily available parts, and should be a cinch to recreate by anyone with a 3D printer. The later revision uses an even more common IKEA jar, making it even easier to copy the build no matter where you are in the world. It even uses herringbone gears which gives it a very offbeat look. We’ve seen other hacked tumbler projects too, like this one built around an old case fan. Video after the break.

Building A Vibration Tumbler On The Cheap

There are few tasks quite as laborious as sanding and polishing. Any job that takes a lot of time and elbow grease is a prime candidate for mechanical help, and this one is no exception. At the suggestion of friends, [VegOilGuy] decided it was time to invest in a vibration tumbler. Naturally, building it rather than buying it was the order of the day.

If you’ve ever used an electric sander, you’ll know they’re an excellent source of vibration. Initially, the intention was to build a tumbler with the sander being removable and still usable for its original purpose. A clamping base was constructed with cable ties, wood, and Bondo, but sadly to no avail. The Velcro connection to the plastic tumbler bowl was simply not robust enough to hold up to repeated use.

Instead, the sander was permanently bolted to the tumbler bowl, yielding more positive results. A funnel was then also added to the bowl, to improve media circulation and reduce the amount required. Initial tests were positive, with the tumbler successfully polishing some cast brass parts using crushed walnut shells. [VegOilGuy] is still looking for a more abrasive media to use for initial patina removal, however.

Sometimes the best tools are the ones you build yourself. In this case, it’s a cheap and easy way to get a vibration tumbler and the results are great. If sanders aren’t your speed, why not check out this fan based build instead? Video after the break.

Continue reading “Building A Vibration Tumbler On The Cheap”

Hackaday Links: October 11, 2015

[Kratz] just turned into a rock hound and has a bunch of rocks from Montana that need tumbling. This requires a rock tumbler, and why build a rock tumbler when you can just rip apart an old inkjet printer? It’s one of those builds that document themselves, with the only other necessary parts being a Pizza Hut thermos from the 80s and a bunch of grit.

Boot a Raspberry Pi from a USB stick. You can’t actually do that. On every Raspberry Pi, there needs to be a boot partition on the SD card. However, there’s no limitation on where the OS resides,  and [Jonathan] has all the steps to replicate this build spelled out.

Some guys in Norway built a 3D printer controller based on the BeagleBone. The Replicape is now in its second hardware revision, and they’re doing some interesting things this time around. The stepper drivers are the ‘quiet’ Trinamic chips, and there’s support for inductive sensors, more fans, and servo control.

Looking for one of those ‘router chipsets on a single board’? Here you go. It’s the NixCoreX1, and it’s pretty much a small WiFi router on a single board.

[Mowry] designed a synthesizer. This synth has four-voice polyphony, 12 waveforms, ADSR envelopes, a rudimentary sequencer, and fits inside an Altoids tin. The software is based on The Synth, but [Mowry] did come up with a pretty cool project here.

Unjettisoned Inkjet Turned Tumbler

printer parts tumblerDon’t throw out that old printer! Not that you would, but even if you’ve already scavenged it for parts, you can use the shell and the rollers to make a rock/coin/what-have-you tumbler. If your printer is part scanner, it might end up looking as cool as [th3_jungle_inv3ntor]’s. You’ll have to laser-cut your own arachnid to supervise from above, though.

Somewhere between having an irreparable printer, being inspired by another tumbler, and the desire to make a mancala set for his sister-in-law, [th3_jungle_inv3ntor] was sufficiently motivated to get out his hacksaw and gut the printer. He used the main paper roller and its motor to do the tumblin’, and a smaller roller to help accommodate different jar sizes.

Aside from adding those sweet blue LEDs, he wired in a toggle switch, a speed control pot, and an LM317 to govern the tumbling rate. Unfortunately, the rocks in [th3_jungle_inv3ntor]’s town are too soft and crumbly, so he can’t make that mancala set after all. But hey, (almost) free stuff tumbler.

No dead printers lying around? If you have a drill and a vise, you could always make a tumbler that way, and nothing is compromised but the peaches jar.

A Peach Of A Homemade Parts Tumbler

[Chris] finds the average price of rock tumblers insulting. Almost as insulting, in fact, as prepackaged fruit salad made with Chinese peaches. While there may be little he can do about the peaches, he has given the finger to lapidary pricing by making his own tumbler on the very cheap.

Simply put, he drilled a hole in bottom of the peach vessel and then stuck a threaded rod through it. He held the rod in place with a nut and a washer. After securing the proper permits to source sand and water from his property, he put both in the jar along with some old nails that had paint and crud on them. [Chris] put the rod in the chuck of his drill and clamped the drill in his bench vise. Half an hour later, he had some nice, shiny nails. Make the jump to be amazed and entertained. If you prefer using balls, check out this homemade mill.

Continue reading “A Peach Of A Homemade Parts Tumbler”

Homemade Ball Mill Tumbles Along Like A Champ

[Mike] enjoys doing all kinds of things with glass. He likes to melt it and fuse it into new things, so it’s perfectly understandable that he wanted to make his own glass. Doing so requires finely ground chemicals, so [Mike] put together this awesome homemade ball mill.

The design is wonderfully simple. The mill is powered by a robust 12VDC motor from a printer that he’s running from a variable power supply in order to fine tune the speed. [Mike] built a scrap wood platform and attached four casters for the drum to spin against. The drum is rotated by a round belt he had lying around from various other projects. [Mike] already had a couple of those blue containers, which formerly held abrasive grit for use in vibratory tumblers.

[Mike] had some trouble with the drum walking off the casters so he attached scrap piece of aluminum to form an end stop. All he had to buy for this project were the 5/8″ steel balls and the casters. The mill can also be used as a rock tumbler, though the bottle isn’t quite water tight as-is. He does not recommend this type of setup for milling gunpowder or other explosives, and neither do we.

Make the jump to see the mill in action and get the grand tour. If you need more tumbling power, use a dryer motor!

Continue reading “Homemade Ball Mill Tumbles Along Like A Champ”