A Beginner’s Guide To X-Ray Crystallography

In graduate school, I had a seminar course where one of the sections was about X-ray crystallography. I was excited, because being able to discern the three-dimensional structure of macromolecules just by shining X-rays on them seemed like magic to me. And thanks to a lackluster professor, after the section it remained just as much of a mystery.

If only I’d had [Steve Mould] as a teacher back then. His latest video does an outstanding job explaining X-ray crystallography by scaling up the problem considerably, using the longer wavelength of light and a macroscopic target. He begins with a review of diffraction patterns, those alternating light and dark bands of constructive and destructive interference that result when light shines on two closely spaced slits — the famous “Double-Slit Experiment” that showed light behaves both as a particle and as a wave and provided our first glimpse of quantum mechanics. [Steve] then doubled down on the double-slit, placing another pair of slits in the path of the first. This revealed a grid of spots rather than alternating bands, with the angle between axes dependent on the angle of the slit pairs to each other.


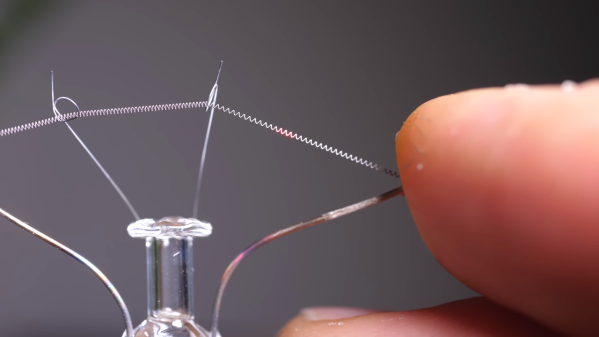
To complete the demonstration, [Steve] then used diffraction to image the helical tungsten filament of an incandescent light bulb. Shining a laser through the helix resulted in a pattern bearing a striking resemblance to what’s probably the most famous X-ray crystallogram ever: [Rosalind Franklin]’s portrait of DNA. It all makes perfect sense, and it’s easy to see how the process works when scaled down both in terms of the target size and the wavelength of light used to probe it.

Hats off to [Steve] for making something that’s ordinarily complex so easily understandable, and for filling in a long-standing gap in my knowledge.

Continue reading “A Beginner’s Guide To X-Ray Crystallography”

Form 3 SLA Printer Teardown, Bunnie Style

[Bunnie Huang] has shared with all of us his utterly detailed teardown on the Form 3 SLA printer from Formlabs (on the left in the image above) and in it he says one of the first things he noticed when he opened it to look inside was a big empty space where he expected to see mirrors and optics. [Bunnie] had avoided any spoilers about the printer design and how it worked, so he was definitely intrigued.

The view inside the Form 3.

Not only does the teardown reveal the kind of thoughtful design and construction that [Bunnie] has come to expect of Formlabs, but it reveals that the Form 3 has gone in an entirely new direction with how it works. Instead of a pair of galvanometers steering a laser beam across a build surface (as seen in the Form 1 and Form 2 printers) the new machine is now built around what Formlabs calls an LPU, or Light Processing Unit, which works in conjunction with a new build tank and flexible build surface. In short, the laser and optics are now housed in a skinny, enviromentally-sealed unit that slides left and right within the printer. A single galvo within steers the laser vertically, as the LPU itself moves horizontally. Payoffs from this method include things such as better laser resolution, the fact that the entire optical system is no longer required to sit directly underneath a vat of liquid resin, and that build sizes can be bigger. In addition, any peeling forces that a model is subjected to are lower thanks to the way the LPU works.

Details about exactly how the Form 3 works are available on Formlabs’ site and you can also see it in action from a practical perspective on Adam Savage’s Tested (video link), but the real joy here is the deeply interesting look at the components and assembly through the eyes of someone with [Bunnie]’s engineering experience. He offers insights from the perspective of function, supply, manufacture, and even points out a bit of NASA humor to be found inside the guts of the LPU.

[Bunnie] knows his hardware and he’s certainly no stranger to Formlabs’ work. His earlier Form 2 teardown was equally detailed as was his Form 1 teardown before that. His takeaway is that the Form 3 and how it works represents an evolutionary change from the earlier designs, one he admits he certainly didn’t see coming.

HDD-Driven Chime Clock Is Quite Striking

It seems that the more hectic life gets, the harder it is to consciously slow down and enjoy the experience. There’s always another bill to worry about, and a new deadline around the corner. The last thing we need are ultra-precise digital clocks everywhere we look. When it’s time to relax, there’s more than enough room for a passive type of clock that gives the time on time’s terms.

[Scoops]’ beautiful chime-only clock seems perfect for its location — an intimate event space inside an old house in Taiwan. Having only a vague sense of passing time helps us relax responsibly at social events. There’s no need to pull out your phone or glance at your watch when notifications about the passage of time softly permeate the air.

Here’s how it works: a NodeMCU controls four hard drive actuators through a ULN2003. The actuators each have a small extension and a clapper fitted on the end, which strikes the aluminium tubes that make up the chimes. There’s a web interface where [Scoops] can set the chimes to sound as frequently or infrequently as desired, or schedule a quiet period during the overnight hours. In emergencies, the clock can also be muted directly with the push of a button.

Take a little time to check out the short videos after the break, because this thing does a mean Westminster Chimes. But don’t stay too long, because time is running out! You have until Friday, January 24th to enter our Tell Time Contest over on IO.

Time can be relaxing or suffocating, depending on the way you look at it. If it’s visual relaxation you need, watch this bubble clock and float away from reality for a while.

Continue reading “HDD-Driven Chime Clock Is Quite Striking”

Reverse Engineering Yokis Home Automation Devices

These days, it’s hard to keep track of all the companies that are trying to break into the home automation market. Whether they’re rebrands of somebody else’s product or completely new creations, it seems like every company has at least a few “smart” gadgets for you to choose from. We hadn’t heard of the Yokis devices that [Nicolas Maupu] has been working on before today, but thanks to his efforts to reverse engineer their protocol, we think they might become more popular with the hacking crowd.

Even if you don’t have a Yokis MTV500ER dimmer or MTR2000ER switch of your own, we think the detailed account of how [Nicolas] figured out how to talk to these devices is worth a read. His first step was to connect his oscilloscope directly to the SPI lines on the remote to see what it was sending out. With an idea of what he was looking for, he then used an nRF24L01+ radio connected to an ESP8266 to pull packets out of the air so he could analyze their structure. This might seem like a very specialized process, but in reality most of the techniques demonstrated could be applicable for any unknown communications protocol of which you’ve got a hex dump.

On the other hand, if you do have some of these devices (or plan to get them), then the software [Nicolas] has put together looks very compelling. Essentially it’s an interactive firmware for the ESP8266 that allows it to serve as a bridge between the proprietary Yokis wireless protocol and a standard MQTT home automation system. When the microcontroller is connected to the computer you get a basic terminal interface that allows you to scan and pair for devices as well as toggle them on and off.

This bridge could be used to allow controlling your Yokis hardware with a custom handheld remote, or you could follow the example of our very own [Mike Szczys], and pull everything together with a bit of Node-RED.

New Contest: Train All The Things

The old way was to write clever code that could handle every possible outcome. But what if you don’t know exactly what your inputs will look like, or just need a faster route to the final results? The answer is Machine Learning, and we want you to give it a try during the Train All the Things contest!

It’s hard to find a more buzz-worthy term than Artificial Intelligence. Right now, where the rubber hits the road in AI is Machine Learning and it’s never been so easy to get your feet wet in this realm.

From an 8-bit microcontroller to common single-board computers, you can do cool things like object recognition or color classification quite easily. Grab a beefier processor, dedicated ASIC, or lean heavily into the power of the cloud and you can do much more, like facial identification and gesture recognition. But the sky’s the limit. A big part of this contest is that we want everyone to get inspired by what you manage to pull off.

Yes, We Do Want to See Your ML “Hello World” Too!

Wait, wait, come back here. Have we already scared you off? Don’t read AI or ML and assume it’s not for you. We’ve included a category for “Artificial Intelligence Blinky” — your first attempt at doing something cool.

Need something simple to get you excited? How about Machine Learning on an ATtiny85 to sort Skittles candy by color? That uses just one color sensor for a quick and easy way to harvest data that forms a training set. But you could also climb up the ladder just a bit and make yourself a camera-based LEGO sorter or using an IMU in a magic wand to detect which spell you’re casting. Need more scientific inspiration? We’re hoping someday someone will build a training set that classifies microscope shots of micrometeorites. But we’d be equally excited with projects that tackle robot locomotion, natural language, and all the other wild ideas you can come up with.

Our guess is you don’t really need prizes to get excited about this one… most people have been itching for a reason to try out machine learning for quite some time. But we do have $100 Tindie gift certificates for the most interesting entry in each of the four contest categories: ML on the edge, ML on the gateway, AI blinky, and ML in the cloud.

Get started on your entry. The Train All The Things contest is sponsored by Digi-Key and runs until April 7th.

Tumble Polisher Smooths Parts With Ease

When you’re 3D printing parts, it’s easy to create pieces with all manner of complex geometry. However, you’re often stuck dealing with unsightly layer lines and other surface imperfections. [reitter_m] chooses to get around this through the use of a tumble polisher of his own design.

The polisher uses a drum made out of a glass jar sourced from IKEA. A 3D printed gear is printed to size, and then fitted around the outside. This allows the drum to be turned by a motor fitted into the base of a 3D printed cradle. A simple gear motor is used to spin the drum nice and slowly, powered by a 12 V, 500 mA supply.

It’s a build that uses readily available parts, and should be a cinch to recreate by anyone with a 3D printer. The later revision uses an even more common IKEA jar, making it even easier to copy the build no matter where you are in the world. It even uses herringbone gears which gives it a very offbeat look. We’ve seen other hacked tumbler projects too, like this one built around an old case fan. Video after the break.

CircuitPython Slithers Into 100th Board — The OHS 2020 Badge

CircuitPython reached a major milestone last week as it welcomed its 100th board into the fold: the wristwatch form factored badge designed for the 10th annual Open Source Hardware Summit, which takes place March 13th in New York City. Although CircuitPython — an open source derivative of MicroPython — was born at Adafruit, more than half of the boards on this list were produced outside of the company. That just goes to show the strength of the community in support of the snake.

The OSHW 2020 badge joins a litany of familiar boards happy to drop you into a Python interpreter. Among them there’s the Adafruit Feather ecosystem, the ItsyBitsy, specialized boards like the Edge Badge that was in some goodie bags at Supercon, and the CircuitPlayground — that Swiss army knife of sensors which now comes in a Bluetooth version. The first 100 boards were rounded out in strong fashion with [Joey Castillo]’s OpenBook e-reader and the Teensy 4.0. Continue reading “CircuitPython Slithers Into 100th Board — The OHS 2020 Badge”