Usually corroded buttons on a piece of electronic equipment wouldn’t be that big a deal to repair, but as [Haris Andrianakis] recently found out, things can get a little tricky when they are sealed inside a device meant to operate in a marine environment. Figuring out how to get into the case to clean the buttons up is only half the battle, when you’re done you still need to close it back well enough that the elements can’t get in.
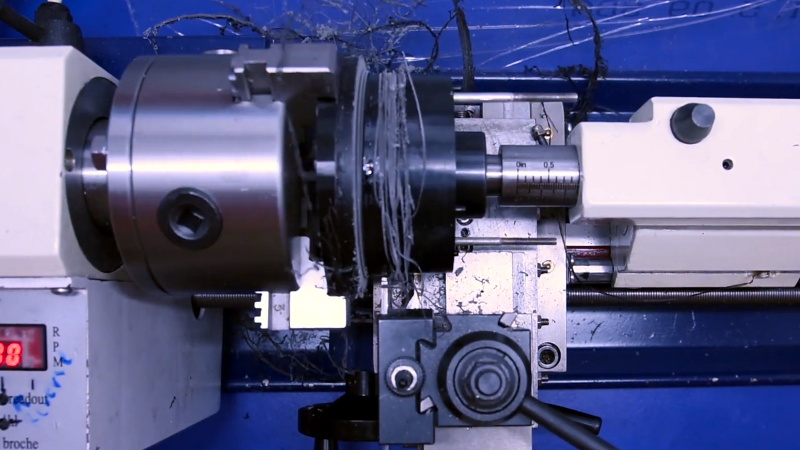
 The device in question is a tachometer intended for a Yamaha outboard motor, and the buttons are sealed between the guage’s face and the compartment in the rear that holds the electronics. Pulling the guts out of the back was no problem, but that didn’t get [Haris] any closer to the defective buttons. In light of the cylindrical design of the gauge, he decided to liberate the front panel from the rest of the unit with his lathe.
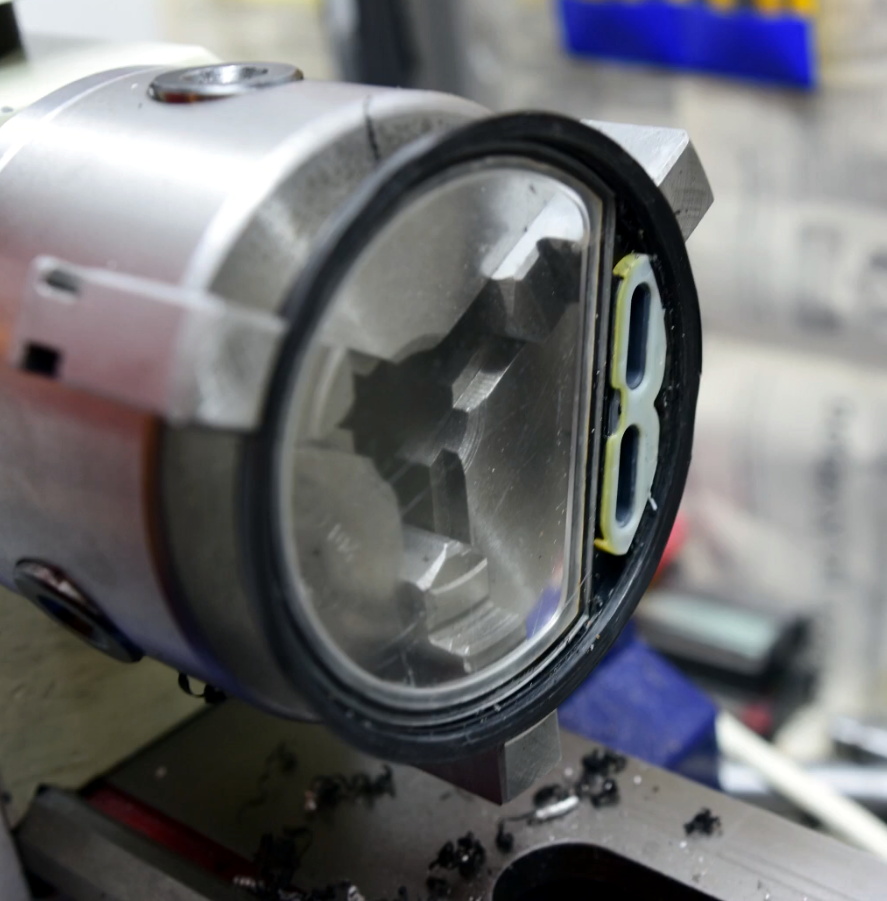
Removing the face was a delicate operation, to put it mildly. The first challenge was getting the device mounted securely in the chuck, but then the cutting had to be done very carefully so as not to damage the housing. Once he cut through the side far enough to get the face off, the actual repair of the buttons was fairly straightforward. But how to get it back together?
After a few missteps, [Haris] finally found a solution that have him the results he was looking for. He 3D printed a ring that fit the front of the gauge tightly, hot glued it into place, and used it as a mould to pour in black epoxy resin. Once the epoxy had cured, the mould was cut off and the gauge went back on the lathe so he could trim away the excess. He had to do some hand sanding and filing to smooth out the bezel, but overall the end result looks very close to factory.
We get it, there’s a lot to consider when you add a lathe to your workshop. But hacks like these are wonderful reminders of how many tricks these versatile machines are really capable of.


don’t you have a single tool working properly ?
axially unbalanced lathe, grinder, polisher
Says someone who obviously can’t ever have actually used a lathe, grinder or polisher. I see nothing wrong with any of the tools shown in this video.
it’s not hard to verify who is not correct
open video at
4:25
7:39
8:00
never promote poor quality labor in public place
Not that I can add much to what others have already said, but –
4:25 – What you see as rotating off-center is simply a scrap piece of 5mm acrylic sheet that he’s using to spread the force from the live center. It’s completely irrelevant if this is slightly off-center. The actual workpiece is held concentrically in the 3-jaw chuck. If you look closer, you’ll even see the tip of the live center digging into the piece of acrylic, so there is absolutely zero chance of it flying off.
7:38 & 8:00 – A new felt or cloth polishing mop (not a grinder, as you said originally) never runs true, nor does it particularly matter. They soon wear down through use to run true.
Anyone who has actually used these machine tools would know that there’s nothing to worry about here.
Don’t promote your ignorance in a public place.
Looked.
Lindsay Wilson is 100% correct, and you are not.
I used to work as a jewelry polisher, and learned further techniques in watchmaking school. That is usable for what he is doing, and new wheels never run completely true. They are designed to be dressed on the mandrel, in place- where they will go back on concentric afterwards. A tool exists for this, but a bunch of hacksaw blades welded together work well for this.
The polishing wheel is a little wobbly- but only on one axis, and not Z. It would work better dressed- but it will work like this for what he’s doing.
Also- I work as a machinist. The 1st item is held concentric on the OD, the item he is bracing against is simply not cemented concentric to the OD. He is just bracing against it- not everything is designed to be concentric. Given this type of gauge, its understandable its off center in that way.
You’d freak out if you ever saw a crankshaft being machined- everything is eccentric centers.
You don’t understand how to use a lathe, or polish in real life. I can actually tell this from your comments and your insistence. Please don’t judge other’s work negatively if you don’t have the experience to call out such things. It just makes you look dumb.
+100
Agreed I see nothing wrong there – at 4:25 you see the work piece being less that perfectly true in the jaws (or less than regularly shaped – probably this one as the result is good) but the lathe itself looks fine.
The polisher could use a bigger base and some bolts perhaps as it does seem to have a touch of vibration walking – but again nothing unusual or really wrong with that. In fact its pretty much unavoidable with how the mop fittings and mops are – they are never perfect!.
These tools are fine. The things they’re holding may not be perfectly centred – in the case of the lathe, it’s expected (the object being cut has an off-centre disc on it); and for the bench grinder those brand-new consumable wheels will centre themselves as they wear.
Yah, cause obviously a place called HACKaday is totally geared towards the professional who does everything perfect and only with the most ideal of tools.
Be carefull with superglue around surfaces that should remain opticaly clear… It outgases and produces nasty white residue all around the place. Especialy in small confined areas.
With the polishing step done I’d think that problem is mostly solved, a good point though. CA glue doesn’t take long to outgass ‘completely’ in my experience but who knows how many variables there are to that. It certainly does ruin your project when it catches you out..
Indeed, do not store opened tubes of superglue in your CD / DVD cabinet.
:)
This is real good advice.
I find myself lately trying to find something to hermetically seal a one of a kind antique blueprint between sheets of Museum acrylic, using a viton cord and ball milled grooves as seal area- but can’t find anything to glue and permanently seal the clear UV blocking acrylic shut around the edges like that that won’t outgas and harm the print.
Anyone got any ideas?
Call your local archives and ask what they use.
Your best bet for a professional archivist to answer is a University Archives dept or a State/provincial level Government archives.
I’ve been to both of those locally and they’re highly skilled, well trained, friendly, and helpful.
In fact it may be worth just paying them to do it for you.
Why glue them? Metal clips or brackets to keep things sandwiched should be sufficient. I’ve never seen pro conservators hermetically seal their documents inside something.
Thinking of friction fitting milled aluminum channel around to keep it compressed.
They are a series of 1 in existence of 4 technical drawings from a lost school of watchmaking in Pittsburgh. I’m trying to seal them against any moisture and light, as thoroughly as possible.
I have talked to pro conservators already, and have a cousin who is an art conservator who advised as well. And this is not something normally done, Im just going way beyond for these.
Have you considered friction/stir welding the plastic sheets together? May be a bit overkill, but it could seal the document without adhesives.
A Dremel with a thin metal rod (IE the blunt end of a drill bit) should be enough to stir-weld the acrylic.
Perhaps the best option would be for a UV cured resin around the edges?
Though I think keeping it simple would be best – just have the seal slalom between bolts holding the front to the back – as long as you have little rubber washers for the bolts on the inside of the seals it would be a decent seal without over stressing the sheet..
I wonder however if its actually a good idea unless you are going to pack it in a perfectly climate controlled environment.
Was thinking bolts and washer idea independently. Was gonna leave a small hole in back like an airplane window, leading to a sealed dessicant box.
Didn’t mean to hijack comments, thanks all
UV and antique blue prints? Probably not a good idea.
I’m Far from expert, but ShoeGoo is damn water tight, durable, and does not create a film like CA on acrylic or polycarbonate. Great for assembling and sealing mini submarines rov’s.
http://www.thegrumble.com/index.php?threads/framing-displaying-blueprints.4610/
Addresses the issue of extreme light sensitivity of true blueprints. One person suggests having photocopy duplicates made for display. Then you have the best of all worlds…displaying the aesthetic art, and retaining the original work in pristine, original condition.
This is useful. They are true blueprints, and I was going to seal them inside museum acrylic- same thing as museum glass, but much lighter- blocks 99% of UV light.
I want to get them scanned first, but they hung on the walls in the school on their frames anyway. I may use copies, or seal orginals behind the copies.
Coroplast board was suggested for backing material, as it is non reactive and 100% acid free.
Thanks for the link.
Nice job with the printed mold! I make all kinds of 3D printed molds and they work great! With this mold release, you can get the molds off with a lot less hassle: https://www.smooth-on.com/products/ease-release-205/