Somehow, [Jeremy S Cook]’s wife was able to keep a Keurig machine going for 10 years before it quit slinging caffeine. [Jeremy] got it going again, but decided to buy a new one when he saw how it was inside from a decade of water deposits.
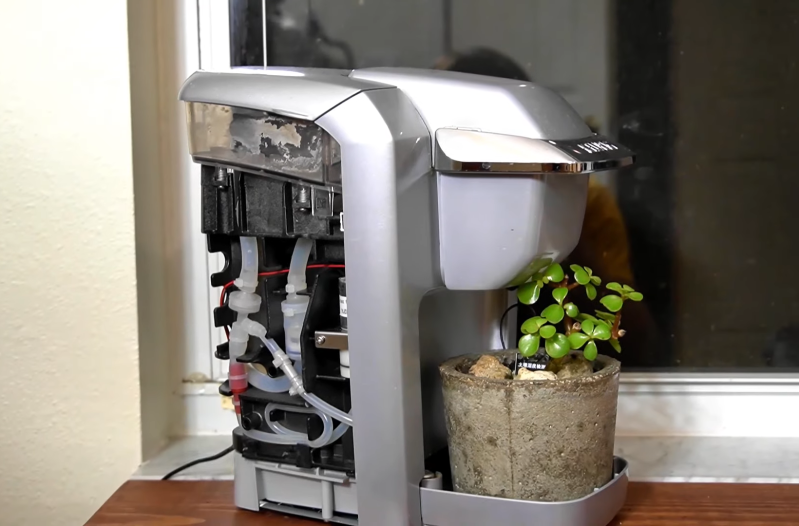
But why throw the machine out like spent coffee grinds? Since the pump is still good, he decided to turn it into an automatic plant watering machine. Now the Keurig pumps water using a Raspberry Pi Zero W and a transistor. [Jeremy] can set up watering cron jobs with PuTTY, or push water on demand during dry spells. We love that he wired up a soil moisture sensor to the red/blue LEDs around the brew button — red means the plant is thirsty, purple means water is flowing, and no light means the plant is quenched and happy.
This project is wide open, but cracking into the Keurig is up to you. Fortunately, that part of the build made it into the video, which is firmly planted after the break.
Old coffee makers really do seem suited to taking up plant care in retirement. Here’s a smart garden made from an espresso machine.


Great hack! I wish we could see more real hacks in Hackaday “like back in the good old days”.
About those moisture sensors, i read somewhere that those that measure voltage between plates are not so good in the long run. If i remmeber correctly the onces that relied on AC current and used some math magic worked the best.
Wouldn’t reversing polarity on each measurement be enough?
I’ve seen enough Star Trek to know that reversing the polarity fixes everything, everytime.
I think it’s the difference between measuring conductance or capacitance. Conductance changes with moisture, but also degrades with corrosion and is influenced by mineral/fertilizer content of the water (pure water isn’t a good conductor).
Capacitance measurement on the other hand doesn’t require low surface resistance in order to sense the change in dielectric property due to presence of moisture, so it’s unaffected by minor corrosion (actually doesn’t require exposure of the plates at all).
Thanks! Awesome to get a not-not-a-hack comment on my build :-)
I believe they corrode after a while, but have also seen that they can be cycled on and off to prevent this (or at least drag it out significantly). I haven’t done this yet, but probably should.
i appreciate the project and my 85-year-old grandma now appreciates the video (sent to her via SMS). she’s locked-down in a 2,500 elderly person campus. her mocking comment is, “Somehow I don’t think that Jade plant likes hot water.” xD
i’ve torn down 3 Keurig machines: 2 of your type, 1 of the plumbed-in-office (large) type. having done nothing with all of the parts for years, it’s nice to see your work and great to read the resultant feedback generated.
Great hack! That Keurig model uses a .016″ Orifice restrictor to control the flow rate. If you want a different range of adjustment, try a different orifice size.
https://air-logic.com/F-2815andF-3120SeriesOrificeRestrictors
The capacitive sensors are “non invasive” and dont dissolve over time.
And yes: Disolved Copper is VERY bad for plants and biology in generals… Google Copper sulfate wheed killer ;)
it’s a far better fungus killer, it’s used on plants infested with fungi in dosages where it won’t harm the plant.
and some trace amount of copper is even beneficial…
Now that’s a hack!
Thanks!
“when he saw how it was inside from a decade of water deposits”
You never descaled your coffee maker in a decade?
Testament to the quality of Keurig that it survived for so long.
Do you think that cleans it out 100% everytime?
Boy have I got news for you…
The buildup ot what doesnt loosen by a descaling is significant.
My machine has a counter for when it is time to descale it, and I have done so every time it is called for, but the tubes and pump are still full of buildup
Well, some water supplies have less dissolved minerals.
You can get extra calcium this way!
i usually put one Tums tablet in with each Kcup.
Ha, well to be fair, I rarely drink hot coffee. I probably operated it 10 times over the years.
As interesting this kind of a hack is, it still looks very much like a proof-of-concept and nothing anyone in their right mind would use: The size of the coffee maker compared to the small plant (already squeezed) is quite excessive. Further development would be to add extension piping allowing to put the plastic monster on the side and just have smaller lines to the plants.
Hey, lighten up. He turned a Keurig into something useful. It probably waters plants better than it made coffee.
Ha, right. Was a fun build, which was mostly the point!
Have liberated a pump from a no longer useful Keurig. Still on the workbench awaiting pairing with a water receptacle, a 12V wall wart, an ESP8266, a power supply for the ESP8266, and a relay for the 12V power to the pump. That being said, the pump is pretty large, but definitely not the monstrosity of the complete Keurig enclosure!
Over-complicated, over-powered and inefficient? Yes.
Great use of old parts and nice hack? Yes.
Thanks!
Keurig pods are an affront
Yes, great hack, but Keurig made simple a process that was already as simple as pressing a button, but added waste and a poor result to the mix.
Although not as fancy, I’ve used a 12V car windscreen washer pump connected to the 5V output of an old PC power-supply running off a mains timer to water about half a dozen tomato plants whilst I was on holiday. It ran for 20-min a day and pumped water out of an old dustbin. 5v keeps the flow-rate down and stops the motor which was designed for short duty-cycle from burning up when run for minutes.
Bonsai Coffee Tree
Nice. Was kind of thinking that the two could eventually morph together like some sort of sci-fi hybrid :-)
+1
I had used a different approach to control water and pest in my potted plants prior to a timer approach. I sat the pots in larger containers and water the containers instead. Water seeps from the drainage hole up to the soil. You can keep the “water table” level by something like a pet water bottle i.e. an inverted bottle filled with water with the opening at the level line.
We have the red version of this same model. If memory serves, we’ve had it for 6 or 7 years now. Just recently it began popping pods when pumping the heated water through the pod. I tried cleaning the machine and sharpening (again) the upper and lower spikes that puncture the pods. This upped successful brewing from about 50% to 90%. The remaining 10% of brewing attempts resulted in popped pods, LOTS of grounds in the cup, and a big yucky mess on the counter. Unfortunately, I could not correlate the problems with any specific brand/style of pod. 90% was not good enough, I guess. My wife ordered a replacement, but I insisted we keep the old one. Now I know what to do with it! Thanks [Jeremy]!
Ha, well glad you have a new project! I’d be curious to see if the red ground is standard here or some sort of anomaly.
Thanks for the writeup Kristina!
Great closed loop! Great style! I love to see devices coming back to life so even better when they come back to life to support life!
I would recommend to add a hole at the bottom of that beautiful pot so water excess can flow and avoid salts accumulation at the bottom.
Watch out with rust build up in that DC soil sensor!
I love how neat and snugged your electronics assembly is!
Before you scavenge your coffee maker remember that most drip makers do not have pumps in them. I found the easyest method of consistent watering a long time ago. It is simple and it works well. It does require two pumps though. Start with a 5 gallon bucket, your water reserve. Find a container that holds as much water as you want to put on your plant, and come up with a way to hold that up over the bucket. Install pump #1 so it will pump water from the bucket into this container and any overflow drains back down into the bucket. Put this on a timer set it for noon and to run for 1 minute. Install pump #2 from the bottom of the container pump #1 fills to the plant. Put this on a timer, set it for 12:05 and to run for a minute. There you go. You can do multiple plants with multiple second pumps. Digital timers give you more granularity but this even works well with pin timers as it is the relationship between the two that counts, and they will both stop at the same time if the power fails. The only pitfall is the second pumps run dry for a litlte bit, but that does not seem to do them any harm. I have used pumps off eBay but you could also use the little submersabel pumps that HF sells but you would have to account for the volume the pump takes up in the suspended container, and you probably could not do more than one or two plants. THe nice thing is if you go on vacation or what not, this can keep things watered for a long time.
Or how to replace one transistor by 200 millions. (Just for the fun of it. That’s the idea right?)