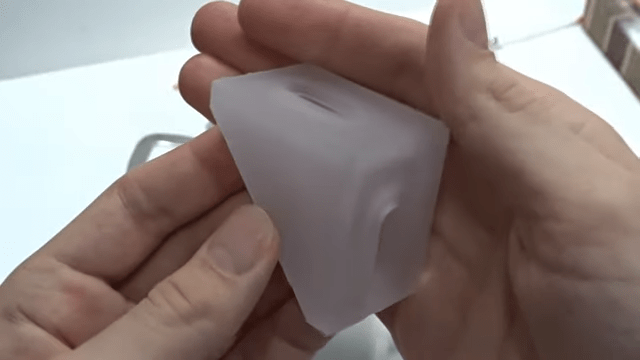
The biggest problem with fused deposition 3D prints is that while the layers should stick together, they aren’t the same as a solid piece of plastic you would get from, say, injection molding. You can anneal plastic using moderate heat, but it is likely to cause the part to deform or change size. [Free Spirit 1] has a solution for this. Using a powdered salt, the part is packed on the inside and out and put in an oven. The results in the video below look really impressive.
In addition to making the part look solid and — we assume — adding strength, the resulting prints are also water- and gas-tight which was the purpose of the effort. That alone would make the technique worthwhile.
The only thing we noticed is that the part has to have access to hold the salt. Anything not supported would be subject to deformation. However, the ground-up salt is so fine that it should be relatively easy to fill in most parts and, of course, print with 100% infill to avoid hollow internal areas.
[Free spirit 1] used a coffee grinder to get the salt powder, but apparently you can buy “flour salt.” We wondered if other powders might work well, too. Apparently, sand didn’t work out, perhaps because the salt dissolves out in water, so whatever you use, it should probably dissolve in something that won’t attack your plastic.
Annealing isn’t a new idea, and we’d love to see some objective tests on this new method.


cnc kitchen just did a video where he packed them in plaster and had good results
Maybe talc is even better : ultra smooth and not reactive
try it out and document your process, and you too could be featured on HAD!
It would definitely be interesting to know what else is suitable for this process. Baking soda, perhaps?
Baking soda can decompose in heat to NaCO3 (aka washing soda). Probably a bit more expensive than salt too.
Make that Na2CO3
Make some “hot ice” hand warmers with the byproduct.
But then you could use your “casting” material remnants to make caffenol.
The Na2CO3 would not be a problem. But the evolving CO2 gas could have an interesting effect on the 3D printed workpiece. You use baking soda to introduce gas bubbles into your cake, not to make it more compact. :-)
Baking soda decomposes to washing soda and water vapor, which would not be great for keeping the ‘casting’ material dimensionally stable. better to start with washing soda by itself.
I’ve been making attempts at remelting prints with baking soda, and have gotten results that are… not terribly good, but not bad either.
So far I’ve attempted this on clear PLA, transparent black (smoke colour) PETG, and clear PETG. In all cases, the surface ends up looking somewhere between bleached and having baking soda embedded in it. The insides look either more yellowish or brown than what it starts out with.
I’ve not noticed any bubbling of effects of off-gassing, but the baking soda itself turns into an off-white colour after baking. Not immediately noticeable on its own, but very noticeable when you mix it with unbaked baking soda. Perhaps the off-white stuff is Na₂CO₃?
What’s worth noting is that baking soda comes off the shelf very fine, much finer than “fine salt”, so no additional grinding is necessary. It’s also cheap, slightly over $1 for 454g.
What temperature does the decomposition occur at?
I was watching the oft cited CNC Kitchen video and was intrigued but turned off by the absurd post processing. I was thinking of testing it out this weekend with green sand (sand casting sand) but haven’t been able to source any locally. Salt and washing soda are easily available and cheap. Now I just need to get the house to myself so I can put plastic in the oven without consequence…
“Green sand” is easier to source then people say.
1.) Generic Cat litter.. “Self Clumping”
If you absolutely can NOT find cat litter without the blue odor crystal’s or “super safe”(aka they use compressed sawdust because “oh it could irritate the paws” as if they never walk around on nasty materials and surfaces for survival and hunting..)
Cement. Not Concrete.
“See I Meant to glue it on the Port. No i didn’t LIME about it.”
Portland type 1 cement and very fine sand.
Generic cat litter has a Dark Gray/Grey and green tint to it..
Like Portland cement. It can be reused if dried and broke up.
If you are very very very pressed for materials… 70% of sand and 30 % of clay.
The biggest issue with this? Be it wet or dry it, the plastic will want to draw in the adjacent material.
So? If you want to anneal your part for pure strength and not finish you might be okay…
If you want to anneal it for appearance and finish? You’ll have to consider coating it with a Sealant.
An decent Sealant would be a Silicone Caulk.
At 500f (260c) (full 7 days X 24 hours) a decent name brand bathroom caulk stayed rubbery for 1 week.
After first pressing mold, Coat the green sand with Silicone. Apply a layer of Saranwrap on both sides of the mold, re-press the part between the two molds to remove excess. Note consider the first two Annealings failures as the saranwrap will melt to each other but not the Silicone
There are probably more materials to experiment but you will start to gravitate toward mold making if you are making mulitple parts.
Again, so many errors in a modest number of words. I’m beginning to suspect that you, sir, are a TROLL.
I saw that. Salt dissolves though.
I saw the plaster video and thought it was a great idea. It looked like too much post processing, getting the part back out of the plaster when compared to this salt method. I’m more interested in trying salt than plaster now.
I also liked his trick of baking the item with the fitting threaded on so that the threads come out perfect. Great idea!
Salt sounds pretty efficient for reusability, too – even if you dissolve it in water, you can just leave that out somewhere and it’ll turn back into salt, chuck that through the grinder again and you’re ready for next time.
You might try applying resin from your other printers like siraya blu, clear. Then let it cure under the uv light. You get a clear, solid, waterproof plastic layer that might even smooth out your print.
I see two problems with that:
One is that resin is thick – you’ll probably lose dimensional accuracy by coating and curing the part.
Two is that if you don’t use that thick layer in order to avoid losing dimensional accuracy you’re much more likely to miss a spot and fail to waterproof the part.
I’ve also seen videos of other creators trying to smooth prints with a resin layer and it generally went poorly.
I haven’t tried it myself but the salt packing method frankly seems pretty cheap, easy, and ideal for most situations.
I’m not sure why there would be a need to remelt any of the items I 3D print. I also never print at more than 60%. Sorry – not impressed for the results in appearance and texture. I didn’t see strength being measured – but more infill does not always mean a stronger part. The honeycomb infill is plenty strong for anything I’m printing.
Yes, I also print everything in PEEK.
Cool story bro
Baking an FFF part almost always strengthens the part but also usually distorts it. This technique minimizes the distortion at the cost of 100% infill. This is not a technique I would use for 99% of my 3D prints, but when I come across a situation that would benefit from it, it’s great that someone has already developed and publicly documented it.
So what happens when more honeycomb infill, more walls etc. *aren’t* strong enough? What happens when you simply can’t add more walls or higher percentage of infill? Many of us need our parts to outperform the constraints that FDM parts inherently have, hence the seemingly eternal search ways to strengthen what we have already produced. My prints are envious or the cushy lives your prints must live.
Also, I love the frosted look – I’d do this just for the surface texture alone. Beats the heck out of the telltale linear FDM sheen. FDM parts look like amateur hour no matter how great the printer is, no matter how well it’s dialed in, no matter how miniscule the layer height is.
Can you not even attempt to conceive a situation in which others may need stronger prints. I know that this may come as a shock, but, there are in fact other people out there who are different from you.
I just accidentally printed at 146% infill. Quality and accuracy was pretty bad but strength was ok ;)
You are so cool bro.
Can we see some of your cool work, cool guy?
Connor, go back to eating your boneless wings and stfu.
I’ve been wondering about this for months! I’m glad to see someone actually did it!
Cool process! I’ll have to keep this in mind.
Does something like that work for joining aluminium parts in a single piece?
I bet it would if you could get it hot enough and packed tightly enough.
That’s sort of like sintering I guess.
Aluminum has an oxide layer that won’t let it do this. You can’t get the aluminum oxide layer removed. If you could dissolve it with flux, maybe. Brazing is almost exactly this, however: it introduces a very thin layer of metal between the pieces you’re trying to attach, and adheres to both.
Schwinn Bicycles used to build frames by butting steel tubes together with a small brass ring pressed into the end of the intersecting tube, and then dip the whole frame in a bath of liquid salt, so all the brass melted smoothly and flowed into the joints.
I’m no metallurgist by any means, but it seems logical that you would not need the same exact requirements for Al as you would for plastic. Therefore slathering a little flux on the aluminum before packing it tightly into a box of salt, which would displace oxygen and allow for the removal of the Al2O3 without reformation, should be possible. If that doesn’t work, using an airtight box and pulling a light vacuum before placing it into the oven should suffice. Or just pump the box full of Ar before sealing it up. The procedure would be different, but the question is, can you place 2 pieces of Al next to each other and heat them sufficiently to melt together. There must be a way, no? If you can weld aluminum, you can surely find a way to do this.
Consider people melting down aluminum cans. The cans don’t turn into crinkly sheets of aluminum because their oxide layer prevents them from melting into a pool or whatever shape you’re casting. They melt and pool. The oxide layer becomes slag or floats to the surface or just burns off.
Yes, we call it foundry /s
Please do not pressure test anything with a compressible gas! Even the strongest safety glasses would not survive a catastrophic failure. The correct method is to completely fill the vessel with a liquid, i.e. water, before applying pressure (with a liquid if possible). That way there is little or no compressed gas to send shards flying. Also never use combustible chemicals. Water is an excellent choice.
Looked like a vacuum pump to me.
You don’t “compress water”, bruh.
You can’t deform H2O. You are compressing a small bubble of gas inside the water. be it normal air, carbon dioxide or nitrogen.
Scientists are unable to compress a “lipid” like water.
Pressure… Under water… comes from All of the water above and affecting the bag of air called your blood vessels.
The “bends” is when you rise to fast and you pop just like the Nitrogen in a Guinness can.
If you so much as say “b-but my Diamonds press Hudrogen in metals… ice-7 is in the lab, I put it in my scoont do lunch box thermos” then you have an ego problem and one of ignorance..
Wow! How do you get so many things wrong in so few words?!!!!
You are next hot shot!
Show me a compressed liquid that increases density before becoming solid..
What happens when water becomes a solid?
And what happens to the material next to it.
You nuts are going directly into the vice.
https://en.wikipedia.org/wiki/Properties_of_water#Compressibility
Water’s compressibility is very low (close to zero), but it is not incompressible. So you are technically incorrect – the worst kind of incorrect.
Funny enough, water is rarely used as a hydraulic fluid, even though it is much less compressible than most oils that are used for the purpose. Less compressibility means less efficiency, however water has a tendency to destroy mechanical parts just by existing near them, so lesser substitutes must be used.
Actual real engineers who know what they’re doing have to take such factors into account when designing hydraulic systems, unlike guys who did well in high school science and stopped learning for the rest of their lives.
What happens when you print at less than 100%??
I’d guess that it crumbles in on itself.
Yup, the video shows the oven set to 3D printer extrusion temperatures so the part will deform and sag into a non-100% infill.
I checked PLA 40% infill for 45 minutes 140ºC. I made with wed salt, When heating it loss moisture, the salt be like a solid rock. I like results. I recommend it.
And a recipe for fish: Salt-Baked Fish
https://www.foodandwine.com/recipes/salt-baked-fish
Enjoy
What about the same, using flour?
yes lets heat a hydrocarbonate in powder from, so once you heat it, that its not an insulator its a small bomb
Flour would burn while salt would not. Eventually you could get the salt to melt with enough heat, but probably not in a regular oven.
Moderation standards on this website are arbitrary and dumb. Why did this get held for moderation and not my other comments above?
Flour will burn… maybe it’ll turn straight into charcoal… maybe into an open flame. IDK, never tried putting dry flour into an oven.
If you add an egg, some butter and chocolate chips it will go fine.
Okay, this gives me a great idea. Use this technique to adhere multiple parts together. You could use this for geometries that won’t print, either due to size or shape. Someone who is able, please try this! I would if I had a printer.
I am wondering if a part could be printed with a low infill and have it be filled during its time in the oven. Saving time on the printer. Maybe using something that would hold its shape better than the salt, maybe misting a small amount of water every once in a while while filling could help.
I also wonder about the possible benefits of mechanized agitation while filling with salt.
You can already ‘weld’ plastic stuff with one of those 3d printing pencils, or heating the sides locally and sticking them together, or ‘stitching’ around the edges with a soldering iron.
This would be the same thing IF you can get the parts tight enough together in the first place (you can’t push them together mechanically while they are melted). Maybe a combination of the two would result in a stronger connection.
Ah, so, like “missing wax” technique, only without missing, just adding more. It requires mold which will hold shape well, and new material added must be identical to the material used to print the positive model.
I am not sure if molten plastics would be of low enough viscosity to flow into holowed parts of the mold. Also, there probably would need to be separate lower channels for material flow, and upper vent channels for “void” (air) to escape as the mold fills.
Hi, I actually tried with ASA and can confirm : the molten plastic welds pretty good but it doesn’t flow at all between the pressed surfaces. So only the peripheral surfaces got welded and the core wasn’t, which resulted in neat breaking under stress test but no layer tear.
The salt technique could prove to be interesting to weld plastic parts together if there is for example a rail to keep the parts from moving away. Would like to try that salt technique with ASA just to even out shear strength !
So, just like… injection molding ? Ask for creating a mold and inject few parts, it’s not *that* expensive anyway.
i did this for pla parts for a taig lathe cnc conversion. print out parts at 100% infill, then super glue the perimiter, encase in plaster of paris, and ramp up and finish off baking at 425 for an hour. plaster is a pain, the stuff from lowes does not disolve in water, the outer 1/4 inch turns to mush, the rest is still solid. worked well.
Can you re-heat the plastic to a some sort of flow point in the setup?
Seems you’re trying to create a crucible-less casting method here.
What if the part to re-heat was printed with some features that resembled sprues and risers of a work piece that was just removed from a casting mold.
Thus when the plastic was at flow temperature, you’d have some feed material to flow in and help the the part not collapse or change shape too drastically.
Can you do this without getting too close to a char or flash point of the plastic or its fumes?
Seems that you would have some iffy/unknown layer bonds , if the entire part isn’t heated to the flow point?
As asked above about putting aluminum together in a support/mold? Yes the oxide layer is an issue. Plus you’re back at the need for “excess” material needed so as to flow in and fill the gaps.
But with all the tangents of crucible-less casting or re-flowing the material, at what point will you have tied up the labor and time of just casting or molding or other manner fabricating the part in the first place?
Forgive me if this is a bit spotty to read or missing a thought or two, it’s a bit early and the typing part of my brain isn’t caffeinated yet.
He heats PLA at 230C and PETG at 240C – well above the melt point (and well below the char point) for both. He bakes them for 45 minutes to ensure the entire apparatus reaches the target temp.
Because it goes above the melt point the layers should completely re-flow and fuse together into a complete whole (and from the video it appears that is exactly what happens). It should effectively be the same as an injection molded part. You’ve just done away with injection and used the printed part to both create the mold in the salt and supply the material for the casting at the same time.
My experiments with 100% PETG infill broke into shards similar to those when you break glass. I do not see any point in re-flowing what is already 99% or more fused. And sacrificing any dimensional precision and/or accuracy is a deal-breaker.
However I’m interested in the surface finish for some art parts like figurines etc..
But for applications where you want your part to be truly as strong as a injection moulded part, this technique works out really great. Its not for figurines. Its for load bearing shapes.
The compacted salt works like wetsand in metal moulding, so the part keeps its dimensional accuracy for the most part.
FDM prints ARE NOT SOLID…. the layer contact is not a solid bond, you can easily snap the layers apart with your hands.
This remelts the plastic in its entirety and that removes layers. Its all one solid piece.
can confirm, pla printed parts are not solid, trying to turn them on a lathe ends up with strings of layers seperatting. baking does turn them solid, able to turn on a lathe and get nice chips of plastic.
Yeah, you would be interested in figurines.
CNC kitchen did a strength test.
Far too much work, honestly. If smooth and nice looking surface is your intend:
– sand
– apply primer
– apply a paint coat
Regarding the mechanical constraints, my prints are not subject to high constraints
no
I needed this to make my prints water tight.
Same Same. I’m definitely going to try this. I have a 3D printed handheld remote that needs to be waterproof. The current version is rattle canned nylon, but I think this process will result in much better water-proofness.
I know this probably isn’t wildly helpful, but I bought an SLA printer specifically for making water/gas tight prints, and it works well.
Yeah this process really should be referred to as “remelting” or “sintering”, annealing implies more of a stress relief or some sort sub-melt temp thermal conditioning via heat and slow cooling.
What about epsom salt? Its cheap and fine powder.
Because epsom salt is about 53% water and heating it at these temperatures would release that water and ruin the process. Nile Red has a video about epsom salt and the process of removing the water.
Hi Sam, thanks for the info. Ive watched his video. awesome guy
Investment would do a similar job, can be heated to any temperature and is water soluble. Also pretty cheap.
Expansion might be a problem, but “risers” might help buffer volume likes with casting.
Also in any medium, you could assemble hard to print components by “gluing” with acetone then baking.
Hi Davud i watched the youtube video. awesome! thanks for this information. i will buy some salt now :)
cheers,
Johann
What would happen when I’d use expending filament and treat it this way?
What about foodsafe?
Hello everyone, wondering what are your thoughts about using this very interesting method to make a 3d printed object foodsafe, removing the micro spaces between layers where bacteria would otherwise develop.
Thank you all in advances for your inputs.
Regarding the 100% infill thing, It seems like you could do something similar to rotomolding, by printing the part with minimal infill, then rotating the encased part after reheating. The rotation would have to continue until the whole part was below the melt temperature, and would have to be done on two axes in order to avoid any spots that were never on the “bottom”. Which is an essential part of rotomolding anyway. Just like someone else commented, except that he was talking about injection molding, this gets you the light weight airtight/watertight parts that rotomolding does, but without having to make a mold, and with the plastic already pre-measured.