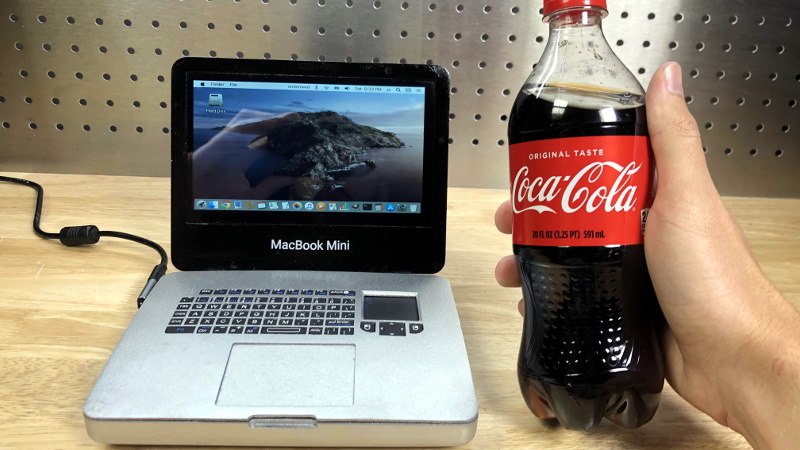
Do you like the sleek look of Apple’s laptops? Are you a fan of the Raspberry Pi? Have a particular affinity for hot glue and 3D printed plastic? Then you’re in luck, because this tiny “MacBook” built by serial miniaturizer [Michael Pick] features all of the above (and a good bit more) in one palm-sized package. (Video link, embedded below.)
Getting the LCD panel and Raspberry Pi 4 to fit into the slim 3D printed case took considerable coaxing. In the video after the break, you can see [Michael] strip off any unnecessary components that would stand in his way. The LCD panel had to lose its speakers and buttons, and the Pi has had its Ethernet and USB ports removed. While space was limited, he did manage to squeeze an illuminated resin-printed Apple logo into the lid of the laptop to help sell the overall look.
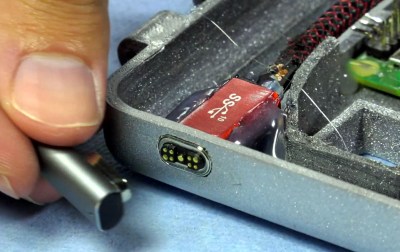
 The bottom half of the machine has a number of really nice details, like the fan grill cut from metal hardware cloth and a functional “MagSafe” connector made from a magnetic USB cable. The keyboard PCB and membrane was liberated from a commercially available unit, all [Michael] needed to do was model in the openings for the keys. Since the keyboard already came with its own little trackpad, the lower one is just there for looks.
Speaking of which, to really drive home the Apple aesthetic, [Michael] made the bold move of covering up all the screws with body filler after assembly. It’s not a technique we’d necessarily recommend, but gluing it shut would probably have made it even harder to get back into down the line.
We’ve previously seen [Michael] create a miniature rendition of the iMac and an RGB LED equipped “gaming” computer using many of the same parts and techniques. He’ll have to start branching off into less common machines to replicate soon, which reminds us that we’re about due for another tiny Cray X-MP.


Apple Pi
+1
Or PIneApple
I really wish that this guy would stop making videos until he learns the basics of even something as simple as 3D printing a part to fit what you’re using instead of dremeling the hell out of parts. I’d be more excited if he just learned how to prep and paint a 3D print correctly.
Well the site is called “HACKaday”, not “PERFECTLYEngineeredaday”
Very true, as the end result is very nice, but having to watch all the unnecessary mods because he didn’t plan things properly is very annoying and shows an elementary understanding of engineering basics. He’s the only “engineer” I know of that apparently doesn’t own a soldering iron; watching the brutal removal of parts that can be unsoldered so easily was hard to watch.
Dremeling to fit was necessary in this “case”. Both the Pi itself and ALL of the 7″ LCD displays on the market today are too thick to use as-is for laptop applications. Without that, the unit would have been another 12mm or so thick. In Michael’s case, hacking is a literal thing.
Well, you know… a lot of people have this obsession with making all their devices razor thin. They like it even more if it results in lost functionality. No, I don’t get it either but you have to at least recognize that these sorts of trends exist and are commonplace if you hope to understand the people around you.
I love the video and the project is fascinatingly implemented, but this obvious surreptitious advertising for the CC lemonade in the photo and video is, in my personal opinion, incredibly annoying and undermines the credibility of the otherwise really great project.
In regards to the Title Photo;
The soft drink bottle appears to be more in focus, and the “mini” is less focused.
This gives the appearance of the bottle being closer to the camera, therefore the size comparison is not obvious.
A proper^H^H^H^H^H^H cromulent perspective would have the two objects side by side on the table, both in focus.
If you look at the bottom of the bottle, it’s inline with the front of the “laptop”, so it is side by side on the table.
My bad!
I was judging from the cropped Title photo that shows up when you first see the article in the “blog” format!
Dear heavens, someone get this guy a hot air rework setup. If you can buy an FDM and an SLA printer, you can acquire a $50 hot air pen. I get the “HACK” mentality, but look at all the innocent components you could have harvested instead of murdering them. I’m honestly impressed none of the dremeling swarf shorted anything out! Neat results!
“all [Michael] needed to do was model in the openings for the keys.” And then manually file each key opening to fit. That’s “all” he had to do.