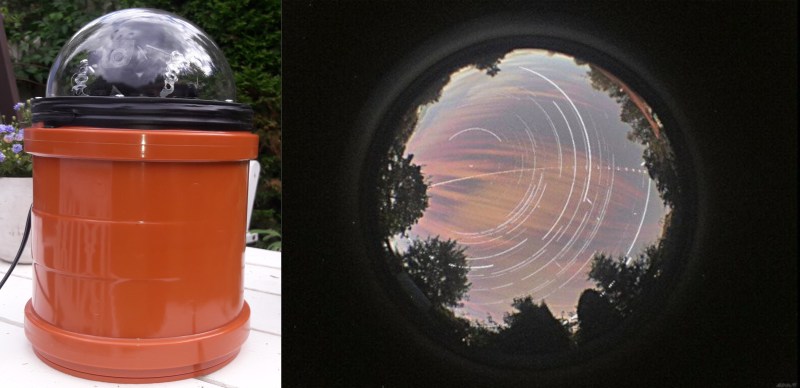
Combining a Raspberry Pi HQ camera and a waterproof housing, [jippo12] made an all-sky, all-Pi meteorite tracking camera on the cheap, and it takes fantastic photos of the heavens. It’s even got its own YouTube channel. Inside there’s a Raspberry Pi 4 plus an HQ camera to take the pictures. But there’s also a system in place to keep everything warm and working properly. It uses a Raspberry Pi 3+, a temperature sensor, and a relay control HAT to pump pixies through a couple of 10 W resistors, making just enough heat to warm up the dome to keep it from fogging.
A few years ago, we reported that NASA was tracking meteorites (or fireballs, if you prefer) with a distributed network of all-sky cameras — cameras with 360° views of the night sky. Soon after, we found out that the French were doing something quite similar with their FRIPON network. We pondered how cool it would be to have a hacker network of these things, but zut alors! Have you seen the prices of these things? Nice hack, [jippo12]!
Rather do things the old fashioned way? Dust off that DSLR, fire up that printer, and check out OpenAstroTracker.


Worth pointing out the pi 3 is also a camera controller so its not as wasted as the article make it seems, it is more than just a thermostat.
Nice to see the HQ camera getting some use, and looks like a good start to making a really good finished version.
Should be able to use just one Pi 3 compute module as it has both camera lanes broken out for a cheaper future version for example (I believe there is already a commodity PCB compute module carrier board that does this). The PCB to carry the compute module can also easily be part of the structure to hold all the electronics in place if making a custom carrier board etc.
Still good work, great results!
I was a bit confused as to why it had two Pi’s in there. If the 3 is the camera controller and thermostat, what does the 4 do?
pi 4 runs the HQ camera the 3 a standard Pi cam as well as the heater.. Does seem a little overkill, but it looks like a I have these on my desk and want to do this build.. And the results are good, which if its bits you had laying around is hard to argue with.
ha – the pi4 *IS* the heater – what would happen if you had one of these in someplace like Phoenix where it’s 120F in the summer ? How would you keep it cool yet not fog ? A Noctua fan ?
I wonder that the enclosure is? Where can one purchase it?
“what”… I meant to say “what” not “that”… uhhg fat fingers.
Acrylic pet domes are a great choice for stuff like this. They’re meant to let a pet look through a little clear bubble in a fence. They run $30-50 on ebay depending on the size.
What did you use as a tube?
Meteotux is not FOSS? Not good. Seriously what can it do that MEncoder, FFmpeg and Imagemagick can’t do when stitched together with a bash script?
Point is that the software could stretches exposures and gains high without dropping frames which gives high scientifical value. Not possible with scripts.
Resolution and quality is something what you could just dream couple of years ago for this kind of purpose ;)
Not that good not that interesting but not bad not really worthy of an entire comment …have a nice day!
I failed to get more than a few seconds of exposure time out of the python interface. One probably needs to poll images and stack them in software. Doing this in python leaves gaps of unexposed time between stacked frames. So not 100% working.
Still, would love to see the tool as Foss.
Doesn’t that reasoning literally also apply to any piece of commercial software? Feel free to implement it yourself if you want.
It was two very specific questions.
2 aswers:
1) It’s not FOSS.
2) Please show me what you can do seriously do with MEncoder, FFmpeg and Imagemagick when stitched together with a bash script. And do compare results before your next post.
If you have to ask that you have no idea about the subject, the question is what can’t you do with that combination?
Perhaps you don’t understand, your comment implies that you believe that the BASH shell is not Turing complete. Hilarious.
Umm. did you compare results or not?
Do you not know what Turing complete means?
Why have a video of the meteotux install on youtube, and not at least post the commands at the bottom as a comment so we can cut’n’paste? Grrr
Seriously? :D
Bought it just to fill the niche. Seems fairly competent. Just wish the parts list was a lot better. I dont know how well it will do with the weather in my state but worth a try. I’ve seen some bright ones that I reported to the meteor watch site. now I can actually have captues potentially.
Trying to build this atm and I cant recommend it.
the build guide is lacking information.
are the heaters for the camera are the heater for the enclosure.
how are they dealing with moisture
what parts for the enclosure.
mounting the camera and pi.
power for outside.
how do you use the pro function since I bought it. command details …
bottom line: its promising but avoid for now.
This is no building instructions directly. That was how i did it here in Finland. Every country has their own moisture/heat/sandstorms etc. you can apply whatever you need to it to build it working outside. Best thing is just put raspberry pi with camera inside to look sky out from your house window :)
Sorry! These are not direct building instructions, you have to adjust them in your country/zone where you live and use some “hacker” sense to adjust it to your location.
The folks at Skyhub.org are doing something similar but adding some machine learning.
That looks professional but it use open cv so it will lose frames from camera. But still nice built and thanks for info i will look up that nvidia iot thing later ;)
Wouldn’t having the camera sensor under a dome like that risk burn in from the direct sunlight throughout the day in approximate the same path across the sensor every day? Since it’s for recording stars at night having a mechanical shade that is pulled over during the day would make sense?