The average cost of a desktop 3D printer has dropped like a stone over the last few years. They went from a piece of equipment you had to wait your turn to use at the hackerspace to something you can pick up on Prime Day, which has definitely been a good thing for our community. But to get the price down, these printers are almost exclusively running single extruder setups with no provision for multi-material printing other than swapping the filament manually.
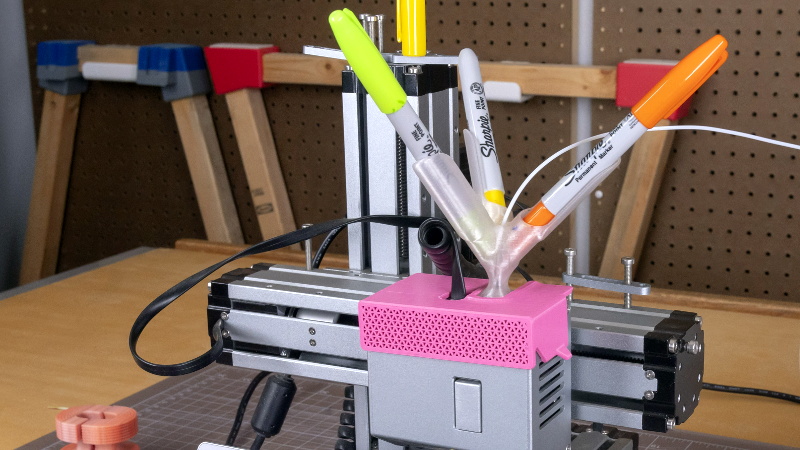
From a practical standpoint, that’s not much of a problem. But wanting to add a little visual flair to his prints, [Devin Montes] came up with a simple 3D printed mount that holds the tip of up to three Sharpie permanent markers against the filament as it enters the top of the extruder. When used with white or translucent filaments, these markers can give the final print an interesting splash of color. Obviously it’s not true multi-color 3D printing, but it can certainly make for some attractive decorative objects.
 The mount is designed for the Snapmaker 3-in-1 3D printer, which is relatively well suited to such a contraption as it has a direct drive extruder and there’s plenty of clearance for the markers to stick up. The concept could certainly be adapted to other printers, but it might be a little trickier in the case of a Bowden extruder or an i3 clone that has frame components running over the top. It sounds like [Devin] is working on a generic version of the marker holder that can work on other printers, so it should be interesting to see how he addresses these issues.
Technically this isn’t a new concept, as makers were pulling off similar tricks back in the earliest days of desktop 3D printing. But this is an especially well-implemented version of the idea, and if [Devin] can really come up with a mount that will work on a wider array of hardware, we could certainly see it becoming a popular way to make printed projects a bit more exciting.


That is a good idea.
I have been just drawing on the reel before it goes in …
https://www.thingiverse.com/thing:4185577
and…
https://www.thingiverse.com/thing:1862194
This is way more refined, but the dragonflies, geckos and other critters I’ve made with marker pens on the reel all come out different.
This mod is just calling out for solenoid drive to load the pens…. Hmmm..
Solenoid, nah, use a servo with a 3D printed cam. Place springs near the tip of the pens to assist with retraction. Or something similar
Servo? Nah, integrate a CMYK inkjet printer head..
I’ve actually been toying with doing that, in a slightly different way, printing dyes or inks on each layer before the next is printed. I get the impression fabric dyes would work well with PLA and almost certainly nylon filament.
You mean print a layer then go over it again with the inkjet? That would take twice as long to print, wouldn’t it? How about continuous inkjet injection into the filament until it’s time to change color? Also, how to embed the color info into the STL? Sounds fun!
Check Him out on U tube at “Make Anything” He has a lot of talent and is very generous with it.
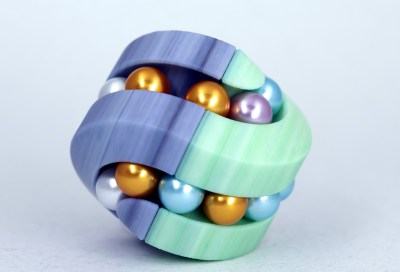
I would like the model he has printed, with the ball races, does anybody know if it’s available for download somewhere ?
Here’s one version: https://www.myminifactory.com/object/3d-print-astrolabicon-pro-114579
His myminifactory account has many more versions, some paid, some free.
I remember the first time I did this years ago (I think it was because of a richrap article) there was an annoying issue that some plastics become brittle after sitting under the sharpie tip for a duration (like 10 minutes) and then snap in the extruder’s gear causing all sorts of issues. I’ve long forgotten exactly what the material was, but I believe it was clear ABS…
What a great idea! I thought it was going to be drawing on the plastic after the print itself, but this is even better. Cool cool cool.
take this a step further and stick a servo or solenoid on each sharpie so they can be moved into and out of contact with the filament with gcode.
I tried this years ago using a design I downloaded off of Thingiverse that also used 3 pens. That one used rubber bands to force the pens against the filament.
I didn’t see much difference in color although maybe that’s because I used white filament and all the discussion I saw about it online called for natural. It seemed to add too much drag and my extruder would often just chew up the filament and stop feeding resulting in failed prints so I didn’t bother pursuing the idea any further.
That was in the days of 3mm filament. Maybe it’s better with 1.75? I don’t know.
I too did something like this a few years ago…I called it the “poor mans palette” .
I found it was difficult to make any deep colors, everything kinda turned out like “easter colors”, which look cool, but restrictive.
the idea I have been wanting to try is to see up an inkjet printer to apply pigment / ink to the filament. With this sort of setup, i THINK you could get deeper colors. Plus the way injets work (actually boiling the ink) means it would probably dry faster than the sharpie.
I won’t have the time to test this for probably years, so if anyone wants to try, please do! (but let me know how it works)
I also want to try this! There is an arduino project out there to drive inkjet cartridges, but as far as I know none that support cmyk.
HELP please, I purchased a Prusa Mini for my son last year. Do you think this will work on it? Also, if it does, I can’t figure out where to buy this. He is a pain in the a** when it comes to Christmas shopping. Thank you so much for your help.
Ha! We were doing this (manually applying sharpie to natural ABS before extruding) on the Cupcake CNC :) https://www.thingiverse.com/thing:1084
i love the idea, but i have to ask if there are any long term repercussions for doing this, or at least any extra cleaning that has to be done to prevent damage/problems down the road. thank you!