If we’ve learned anything over the years, it’s that hackers love to know what the temperature is. Seriously. A stroll through the archives here at Hackaday uncovers an overwhelming number of bespoke gadgets for recording, displaying, and transmitting the current conditions. From outdoor weather stations to an ESP8266 with a DHT11 soldered on, there’s no shortage of prior art should you want to start collecting your own environmental data.
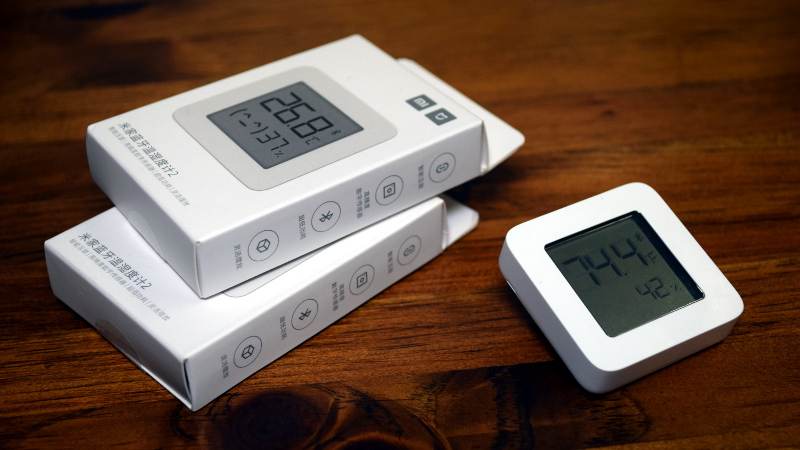
Now obviously we’re big fans of DIY it here, that’s sort of the point of the whole website. But there’s no denying that it can be hard to compete with the economies of scale, especially when dealing with imported goods. Even the most experienced hardware hacker would have trouble building something like the Xiaomi LYWSD03MMC. For as little as $4 USD each, you’ve got a slick energy efficient sensor with an integrated LCD that broadcasts the current temperature and humidity over Bluetooth Low Energy.
It’s pretty much the ideal platform for setting up a whole-house environmental monitoring system except for one detail: it’s designed to work as part of Xiaomi’s home automation system, and not necessarily the hacked-together setups that folks like us have going on at home. But that was before Aaron Christophel got on the case.
We first brought news of his ambitious project to create an open source firmware for these low-cost sensors last month, and unsurprisingly it generated quite a bit of interest. After all, folks taking existing pieces of hardware, making them better, and sharing how they did it with the world is a core tenet of this community.
Believing that such a well crafted projected deserved a second look, and frankly because I wanted to start monitoring the conditions in my own home on the cheap, I decided to order a pack of Xiaomi thermometers and dive in.
Firmware Installation
Certainly one of the most appealing aspects of Aaron’s “ATC” firmware is how easy it is to install. You’d expect something like this would require cracking the case and attaching a USB to UART adapter, and while you actually can go that route if you need to, 99% of users will be using the extremely clever “Web Bluetooth” flashing tool.
 In theory you should be able to install the ATC firmware from any computer running a modern enough web browser, but your mileage may vary with such a cutting-edge feature. My Linux desktop couldn’t connect to the thermometers at all, and trying it on a Chromebook only worked occasionally. Your best bet is probably going to be a smartphone or tablet, and I had no problem flashing several of the thermometers using my Pixel 4a.
All told, the flashing process takes a little under a minute to complete. After you pull the tab on the back of the thermometer, you tap “Connect” on the flasher and wait for it to pop up on the list of local Bluetooth devices. After connecting you need to hit the “Activate” button, which apparently establishes the secure connection required by the original firmware before it will allow for an over the air (OTA) upgrade.
Once the activation process is complete, you select a firmware binary, tap “Start Flashing”, and wait as the progress indicator ticks up towards 100%. This takes around 30 seconds to finish, and afterwards the thermometer should immediately reboot into the new firmware. If it doesn’t wake up after the flashing process, Aaron says you can just pull the battery and it should sort itself out. I’ve gone through this process several times now without ever needing to pull a battery though, so presumably it’s a fairly uncommon problem.
Should you ever need to, the same process can be used to put the stock firmware back on the device. Aaron doesn’t have a stock firmware image in the GitHub repository (likely to avoid a copyright claim) but in the documentation he does tell you how you can extract a copy of it from an official update file.
Now, the more security minded reader may be wondering it this means some militant nerd can go around bricking people’s Xiaomi thermometers. Unfortunately, it does. This tool will let anyone within Bluetooth range flash whatever they want to the Xiaomi LYWSD03MMC, regardless of whether or not it has a custom firmware installed. That said, there’s already been mention of adding some kind of authentication mechanism to the ATC firmware to defend against such attacks; making it notably more secure than the stock firmware.
Getting Comfortable
The web flashing tool doesn’t just install the ATC firmware, it also provides an easy to use interface for configuring it. After connecting to the device, you just scroll down a bit and just tap on the various options to enable or disable them.
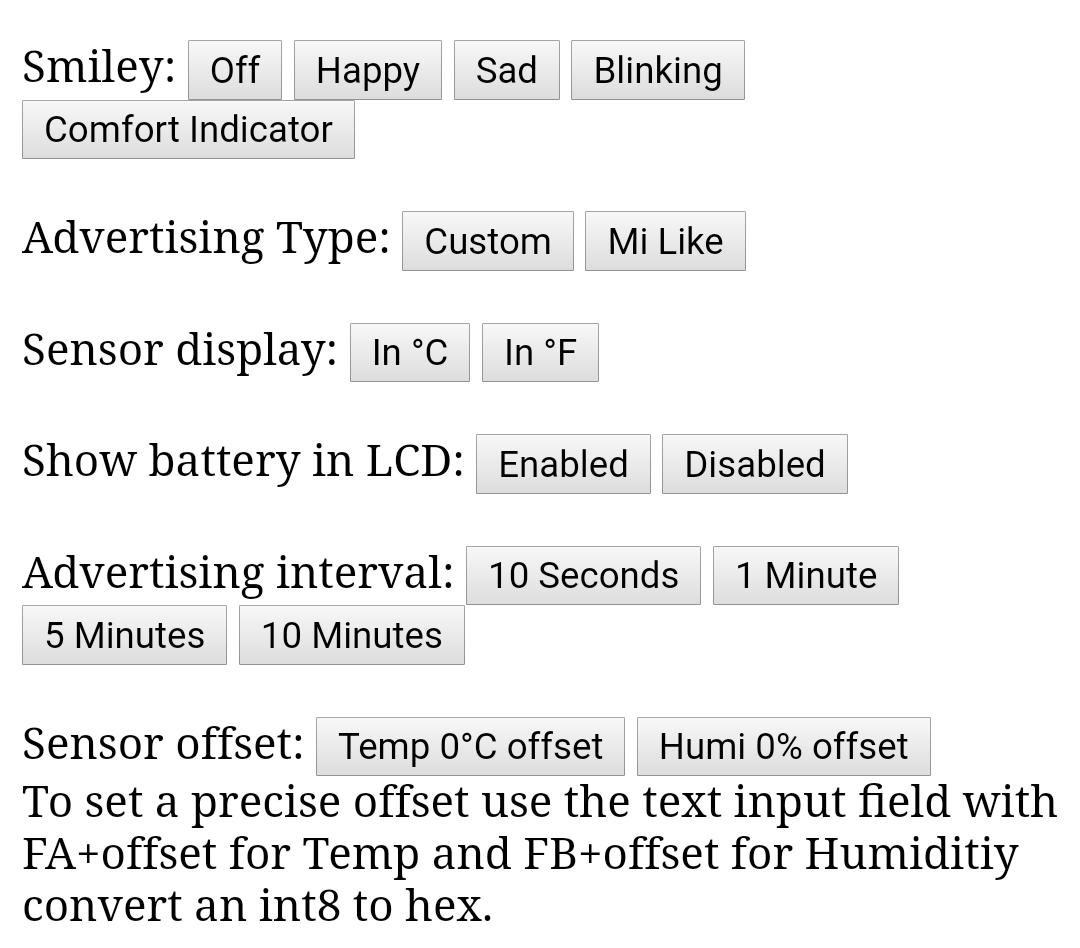 Turning off the weird ASCII-art smiley face was the first thing I did, and being an American heathen, I also changed the display to Fahrenheit. The fact that you can enter an offset values for the temperature and humidity is handy, though it might become unnecessary in the future as Aaron says a more robust calibration routine is on the TODO list.
Showing the battery level on the screen is an interesting feature that’s enabled by default, but personally I turned it off. The problem is that the battery percentage and relative humidity have to share the smaller set of digits on the bottom right side of the LCD. They switch back and forth every five seconds or so, which in practice seems just fast enough that it’s sometimes confusing as to which one you’re looking at. Plus when the CR2032 battery inside is supposed to last up to a year, do I really need to see the battery level so often?
I was a bit confused by “Advertising Interval” at first. I assumed this would be how often the thermometer sends out a BLE packet, but in practice, it sends them out every few seconds regardless of what you change this setting to. What this setting actually changes is how often the temperature data that’s being broadcast gets updated. The default is one minute, so you should expect to get 20 or so packets that will contain the same temperature and humidity values before they get refreshed. Setting the update interval to 10 seconds would give you more granular data, but presumably at the cost of battery life.
Custom Builds
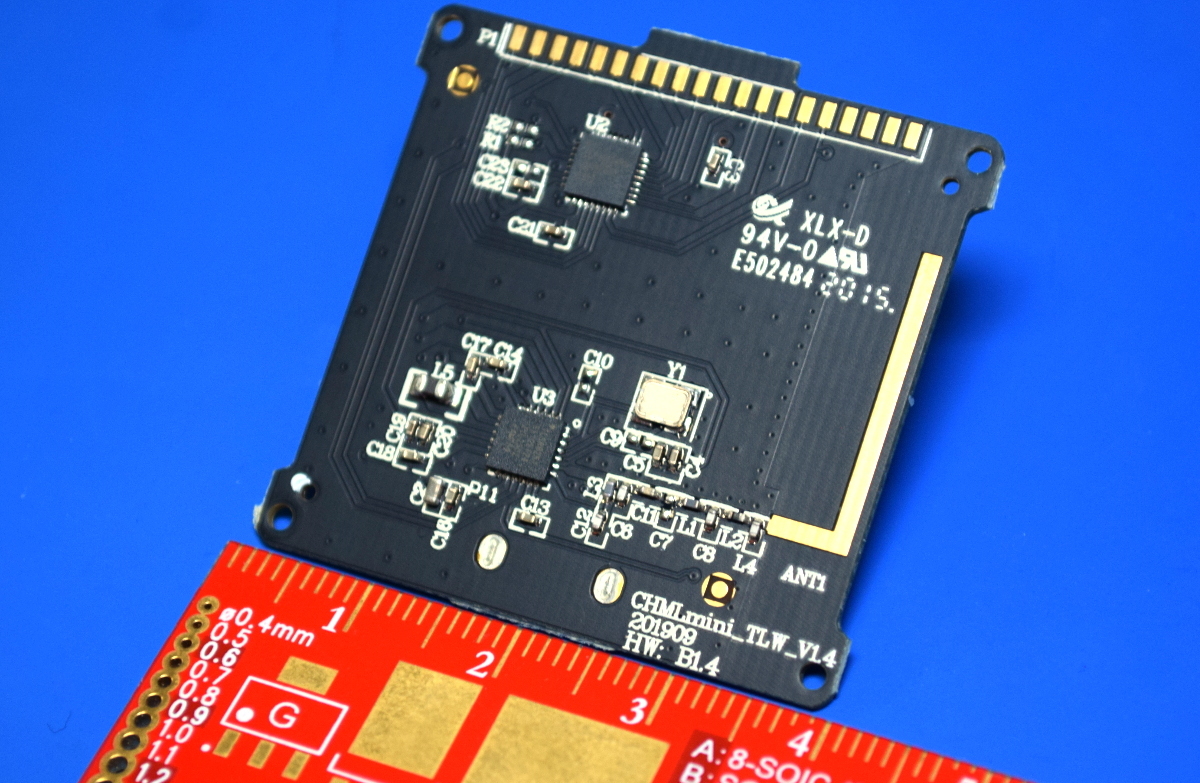
While Aaron doesn’t go into too much detail on the project page, it’s fairly easy to compile your own firmware for the thermometer that can then be flashed with the web tool. On Linux, all I had to do was extract the Xiaomi Telink TLSR825X tarball and add the directory to my $PATH environment variable. From there I could build the ATC firmware and start poking around at the code.
If you’re into low-level C programming, there are a number of Issues in the GitHub repository that you could probably help out with. It sounds like the major one right now is establishing persistent flash storage, which would pave the way for being able to retain configuration across battery changes and more advanced features like local temperature logging.
For my own purposes, it was easy enough to find the part of the code that changes the Bluetooth device name. If you’re going to be dotting these all over the house, seeing something like “ATC_BEDROOM” will certainly be more helpful than the default naming scheme which uses the last characters of the MAC address.
Pulling in the Data
Now to be clear, you don’t need to install Aaron’s firmware to use the data from these thermometers in your own projects. There’s at least one tool that allows you to pull the temperature, humidity, and battery level from the sensors out of the box, and they’re also supported in ESPHome. But the problem with the stock firmware is that you need to actually connect to each sensor to read its data, which is a slow and energy intensive process. One of the main improvements in Aaron’s firmware is that the data is constantly being pushed out in the clear as a BLE advertisement; meaning any nearby device can sniff the values right out of the air without establishing a connection or pairing.
To that end, there are a few packages worth taking a look at. At the time of this writing there’s a pull request to add support for ATC firmware to aioblescan, a simple Python 3 tool that will dump data from the BLE packets to the terminal. A little scripting would allow you to easily parse the output from aioblescan and shuffle the information around however you see fit.
I’ve also had good luck with py-bluetooth-utils, a library designed for working with BLE advertisements. Based on some examples included with the project, I’ve come up with this minimal script which should get you started:
#!/usr/bin/env python3
import sys
from datetime import datetime
import bluetooth._bluetooth as bluez

from bluetooth_utils import (toggle_device, enable_le_scan,
							 parse_le_advertising_events,
							 disable_le_scan, raw_packet_to_str)

# Use 0 for hci0
dev_id = 0
toggle_device(dev_id, True)

try:
	sock = bluez.hci_open_dev(dev_id)
except:
	print("Cannot open bluetooth device %i" % dev_id)
	raise

# Set filter to "True" to see only one packet per device
enable_le_scan(sock, filter_duplicates=False)

try:
	def le_advertise_packet_handler(mac, adv_type, data, rssi):
		data_str = raw_packet_to_str(data)
		# Check for ATC preamble
		if data_str[6:10] == '1a18':
			temp = int(data_str[22:26], 16) / 10
			hum = int(data_str[26:28], 16)
			batt = int(data_str[28:30], 16)
			print("%s - Device: %s Temp: %sc Humidity: %s%% Batt: %s%%" % \
			     (datetime.now().strftime("%Y-%m-%d %H:%M:%S"), mac, temp, hum, batt))

	# Called on new LE packet
	parse_le_advertising_events(sock,
								handler=le_advertise_packet_handler,
								debug=False)
# Scan until Ctrl-C
except KeyboardInterrupt:
	disable_le_scan(sock)
Just Do It
If you can’t tell, I really like Aaron Christophel’s custom firmware for the Xiaomi LYWSD03MMC. As far as I can tell, there’s absolutely no reason not to install it if you’ve already got some of these thermometers laying around. In its current state it gives you greater control over the hardware and what you can do with it, and the features currently in the planning stages promise to take things even farther. Being able to locally log temperature data on the thermometer and download it over BLE at a later date is definitely something to keep an eye out for.
For as cheap as these little thermometers are, I’d highly recommend adding a few to your next parts order. Even if you don’t have an idea in mind for them yet, I wouldn’t be surprised if something comes to you after spending an afternoon hacking their firmware.


Waiting for mine to arrive after reading the previous article. I’m hoping to be able to find some spare gpio on the board so I can try to use them as wireless thermostats.
Yep got 4 coming in after a they ware mentioned at our amateur radio clubs IRC channel.
Thankfully prior to the had article so there was plenty of stock.
Still waiting for them though.
The current situation has really affected shipping times, add in the usual Christmas rush and it gets even worse.
But I’m looking forward to re-flashing all 4 and aggregating the data in one dashboard for easy use.
I have also ordered them, even a bit earlier and still waiting, in fact got refund already and ordered them again. But it can be worse, just week ago I received item shipped from China in February :-)
IF someone does, I’d really love to attach the thermometer to a waterproof sensor, instead of whatever is directly attached to the board.
I can already hear the Nelson style “ha-ha”… but I couldn’t get this to work on my iPhone or macOS Catalina; the BLE device isn’t listed. Any solutions which will allow me to use one of my Apple devices to reprogram the LYWSD03MMC?
Programming worked for me on Catalina using Chrome browser
Works fine for me from Chrome on MacOS 10.15.7, checked browser privacy settings?
i have ordered 6. I have central heat and want to control the individual vents to level out the heat in the house
controlling the vents with an esp and servo
I thought about doing something similar, but it ended up being easier to just balance the flow of each vent duct with the manual dampers installed on the ducting near the furnace, once. It’s a fairly simple procedure to measure the baseline flow, chart that to each room’s volume, and adjust. The heating needs for each room tends to not change much. Food for thought…
I live in a mobile home and the duct work loops around and there is only 1 duct coming from the furnace
I got mine yesterday. used my phone to flash the firmware on on this morning. super easy
Since this thing has custom firmware does this mean I can have a thermometer that reads in Rankine and Réaumur?
Thank you Tom for this second and very detailed post :)
One thing to mention, also the stock firmware does advertise the sensor data, this data is encrypted via an AES and needs a key to decode this data
The webflasher will give the Key when doing the activation so these sensors can be used even with the stock firmware if wanted. After doing an actication in the web flasher the MiHome app does not work anymore as the key has changed it is needed to re add the sensor in the Mi app to get it working like stock again.
Good info, and thanks again for your efforts. I have 6 on the way :-)
My Lacrosse Scientific wx station has a dead battery, an ML2032.
Would a LIR2032 be a suitable substitute?
Sure looks like it:
https://en.wikipedia.org/wiki/Lithium_battery#Chemistries
Dunno why you’re asking here though!
Because, temperature, weather, and hackers; TOGETHER!
LIR have a higher operating voltage, a smaller capacity, and are less tolerant of extreme temperatures.
ML2032 are rechargeable and I believe the station has a solar panel for recharging, so that prevents you from using a CR2032.
You pretty much have to use a ML2032.
Yes, it has a solar panel.
It is currently mounted 0n a flagpole (i.e. a bit of a hassle to replace).
Oh yeah, thanks for the response!
The Xiaomi Mijia BLE enabled devices have been supported for awhile in ESP Home (actually the method can be adapted to work on any platform). An ESP32 is used as the BLE/WiFi bridge, so no BLE device firmware hack is needed. However some devices do have a bindkey that must be sniffed in addition to the MAC address. Here’s a list of the Mijia devices supported along with the associated bindkeys, where needed:
Xiaomi Mijia BLE Sensors
https://esphome.io/components/sensor/xiaomi_ble.html
And more on setting up the BLE tracker:
ESP32 Bluetooth Low Energy Tracker Hub
https://esphome.io/components/esp32_ble_tracker.html
ESP32 Bluetooth Low Energy Device
https://esphome.io/components/binary_sensor/ble_presence.html
This example shows how to sniff both the MAC address and the bindkey from a Xiaomi Mijia BLE device. In-fact the example device is the same LYWSD03MMC Thermometer-Hygrometer that got [Aaron Christophel’s] FW hack.
Esphome Tutorial: for 4$ monitor your home temperature with esp32 and xiaomi mijia
https://omarghader.github.io/how-to-monitor-your-home-temperature-with-esp32-and-xiaomi-mijia-using-esphome/
Thanks for this info.
I’m reminded of Maxwell Smart
“Chief, why are they doing the launch countdown in German?”
“Because all of our best rocket scientists are German”
And Clive James
“Japanese cars are bigger and more powerful in America”
To which we add
“Our all American eponymous german Fahrenheit measure is superior to their eponymous swedish Celsius measure”
I wrote an Apple HomeKit bridge in Go just a few days ago and have an iOS & Mac app in the review pipeline for the App Store:
HomeKit Bridge: https://github.com/the-kenny/atc-homekit-bridge
Your script is not working for me at all with custom firmware ?
user@ws:~/build/py-bluetooth-utils$ sudo ./do.py
[sudo] password for user:
Power ON bluetooth device 0
Bluetooth device 0 is already enabled
Enable LE scan
scan params: interval=1280.000ms window=1280.000ms own_bdaddr=public whitelist=no
socket filter set to ptype=HCI_EVENT_PKT event=LE_META_EVENT
Listening …
^C
Restore previous socket filter
Disable LE scan
Did you ever figure this out?
Did you ever figure out how to solve this?
I’m assuming you flashed the newer firmware fork by PVVX. If so you need to use these settings when you flash them (highlighted) https://github.com/Ollie-Boyd/xiaomi-google-sheets-bluetooth-gateway/blob/main/xiaomi_config.jpeg . If you don’t, the advertising data is different and the script in the article won’t work, or rather it will need significant tweaking.
Nice alternative firmware! ATC BLE sniffing also supported by RPIEasy either on Raspberry PI or on a Linux PC with USB BLE.
https://github.com/enesbcs/rpieasy
Did someone found a way to run ESP32 with arduino to read out the service data from the custom firmware? I am having issues that BLE client don’t show any service data.
I managed to get a ESP32 to capture the BLE advertisement. https://bitbucket.org/dstacer/workspace/snippets/jBoazB/esp32-arduino-ide-ble-scanner-for-xiaomi
I’ve been reliably using gattool to pull temp/humidity from the Xiaomi CGD1.
Getting the timing right was a bit of a snag.
This is what got me going:
bt=$(timeout 5 gatttool -b BTMACHERE –char-read –handle=’0x0048′ –value=”020″ –listen)
You parse it from there on:
humhexa=$(echo $bt | awk -F ‘ ‘ ‘{print $13$12}’| tr [:lower:] [:upper:] )
temphexa=$(echo $bt | awk -F ‘ ‘ ‘{print $11$10}’| tr [:lower:] [:upper:])
temperature100=$(echo “ibase=16; $temphexa” | bc)
humidity=$(echo “ibase=16; $humhexa” | bc)
temp=$(echo “scale=2;$temperature100/100″|bc)
hum=$(echo “scale=2;$humidity/100″|bc)
echo “Haus,location=Buero temperature=$temp,humidity=$hum”
(sorry for the ugly bash, it works though. remaining format is influx compatible.)
Hmm, putting a XIAOMI Thermometer in the refrigerator works. In the freezer does NOT.
The cell probably stops working at -24*C. The display goes blank… I currently use an RF sensor from a weather station , but like the idea of using BLE over RF (saving the extra RF receiver and software polling and the deciphering logic on the ESP32). Too bad…
If it’s in a freezer, you must be close to an AC outlet. Whip up a small DC power-supply with a rechargeable battery backup, and use that.
Our house has a trickle-charged Group 24 deep-cycle 12v battery for running a standby DC sump pump, and I just tap that for monitoring devices.
Um, also… steel freezers probably are not great locations to put wifi and BLE devices into. So, whatever you use, the main unit should be outside, and just extend the actual temp sensor into the freezer. I would probably use a DS18B20 temp sensor and any ole ESP board.
The script posted up worked for me , but with some modifications. In the script, the mac address is hardcoded, so I had to hardcode mine. Modify with these lines, find out the last alpha numeric characters at the end, and change != with == and “your number”
if data_str[5:10] != ’61a18′:
temp = int(data_str[24:26], 16) / 10
hum = int(data_str[26:28], 16)
batt = int(data_str[28:30], 16)
print(“%s – Device: %s Temp: %sc Humidity: %s%% Batt: %s%%” % \
(datetime.now().strftime(“%Y-%m-%d %H:%M:%S”), mac, temp, hum, batt))
print(data_str[5:10] ) # this line will print a string at the end of the script
# be sure to modify the if data_str[5:10] != ’61a18′: with if data_str[5:10] == ‘your number:
the rest should work as normal.
With this script i Got it to work in Home Assistant.
Regards,
Loren
Glad you got it working, but there are no hard coded MACs in the script. The line “data_str[6:10] == ‘1a18′” is checking the preamble sent out by the ATC firmware, this prevents the following lines of code from trying to decode the BLE packets from other devices.
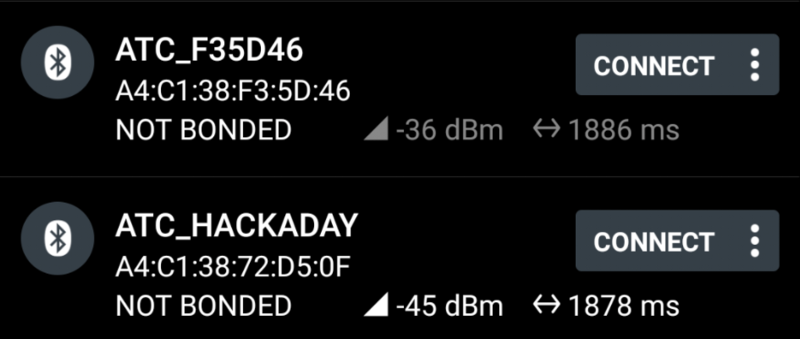
By changing this line to the MAC address of your sensor, you are making it so the script will only respond to your particular device. There’s no problem with that (unless you want to have multiple sensors), but it’s unnecessary. Here you can see that the script is able to detect three separate thermometers running ATC firmware with no changes:
I got an error I can’t for the life of me work out. Any thoughts?
pi@raspi:~/py-bluetooth-utils $ python3 example_ble_scan.py
Traceback (most recent call last):
File “example_ble_scan.py”, line 13, in
toggle_device(dev_id, True)
File “/home/pi/py-bluetooth-utils/bluetooth_utils.py”, line 88, in toggle_device
hci_sock = socket.socket(socket.AF_BLUETOOTH,
AttributeError: module ‘socket’ has no attribute ‘AF_BLUETOOTH’
Sorted – needed to recompile Python3.9.1 and not use the altinstall
$ ./xiaomi.py
Power ON bluetooth device 0
Traceback (most recent call last):
File “./xiaomi.py”, line 12, in
toggle_device(dev_id, True)
File “/home/pi/domoticz/scripts/py-bluetooth-utils/bluetooth_utils.py”, line 99, in toggle_device
request[0])
PermissionError: [Errno 1] Operation not permitted
$ sudo ./xiaomi.py
Traceback (most recent call last):
File “./xiaomi.py”, line 4, in
import bluetooth._bluetooth as bluez
ModuleNotFoundError: No module named ‘bluetooth’
Any ideas?
Already did sudo setcap ‘cap_net_raw,cap_net_admin+eip’ `which hcitool` and
sudo setcap ‘cap_net_raw,cap_net_admin+eip’ `which blescan`
I ordered a few from https://www.aliexpress.com/item/1005001355746608.html and they arrived in less than a fortnight. I also managed to flash one using Chromium on a Raspberry Pi 4, (I had to enable ‘Experimental Web Platform features’ by going to chrome://flags/ and ticking the relevant box), and also turning on Bluetooth ;) but it was reasonably easy once all the ducks were lined up. All my Android devices were too old to be of any use, but the RPI4 just did it.
Great job for the custom firmware. But I am unable to connect it back to Mi Home after flashing the firmware. I assume there is a problem with the server locale. What is the main locale for this firmware? Mainland China and my default Czechia are not seeing the device with modified firmware
I used web flashing tool and loaded custom firmware to my LYWSD03MMC. Then I re-flashed original firmware. I have a problem with using section to customize firmware settings. When I hit any button I got message “Error on sending setting …” and firmware is not updated. What I am doing wrong?
Thank you for pointing me to these little devices. I managed to code a docker image which will read these advertisements and send it to Influxdb. https://hub.docker.com/repository/docker/adystech/mi_atc_reader
Hello Tom,
Thanks a lot for your work on those devices.
Quick question. What would be the MAXIMUM duration between 2 brodcast (in ms) to conserve battery life as much as possible.
I’ve tried 600 000 (10 minutes), but it then goes back to the min value. I’m guessing some kind of value “overflowing” to the next bytes or something like that (I must confess It’s a really wild guess…). Could be interesting to add the info (min>max on the tool)
Thanks if you anwer this
BTW, should you need a french translation for your tool. I would be glad to provide it (even if I do not have the knowledge to implement it on the html)
quick question if this is the wrong place please delete…..what is the best way to get the bluetooth signal back to my server on the other side of the house (the bt range one these is limited)
Thanks
Has anyone else experienced that their mobile device (eg Android Galaxy Tab E) Bluetooth scan cannot see the Xiaomi device with custom firmware to pair with it?
The nrfConnect app sees it, and can get data. I can connect and update the firmware via the Telink flasher.
I can (sporadically) get the Xiaomi device with stock firmware to appear in the Bluetooth scan on the Android device.
I’m trying to develop an Android app which automagically gets temperature and humidity data from the sensor, but this is my first Bluetooth experiment. My app with the Xiaomi + custom firmware worked at one point, but like I said now I’ve tried every (Android) device I have and nothing seems to see it natively, but they reliably find it on the nrf app. o_O
I tried resetting the Bluetooth system app, cache, etc.
Thanks for any insights!
Hey Vic, just wondering if you got anywhere with this problem? your Android app sounds like just the thing I have been looking for, I’m not much of a coder so making good use of these little thermometers and this custom firmware is a bit beyond my abilities and I was wondering if anyone had thought about an Android app to pull the data – would be a great little greenhouse temperature logging setup!
I had toyed with the idea of writing a webpage to crudely scrape the data from the Telink flasher page which I suppose could work for my purpose (just want a simple log of temp/humidity data) but that does seem a bit caveman compared to an app :)
for the custom firmware device one path may be: using a BLE device scanner kind of app (already exists on mobile and PC), log the advertised names to a spreadsheet like file (through the app), then opening it through a spreadsheet (maybe a cloud one). Yes, a long path, but until there is something simpler…
How to save data to txt file ?
Some data: Temp. 23*C, Hum. 43%, Battery 99%
file.txt
23
43
99
Any suggestions for android apps to directly check (and record regularly) readings from this once the firmware is flashed?
All I can find are BLE scanners and most seem like they’re just for inspection etc. Some don’t even convert the raw values.
After I enabled the web experimental features in Chrome on Linux I got the upgrade to work.
I thought that I was doing well after failing to connect with a Win7 PC and my Android phone. I used SUSE 15.4 with a TP-Link Bluetooth adaptor and Chrome with the “web experimental features” enabled.
However, my joy was short lived as, although I can see the ATC device, the flasher will no longer connect to the upgraded device. I get an error about “No Service matching UUID xxxxxxxxx-xxxxxx found in Device.
I can see the device in the Bluetooth pop-up and it says “paired” with an ID of ATC_2F24C5 which is the correct address.
I tried this on a second Xiomi and I get the same result.
The software is still running and I can see the (useless) battery state indicator.
Why can I no longer connect? Have I bricked them?
This article is a goldmine for tech enthusiasts! Exploring custom firmware on Xiaomi thermometers is an intriguing idea. The ability to hack and modify a simple household device like a thermometer opens up a world of possibilities. It’s a testament to the power of open-source hardware and the creative minds in the maker community. I’m excited to see what kind of customizations and improvements can be made. Safety precautions and responsible hacking are essential, of course. Let’s keep pushing the boundaries of what we can do with everyday gadgets!
A note to future readers. If you flash the newer firmware fork by PVVX. If so you need to use these settings when you flash them (highlighted) https://github.com/Ollie-Boyd/xiaomi-google-sheets-bluetooth-gateway/blob/main/xiaomi_config.jpeg . If you don’t, the advertising data is different and the script in the article won’t work, or rather it will need significant tweaking.
Hi there
It is possible to add extra sensor measurement for this small devices ?
I mean, want to add lux or light meter just to detect light presence, too.
Adding a small hole to show sensor or whatever on the case.
Want to detect for light presence on a cellar, but using a single bluetooth sensor compatible with ESP32 and ESPhome coding.
Thanks