Sometimes, the best hifi gear is the gear you’ve already got. This is particularly the case in the cassette world, as high quality decks are long out of production. [Nick] liked his current rig, but wanted to be able to use it with a remote from across the room. Naturally, he set to hacking the feature in.
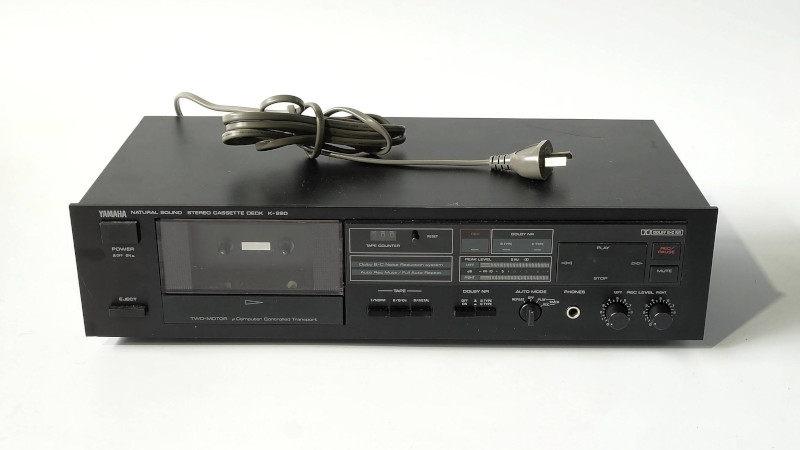
The cassette deck in question, a Yamaha K-220, was old enough to lack a remote, but thankfully new enough to use a computer-controlled tape transport. This meant that the basic features of play, stop, rewind and fast forward can all be controlled with simple digital buttons rather than mechanical ones. This made it easy to interface an ATmega328P to the stereo’s original circuitry. Digital IO pins are hooked up to the buttons, held as high-impedance inputs most of the time, only toggling to ground when necessary to trigger a button press. It was then a simple job to hook up an IR receiver to the chip and program it with some Arduino libraries to work with a typical stereo remote control [Nick] had laying around.
It’s a tidy build, and with more cool cassette releases coming out every year, we’re sure [Nick]’s going to put some miles on the setup. If you find IR too cumbersome though, you can go a step further and replace it with a web app instead. If you’ve been tinkering with similar things in your own workshop, be sure to drop us a line!


I would have liked a remote control on my 1983 Yamaha Virago.
Ha!
Had an 84. Wish I still had it!!!
Mine had the Hitachi carbs, every Spring they refused to work.
When I was a kid, I modified my cassette deck. Simply added a relay to the Play relay and Power Switch.
When playback is on and I depress the power switch it will play till the end of the tape and power off the unit.
When I was a kid, I added remote control to my stereo. A string and a stick on a pivot. Lying in bed, I could pull the string to toggle the power button on and off. Didn’t even need a 555.
Cassette deck mods used to be “a thing,” I think. During my band days, I modified a cassette deck for a different reason.
I discarded the stock drive motor and modified the deck to receive the servo motor and servo control board out of a (then not-so-old) full-height 5-1/4″ floppy drive. I added a toggle switch and two 10-turn calibration pots that allowed me to switch the deck between normal and 2x speed.
That deck, running at 2X, with an outboard DBX encoder, allowed me mix 4 music tracks from my Yamaha 4-track recorder to two DBX-encoded tracks on the modified deck. Then, I could pull the cassette out of the modified deck and put it into the Yamaha 4-track.This resulted in two tracks of stereo music, plus two open tracks on which to add vocals.
It was a poor-man’s way of getting 6 tracks from a 4-track recorder, without having to ping-pong a bunch of times.
I did dozens of good-quality recordings that way before I bought my first 8-track reel-to-reel. After that, I used the modified deck with DBX at 2X speed for mastering.
Very nice. I am a semi-pro musician, and got into home studio/project things starting in the early 90s, but I never modified any equipment. Impressive.
That was slick. Well done.
His security resistor has a nice motivation: “(not strictly necessary and just for protection in case a software bug allows the Arduino output to be driven high)”
Because all hell would break lose if we pull that line up to 5V….
wouldn’t that cause a chain reaction that would destroy the universe?
The Adruino wouldn’t appreciate an output pin driven at 5V being shorted to ground when the user presses a button. The ‘hell’ might be confined to a single pin, not the entire universe, but still, conserving magic smoke is generally good. YMMV. (Youtube Mileage Might Vary.)
Yes. That feeling when you found an error in your post in the moment of pressing “Post Comment”
But luckily the ATMega328 is a very forgiving µC, even a shorted to ground High pin will happily sink some current and continue working.
Come on man…!!! The fun of having vintage audio are the knobs, switches, buttons and toggles! YOLO!
Brings back memories..
One of my early projects when I just started working was a basic IR remote control for my TV to change the channels.
I was working in the engineering department of a telecoms company so had access to lots of ‘toys’ such as assemblers/programmers etc. At the time I had a broken Amstrad stereo system that had an IR handset. The processor was an 8048 and I managed to download and reverse-engineer the firmware for the decoding routines.
From there it was a simple matter of writing and compiling my own code (this was all done on a Digital VAX that we had at the company) to toggle the I/O lines that then switched relays. I used an 8749 cpu (the version of an 8048 with UV EPROM).
My TV was an old (even at that time in the mid-80’s) 24″ touch control (I don’t remember the make..) so simply connecting the relays across the touch contacts added IR remote control to my TV.
I had a touch control one for a brief time, had split aluminum pads with led in the middle of them. I don’t recall what brand it was either. I got it used with a 3 month warranty from a TV repair place and 2.5 months in it broke so I hauled it back, repair was uneconomic so I ended up with another.
I get most of my exercise, getting up to adjust the cassette deck. Will leave it stock.
I love the use of protoboard rather than doing it the “modern way” by having PCB made. A retro build for a retro deck; nice touch.