An IR Blaster Project, In A Nutshell

The speed that computers have gotten smaller is a bit mind-bending. Most of us now walk around with computers in our pockets that would have rivaled the supercomputers from a few decades ago. And, although it seems like the speed at which things are getting smaller and faster has slowed a bit compared to the rapid pace of the 90s and 00s, some truly minuscule computers are accessible nowadays. So much so that it’s possible to do useful computing inside a walnut shell.

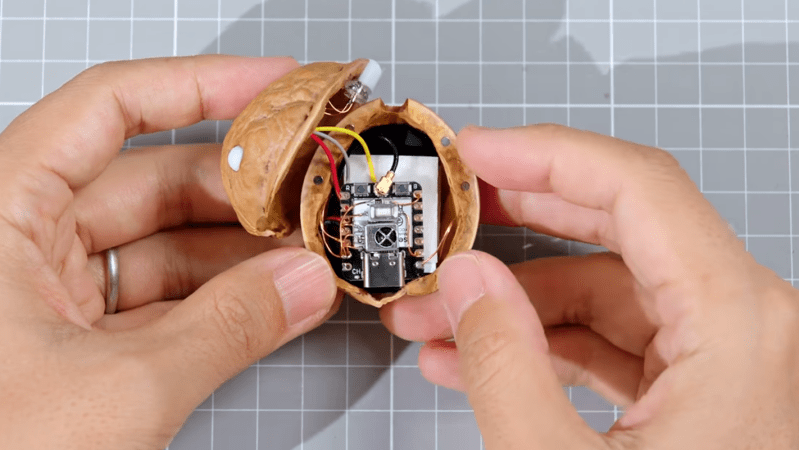
The first step in this build is to crack into a walnut. Most have a natural seam that separates two hemispheres, so splitting it open, enjoying a small snack, and then adding some small neodymium magnets on the inside of that seam to close up the shell is not too difficult. From there, some LEDs were installed at various points in the shell, with an ESP32-C3 installed in the middle to control everything and oriented so that its USB port is still accessible.

Although putting a small microcontroller in a nutshell might seem like a novelty, [JSK-koubou] is actually using the LEDs to perform a useful task. The walnut sits in his living room and connects to a home automation system through the ESP32, and when it receives a command it uses the LEDs to send infrared signals to non-connected devices. Hiding projects in unexpected places is a fun pastime, like this Meshtastic node hidden in a landscape light.

Continue reading “An IR Blaster Project, In A Nutshell” →

An image of skyscrapers over a bay is shown, with some foliage along the bank. The sky and water are a pale blue-grey, while the foliage is pink.

Taking Tri-Camera True-Color Infrared Videos

Silicon-based CMOS camera sensors are cheap and plentiful, but they’re rarely used to their full potential: they can detect a greater range of wavelengths in the infrared spectrum than they can in the visible spectrum, but in most cameras this is blocked by an IR-cut filter. [Project 326]’s infrared camera system reverses this: it records infrared images in color while blocking out visible light.

The system uses three USB webcams, each with its IR cut filter removed and replaced with a different dichroic IR band-pass filter. One filter is centered at 750 nm, one at 850 nm, and one at 940 nm. There is no band overlap; in testing, each camera only detected an infrared flashlight tuned to its own filter wavelength. The original cameras didn’t hold the sensors in a consistent position, so [Project 326] designed new housings. Using three lenses, each with distinct aberrations, introduced some difficulties in alignment. [Project 326] originally intended to use a pair of beam-splitting prisms with only one lens, but this proved too difficult to align using 3D-printed frames.

A Raspberry Pi records a separate monochromatic stream from each camera, which can then be processed into a composite color video. The first frames need to be manually aligned, but afterwards a script can apply the alignment to the rest of the video. Finally, the channels are mapped to colors, with the precise mapping being freely changeable. There were some few unexpected issues: each camera has its own, not terribly precise, local oscillator, and they drifted apart by about one or two frames per minute. Parallax error, on the other hand, was less severe than might be expected: at close range it’s noticeable, but by a distance of 35 meters, it represents less than one pixel of distortion.

The resulting images look great, and it’s easy to forget that they’re being captured without the use of any visible light. We’ve seen a similar technique (though extending into the visible range) used to recreate the surreal effect of Aerochrome film.

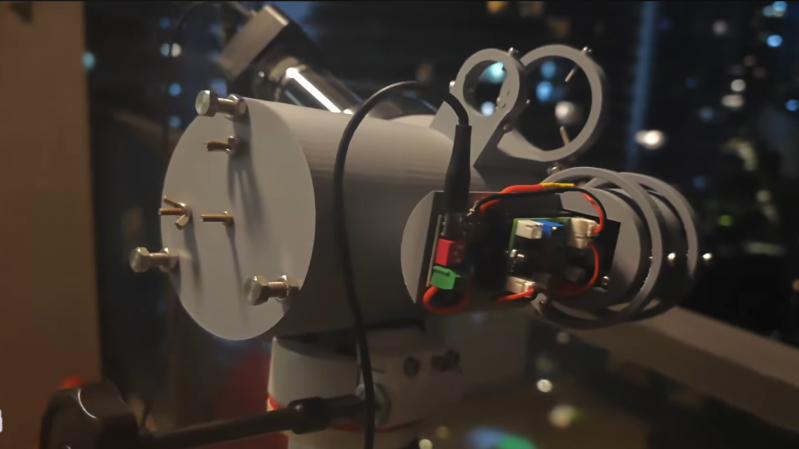
A 3D-printed telescope with an infrared laser on the side is pointed out the window of a building at night.

Long-Range Night Vision With An Infrared Laser

Most consumer-grade night vision devices are basically a standard camera without the usual filter to block near infrared (NIR) light, which are then paired with a NIR light source that’s not visible to the human eye. Unlike the passive night vision provided by an image intensifier tube, these can’t resolve objects beyond the beam of their illumination source. On the other hand, if, as [Project 326] did, you use an infrared laser to illuminate the scene, you can still get a very long range out of these devices.

[Project 326]’s device consists of a previously-built reflecting telescope focusing a distant scene in to a webcam with the infrared filter removed, with the infrared laser illuminating the scene. Finding a suitable laser took some effort: the first option, a secondhand fiber-coupled industrial laser, was accidentally over-volted and destroyed during testing. The second had a fiber output which proved extremely hard to terminate, and a third laser couldn’t be collimated correctly. The final laser was a Vertical-Cavity Surface-Emitting Laser (VSEL) diode array element driven at about two Watts and collimated by a small lens.

This illumination setup is safe at a long range, but only at a long range. The laser was strong enough to burn cardboard at close range, but out at about 500 meters, the beam had spread until it was less than a hundredth of the standard safety limit. To make sure that nothing else would get in the way of the beam, it was shone down from the top of a tall building. Testing with a power meter also showed that at a long range, the beam was weaker than expected. It turned out that the wavelength used (940 nm) is attenuated by water vapor, to the point that up to 70% of the beam’s strength was lost before reaching the target. Despite this, and despite a rather linear beam profile, a somewhat dark image was still visible at 650 meters.

If you’re looking for a somewhat more versatile long-range night vision device, check out one based on an image intensifier. Another approach is to use a very high-sensitivity camera.

Continue reading “Long-Range Night Vision With An Infrared Laser” →

IR Device Control That Lives Off The Cloud

There are lots of smart home systems that will let you blast your older dumb appliances with infrared to control them. However, many are tied to ugly cloud systems that can frustrate you on a regular basis. [Steelcuts] whipped up a cloudless solution to this problem instead.

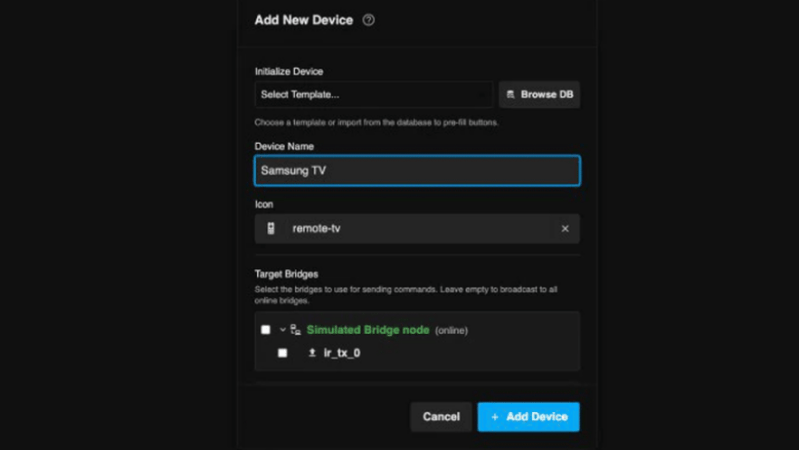
IR2MQTT does pretty much exactly what it says in the name. It allows integrating things like air conditioners and televisions into a Home Assistant setup with the use of an IR blaster and a neat, tidy web app. You use it with an ESP32 or ESP8266 running a firmware based on ESPHome to actually do the IR blasting. In turn, IR2MQTT is a back-end plus a web interface that lets you setup all your IR devices without having to manually capture IR codes and create YAML files to do everything. It’s also integrated with large databases of IR codes for common appliances so in many cases, you can just look up your gear and get it working the easy way.

Sometimes all you need to get the job done is an IR LED and the will to use it. If you’re cooking up your own infrared hacks, don’t hesitate to let us know on the tipsline.

How HP Calculators Communicate Over Infrared

For most people, calculators are cheap and simple devices used for little more than addition and the odd multiplication job. However, when you get into scientific and graphical calculators, the feature sets get a lot more interesting. For example, [Ready? Z80] has this excellent explainer on how HP’s older calculators handle infrared communications.

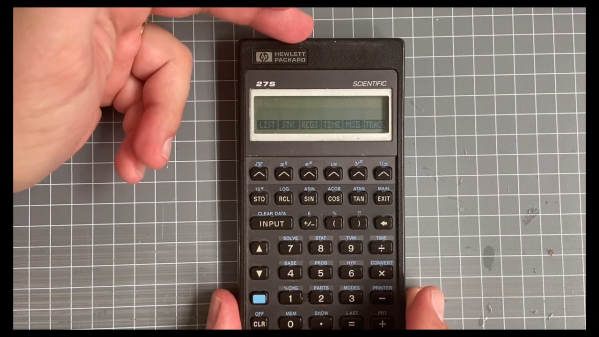
The video focuses on the HP 27S Scientific Calculator, which [Ready? Z80] found in an op-shop for just $5. Introduced in 1988, the HP-27S had the ability to dump screen data over an infrared link to a thermal printer to produce paper records of mundane high-school calculations or important engineering math. In the video, [Ready? Z80] explains the communication method with the aid of Hewlett-Packard’s own journal publication from October 1987, which lays out of the details of “the REDEYE Protocol.” Edgy stuff.

It’s pretty straightforward to understand, with the calculator sending out bursts of data in six to eight pulses at a time, modulated onto a 32.768 KHz square wave as is the norm. [Ready? Z80] then goes a step further, whipping up custom hardware to receive the signal and display the resulting data on a serial terminal. This is achieved with a TEC-1G single-board computer, based on the Z80 CPU, because that’s how [Ready? Z80] does things.

We’ve seen other great stuff from this channel before, too. For example, if you’ve ever wanted to multitask on the Z80, it’s entirely possible with the right techniques.

Continue reading “How HP Calculators Communicate Over Infrared” →

Reverse-Engineering The Tamagotchi IR Connection

The Tamagotchi Connection is a series of Tamagotchi toys that took the original portable pet concept and mixed things up with a wireless connection, which allowed you to interact with the pets of other proud Tamagotchi owners. This wireless connection is implemented using an infrared transceiver, somewhat like IrDA, but as [Zach Resmer] discovered while reverse-engineering this connection, it’s actually what is called ‘Nearly NEC’ by [Natalie Silvanovich], who has a GitHub repository full of related Tamagotchi hacking tools and ROM dumps.

With the protocol figured out, creating a transceiver for low-bitrate infrared communication isn’t particularly hard. In this case, it was implemented using an RP2040 MCU and an appropriate IR LED and receiver pair. This Tamagometer project was also implemented as an app for the Flipper Zero, and a custom PCB called the Pico TamaBadge by [Daniel Weidman].

There’s a web application associated with [Zach]’s project using a Web Serial-enabled browser (i.e. Chrome). The serial protocol is somewhat documented in the patent for the device’s connection feature, which makes it relatively easy to implement yourself.

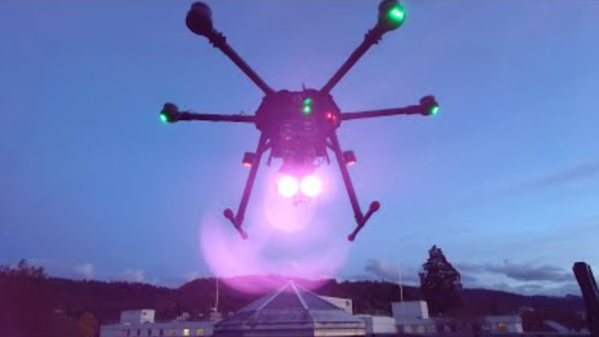
A drone is shown hovering in the sky, with two bright lights shining from its underside.

2025 Component Abuse Challenge: Overdriven LEDs Outshine The Sun

Tagging wildlife is never straightforward in the best of times, but it becomes a great deal more complicated when you’re trying to track flying insects. Instead of trying to use a sensor package, [DeepSOIC] attached tiny, light retroreflectors to bees and hornets, then used a pulsed infrared light mounted on a drone to illuminate them. Two infrared cameras on the drone track the bright dot that indicates the insect, letting the drone follow it. To get a spot bright enough to track in full sunlight, though, [DeepSOIC] had to drive some infrared LEDs well above their rated tolerances.

The LEDs manage to survive because they only fire in 15-µs pulses at 100 Hz, in synchrony with the frame rate of the cameras, rather like some welding cameras. The driver circuit is very simple, just a MOSFET switch driven by an external pulse source, a capacitor to steady the supply voltage, and a current-limiting resistor doing so little limiting that it could probably be removed. LEDs can indeed survive high-current pulses, so this might not really seem like component abuse, but the 5-6 amps used here are well beyond the rated pulse current of 3 amps for the original SFH4715AS LEDs. After proving the concept, [DeepSOIC] switched to 940 nm LEDs, which provide more contrast because the atmosphere absorbs more sunlight around this wavelength. These new LEDs were rated for 5A, so they weren’t being driven so far out of spec, but in tests they did survive current up to 10A.

We’ve seen a similar principle used to drive laser diodes in very high-power pulses a few times before. For an opposite approach to putting every last bit of current through an LED, check out this low-power safety light.

Continue reading “2025 Component Abuse Challenge: Overdriven LEDs Outshine The Sun” →