There are at least two kinds of 3D printer operators: those who work hard to make their prints look better after they come off the bed and those who settle for whatever comes off the printer. If you are in the latter camp, you probably envy people who have smooth prints with no visible layer lines. But the sanding and priming and multiple coats of paint can put you off.
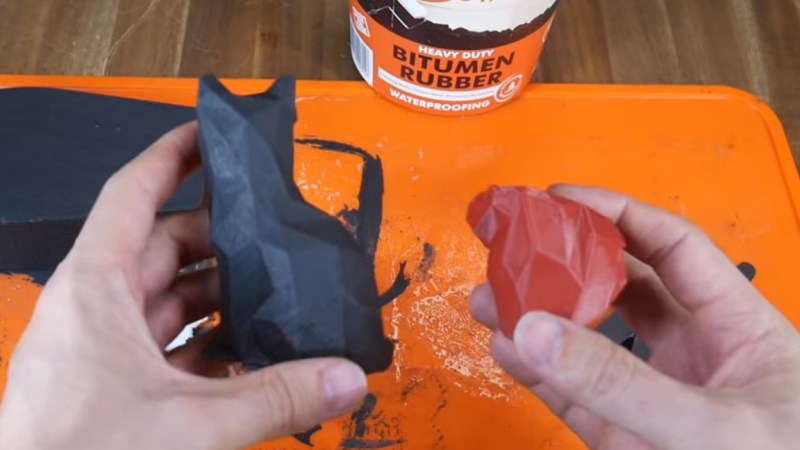
[Teaching Tech] has a few tricks that might change your mind. He shares his technique for using different coatings for 3D prints that provide good quality with a lot less effort. The coatings in question are polyurethane used for coating pickup truck beds and bitumen rubber used for waterproofing. In the United States, bitumen is known as asphalt, and both materials are relatively cheap, available, and safe to use.
According to the video you can see below, there’s no need to sand or prime the print. In addition to covering imperfections and sealing gaps, it produces watertight prints that have UV resistance and some measure of protection against heating.
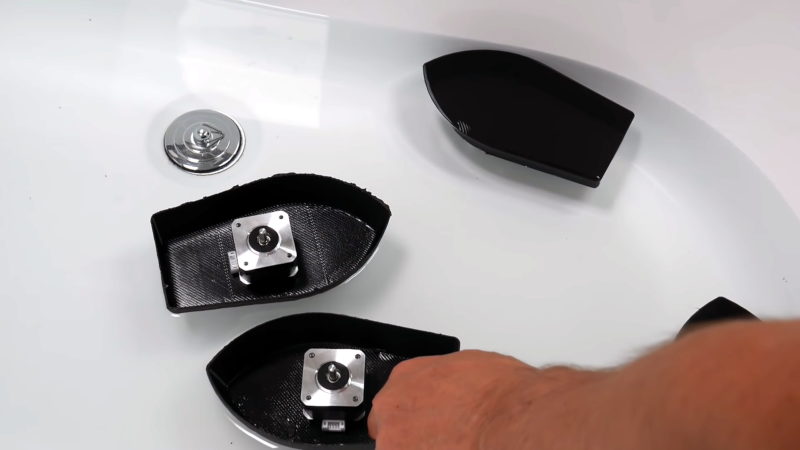 The waterproofing example was fun. Using vase mode, [Teaching Tech] printed a few boats. Having single-layer shells, the boats had a few imperfections. Untreated, the boats actually floated, because they didn’t weigh enough to break the surface tension. However, placing a payload — in this case, a stepper motor — into the boats caused them to sink. With the coatings, though, the boats would float with their motor cargo.
The outward appearance is good, although it isn’t as smooth as paint. You’ve probably seen truck beds and that’s what it looks like. Still, for many parts that’s not a bad look; it almost appears powder-coated. Painting the material on didn’t look very difficult, although the rubber sealant looked thin. On the other hand, it was cut with water, so it might work to use less water in the mixture.
We are anxious to try this out. We aren’t sure if the popular Flex Seal is asphalt rubber, but it might be a good thing to try and is easily available in the states.
We’ve looked at some coatings before. Paint doesn’t have to be hard, but we get why some people don’t want to bother.


I’ve got some of that rubber “undercoating” spray here in the USA – which I learned after buying is not recommended because it will just rust underneath the coating. Looks like I’ve got a use for it now! Also makes me think of using plastidip… The secret Flex Seal granddaddy.
Just make sure it’s fresh. Plastidip if memory serves can go hard in the can.
I’ve not had that in ten years. Make sure the lid is tight!
Lid seal can often be improved with cling film (saran wrap) also. You just put a piece over the top and mash the lid right on. Works for a great many paints etc, probably not cellulose lacquer based though, the thinners might eat the saran wrap.
The sheet metal that a paint can is made of is quite thin and can be creased by hand. When prying up the lid go all the way around without prying “hinging” the lid up near the end. Keep the rims completely free of contents. Let the can sit at a tilt for a while after shaking or even moving if full so lid is not dripping when lifting straight off. Paint left in rim can be left but for only one more opening before residue will not seal anymore.
To close no tools can used at all, a flat board pressing evenly or just thumb pressure around the rim. Any hammering just deforms the seal to nothing. Contents don’t dry out on the store shelf, so preserve the seal formed by these thin sheet metal shapes and the stuff won’t dry out on you.
We use contact cement and the can gets brutalized and goes to waste when half a can is shot.
Many types of paint will self seal their can lids even with small imperfections if you turn the can upside down momentarily after closing it securely.
Never thought about using the undercoating material. Great idea.
I used PlastiDip for the dual SH72 tweezer grips. Unfortunately, I tried with the thickened old bottom of the can material so my surface finish is embarrassing.
So best to use fresh material as I plan to do when I open the next can for the final coating… or try the PlastiDip spray can version that I have no experience using.
FYI… PlastiDip works great for repairing seats if you use a few layers… though you want to make sure for outdoors or thoroughly dried projects since not thinking best to sit on the solvent used if still present. I’ve restored all my lawn & garden tractors seats with excellent IMO results.
There is also this idea I want to try I found recently using silicone and the paint used for coloring the silicone… possibly thinning with mineral spirits to be able to better paint on contoured surfaces and smooth nicely:
https://youtu.be/rq2k9HwjSpY?t=163 (permanent silicone sealing leather seats though the below video notes for marine seats)
https://youtu.be/Sp6HGSSQGXk?t=136 (painting the silicone, note specific silicone and leather/vinyl paint noted in description though I do wonder about other paints effectiveness)
Made a long winded muse, of a single image, video going off on a tangent or two… though shows the PlastiDip part: https://www.youtube.com/watch?v=iMwJ-Jm0dpM
Just realized I’m behind uploading a few videos to the YT vlog that looks like some I only uploaded to Facebook; the PlastiDip seats, a crankcase ventilation tube repair and tire repair included. Looks like I got one of the Kevlar sleeve material type 2 silicone impregnated inner tire liners ply upgrade videos up.
Hey thanks for this wisdom! As a matter of fact, I got a new used lawn tractor recently, and it’s got some cracks in the seat I was considering how to repair… My best ideas so far were vinyl with some rubber cement, or more simply, gaffers tape. Plasti dip sounds like a winner there!
Just be certain to clean the seat material first. I’ve used carb cleaner and/or 91% IPA.
I also take a razor blade of some sort to trim the edges on each side of the cracks if the seat material is rolling upwards. This helps to create a smoother surface.
Takes a few coats, offhand I’m thinking three or four minimum depending on how thin the PlastiDip liquid is. The thinner the liquid, the more coats.
Also, I’ve most always added the additional coat after the surface just started to become tacky so best adherence… though seems to adhere well even when fully cured.
I use auto primer with filler, takes a little work to get use to but it fills in lines. Buy it cheap at Walmart.
im mostly in the latter group because coatings are freaking expensive. give me those striations any day.
But Elbow grease is ‘free’ – get scraping! Seriously a ‘sharp’ blade – as in anything with a well defined edge (can actually use the back of a hacksaw blade for instance) will scrape through the ridges in short order – so on any flat enough area of a print it can smooth it down rather quickly.
Little bit of sandpaper for the curvy bits and final finish (though only if you really want it super smooth) is required… But that’s cheap..
For me I would rather spend some time scraping and sanding than using the fillers, than usually then need you to sand anyway… So when surface finish matters (and you can’t vapour smooth) that’s my usual choice. The rest of the time I’m like you, its a 3d print, it can look like a print, its doing the job I needed it for.
ive had a lot of luck with a flat bastard file. all be it on things that are supposed to be flat. like i had to do the sides of some custom key caps so they wouldn’t interfere with each other. that was a lesson in tedium. actually the thing i print the post are project enclosures, and they really dont need to be pretty so long as they contain my projects.
was going to put a nice finish on my raspi tablet case, but decided to change the design.
Sanding plastic works a lot better if you use “wet-or-dry” abrasive and do the sanding wet. No clogging!
Hmmm not sure bitumen is a great choice for anything that might catch full sunlight, even for only hours a year, could melt itself to the shelf. Might do that if just sitting in the same place long enough also. It’s like running your own pitch drop experiment.
this flash in the pan was only produced to make a youtube video to farm in the likes, subscribes and the paterons … no one is expected to take this seriously
say that to the guy that went for “the gorilla glue challenge”
https://www.nydailynews.com/news/national/ny-louisiana-man-emergency-room-gorilla-glue-challenge-20210212-ismhxhg7xzh2fcx6mofitrq3k4-story.html
“make something idiot proof, and someone will make a better idiot.”
If there is a need for a high quality finish, I would just use XTC-3D, super expensive, but pretty much the single best 3D print coating agent out there, smooth on is unbeable in terms of quality.
Can second XTC-3D, it’s never let me down.
I generally use the same gelcoat I use for carbon fibre layup, and add a pigment or filler powder to make it opaque
I’ve been using spray can truck bed liner for years on prints. It looks great and you can lightly sand it to knock down the texture a bit.
If bitumen spray had the same light-sensitive properties as Syrian asphalt, this surface treatment could be combined with Niépce’s héliographie.
Maybe you can use “Fuzzy skin” feature of Cura slicer in order to get rougher surface with better coating adhesion without sanding.
“Paint doesn’t have to be hard, but we get why some people don’t want to bother.”
It’s not always about the work.
Depending on the application I often prefer the color to be in the plastic rather than painted on the outside. That way scratches are a lot less visible because they only reveal more of the same color underneath. If I do need to paint something though, such as if it’s going to be in the sun exposed to UV on a regular basis I will try to match the paint color to the plastic for the same reason.
I really prefer to sand a print to help key the coating to the surface, and adding filler means i can control which areas are filled.
Using bitumen is going to add a significant thickness to the print, losing definition in the process.
Whether I paint something or not depends on its function and if the part is cosmetic or purely structural. For things that need to be smooth, I’m surprised I don’t see this mentioned yet but look for automotive “glaze putty,” which is like but thinner than bondo, comes in a tube usually (in a quantity that is more reasonable for most prints), and can be smoothed on in a very thin layer (which is what it’s intended for). typically it fills the layer lines and with one or two iterations of sand and prime you’re done; much faster than just trying to sand the print or relying on filler primer.