For the average rider, inner tubes have been one of the most enduring and unchanging parts of bicycle design over the decades. They’re made of rubber, they have a Schrader or Presta valve, and they generally do an okay job at cushioning the ride.
However, if you’re an above-average rider, or just obsessive about your gear, you might consider butyl rubber tubes rather old hat. Today, there are far fancier—and more expensive—options on the market if you’re looking to squeeze every drip of performance out of your bike.
Walking on grass, it’s easy, no matter the shoe. How about an inclined trail? Some hiking shoes or nice tennis shoes will do the trick. How about climbing a mountain? Now we are gonna need something special. [Magnus Midtbø] is a professional climber with an acute awareness of this fact and has used shoes of all kinds; however, today is something special.
Imagine if you could use the technology of MotoGP to give you the same grip as a 1-liter bike. That is exactly what he tried out. RAToM is a company that has started to market a unique product, recycled MotoGP tires. Viral vids of this rubber being used have been going around with shoes even being able to stick to themselves. He decided to put it to the test by requesting some of this special rubber stock and applying it to his own shoes.
After extensive, though simple, testing along the bouldering wall he admitted to the effectiveness of the special soled shoes. This shouldn’t be too surprising with MotoGP’s intensive material science innovations involving their tire material. These tires include a variety of additives, from silicone dioxide to the traditional carbon black. What has not been able to be tested to its required extent is the durability of the material over long periods of bouldering.
Even though most of this specialized rubber material is primarily supplied by one company, the source material is recycled from any used MotoGP tire. This could mean DIY alternatives better than the current leading shoes could be possible with sufficient care if you get a hold of a tire or two… While this would not be an easy process, don’t be too scared to try! Maybe you could learn a thing or two from this case study on homebrewing a running shoe!
A friend of mine and I both have a similar project in mind, the manufacture of custom footwear with our hackerspace’s shiny new multi-material 3D printer. It seems like a match made in heaven, a machine that can seamlessly integrate components made with widely differing materials into a complex three-dimensional structure. As is so often the case though, there are limits to what can be done with the tool in hand, and here I’ve met one of them.
I can’t get a good range of footwear for my significantly oversized feet, and I want a set of extra grippy soles for a particular sporting application. For that the best material is a rubber, yet the types of rubber that are best for the job can unfortunately not be 3D printed. In understanding why that is the case I’ve followed a fascinating path which has taught me stuff about 3D printing that I certainly didn’t know.
Newton strikes back, and I can’t force rubber through this thing.
A friend of mine from way back is a petrochemist, so I asked him about the melting points of various rubbers to see if I could find an appropriate filament His answer, predictably, was that it’s not that simple, because rubbers don’t behave in the same way as the polymers I am used to. With a conventional 3D printer filament, as the polymer is fed into the extruder and heated up, it turns to liquid and flows out of the nozzle to the print. It ‘s then hot enough to fuse with the layer below as it solidifies, which is how our 3D prints retain their shape. This property is where we get the term “plastic” from, which loosely means “Able to be moulded”.
My problem is that rubber doesn’t behave that way. As any casual glance at a motor vehicle will tell you, rubber can be moulded, but it doesn’t neatly liquefy and flow in the way my PLA or PET does. It’s a non-Newtonian fluid, a term which I was familiar with from such things as non-drip paint, tomato ketchup, or oobleck, but had never as an electronic engineer directly encountered in something I am working on. Continue reading “Why Can’t I 3D Print With Rubber?”→
Rubber! It starts out as a goopy material harvested from special trees, and is then processed into a resilient, flexible material used for innumerable important purposes. In the vast majority of applications, rubber is prized for its elasticity, which eventually goes away with repeated stress cycles, exposure to heat, and time. When a rubber part starts to show cracks, it’s generally time to replace it.
Researchers at Harvard have now found a way to potentially increase rubber’s ability to withstand cracking. The paper, published in Nature Sustainability, outlines how the material can be treated to provide far greater durability and toughness.
If there was one question we heard most often this week, it was “Did you see it?” With “it” referring to the stunning display of aurora borealis — and australis, we assume — on and off for several days. The major outburst here in North America was actually late last week, with aurora extending as far south as Puerto Rico on the night of the tenth. We here in North Idaho were well-situated for prime viewing, but alas, light pollution made things a bit tame without a short drive from the city lights. Totally worth it:
Hat tip to Tom Maloney for the pics. That last one is very reminiscent of what we saw back in 1989 with the geomagnetic storm that knocked Québec’s grid offline, except then the colors were shifted much more toward the red end of the spectrum back then.
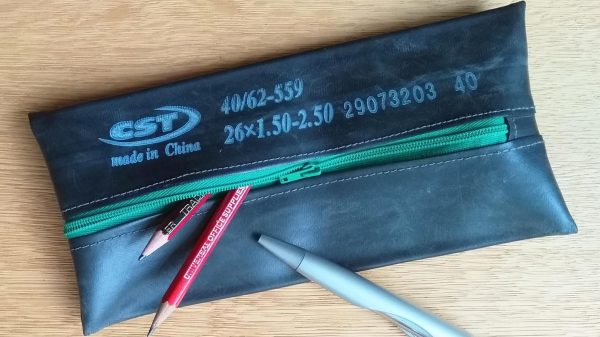
If you’re a cyclist that lives in an area with poorly-maintained infrastructure, you’ll likely have plenty of punctured inner tubes begging for reuse. Consider crafting them into a rugged, hard-wearing pencil case with this design from [Yorkshire Lass].
[Yorkshire Lass] does a great job of not only explaining the basic design of the pencil case, but also the unique techniques required to work with inner tubes in this manner. For best results, the tube must first be straightened by stretching it for some time along a flat board. Strips of the rubber must then be cut to suit, and then assembled into the pattern to make the pencil case. Sewing up the case also requires some special techniques outside those used in regular sewing. That’s largely down to the fact that rubber can’t be pinned in place without leaving a permanent hole in the material. Thankfully, the write-up explains all the traps for those new to sewing inner tubes, which we’d have to suspect is most of us.
Assembled properly, you’ll end up with a pencil case made of far tougher material than most. Plus, it makes a great fashion accessory to flaunt to other bicycle or recycling evangelists at your school, college, or workplace. Even better, there’s scope to run a group craft session with your local bike group given everyone surely has a few dud mountain bike tubes laying around.
We’ve seen some other neat hacks intended to store pens and pencils around the workshop. Meanwhile, if you’ve got your own great reuse ideas for old bicycle inner tubes, do drop us a line!
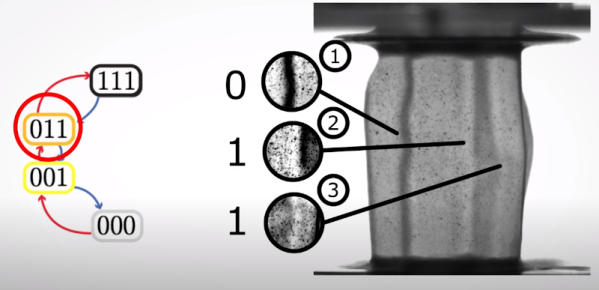
If you ever get a chance to go to Leiden, take it. It is a beautiful little city that hides some high-power university research. It also boasts the world’s first rubber computer. You won’t be running Crysis on it anytime soon, though. The fledgling computer has memory and can count to two — really more of a state machine. It is easier to watch the video below than try to fully explain it. Or you can read through the actual paper.
If you watch the video, you’ll see that deformation in the corrugated rubber structure is apparently repeatable and represent bits in the machine. Pressing and releasing pressure on the structure forms both input and clock and it is possible for the material to go from state A to B on compression, but when you release pressure, it reaches state C. The compression and the angle of the pressure allow for different input conditions. One example rubber state machine counts how many times you compress the piece of rubber.
What do you do with a piece of smart rubber? We don’t know. Maybe if you wanted shoes to count steps so you could transmit the count once a minute to save on battery? The researchers have admitted they don’t have any specific applications in mind either, but presume someone will want to use their work.
Of course, the video’s title: “The Rubber Computer” is a bit of hyperbole, but we can forgive it. Most people wouldn’t get “The Rubber Finite State Machine.” While mechanical computing might seem a bit passe, turns out at the molecular level it may become very important. Besides, you can make a computer out of cardboard (or simulate that computer in an FPGA or spreadsheet, if you prefer).