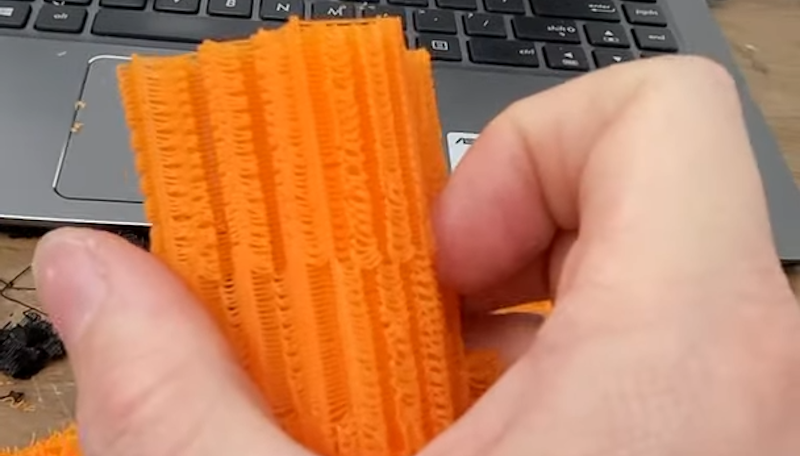
While ramen support might sound like a help desk for soup, it is actually a technique [GeoDroidJohn] uses to get easy-to-remove support structures on 3D prints. We saw the video below and we have to admit that it did remind us of a brick of uncooked ramen noodles.
We had to dig a little further to find out how he did it. We finally found a Reddit post that gives the recipe for Simplify 3D:
- Nozzle diameter/2= layer height
- Support material every other layer, 15% crossing at -45, and 45
- 5 dense layers at 90% 0 gap layers top or bottom.
We have to admit, we try to avoid support where we can, and where we can’t we just pick one of the stock Cura settings. It wasn’t entirely clear how — or even if — you could replicate this in slicers other than Simplify 3D. The layer height, of course, is a given. We think 15% support density with [-45, 45] in the “line directions” box might get partially there. Maybe someone who is an expert in Simplify and some other slicers can help translate.
In any event, it did make us think about experimenting with different support structures. We’ve played with Cura’s tree supports before this and liked them. So maybe the defaults aren’t always the best.
We’d like to have time to try more of what we read about supports. You can also fit your printer with a marker if you want to try that.


At first I thought he managed to somehow use actual ramen as a 3d printer material instead of pla or abs.
Same here…
I really want a ramen printer now!
Same. But then, once you’ve eaten the supports, what do you do with the inferior 3D print you’re left with? You know, because it’s made of pasta.
But hey, wait a minute: is there something you can use to dissolve pasta? Hear me out. You’ve heard, no doubt, about people printing models in PLA that they then do a kind of variation on the lost-wax process to make custom metal castings from. So what if you printed your part with ramen support, which you can eat, then encase the model with investment plaster, then dissolve the model and you have your mold for metal parts. Heck, I can even imagine putting a 20 mm gap under a part, just to get a whole bunch of support material, even from parts that are flat-bottomed! Because ramen. Does anyone here know how Knorr chicken bullion compares with Top Ramen flavor packets? Because this just isn’t going to work without flavor packets.
And the 3D printer itself could be so much less finicky, because you can use a screw extruder to deposit your dough, which can be made with materials you buy at the supermarket. No more expensive filament. No more endless variations on print beds because nothing seems to really work all the time.
Why not use a dual extruder to print a pla spoon supported by ramen
Support your ramens by throw away spoons?
And don’t forget coloured noodles!
Rainbow ramen prints!
> You know, because it’s made of pasta.
Or let it dry, then give it a coat of epoxy resin.
1/2 to 3/4 of a Knorr cube to 1 flavour packet.
I don’t know about eating the supports yourself but you could leave them outside over an anthill for a couple of days. Or use beetles. I know of a science teacher who eats a chicken then removes the remaining flesh using beetles. That leaves him with clean bones that he takes to class to discuss dinosaurs and the evolution of birds.
The point is these little creatures should be able to get up into the knooks and crannys of your print much better than you can. Plus, who wants to eat PLA flavored rammen?
Barilla have had a Pasta printer for a few years now if you want some really weird noodles or really accurate character spaghetti you’re set https://www.thekitchn.com/this-3d-pasta-printer-from-barilla-will-blow-your-mind-252431
I started using the Black Soybean Spaghetti a few weeks ago. Other than smelling like cattle feed, I like the nutrient balance. I guess all the best U.S. grown Black Soy Beans are shipped to Japan from what I found looking into more when planning to use to make Natto… that I’ve still not made as of yet.
I also downloaded the ArcWelder and Cura… hhhmmm… I have to look in my Youtube history… Cylindrical Custom Support this morning: https://youtu.be/owgUmQao2ME?t=55
Haven’t used yet… though installed both plugins in Cura and copied the ArcWelder.exe to my PrusaSlicer StartIn folder.
Thanks for the tip – I think that Cyindrical Custom Support plugin is just what I’ve been looking for.
Cylindrical custom supports is great! Gives you the ability to support JUST the things that need support.
Your very welcome. I was planning to upgrade to Prusa3D for the Prusaslicer 2.3.0, since only have used 2.2.9, just for the paint on support capabilities and I think there is an added seam adjustment capability too.
Randomly saw the video and was like… installation time. Plus I hadn’t gotten around to using ArcWelder and have been wanting to try that for post processing the gcode… random bonus (from what I’ve read and watched at least appears) when reading through the list of plugins available.
Started working on some other projects and assessing upgrading the MPSM V2 to the Colossal Mini V2 build and also new print heads for higher temp materials and possibly an auger drive. To my great surprise having 6mm SS rods also, on top of the 8mm SS rods from old printers, for the X-axis gantry potential extension. Last leaving off, using either an Z-axis new stepper I guess parallel patched to the mainboard driver for now or creating an upper fixed support gantry with a belt drive from the stock Z-axis shaft…, since seems like more issues having like two additional square or spline slide drive shafts where one on the Z-axis motor side to translate to a belt drive on the expanded X-axis gantry and then too another on the other side with both having bottom or top belts to the lead screws. Little overboard and the spline or square drive shafts aren’t so common unless you have a few dot matric printers around for the square. I have no idea other than milling… to find a reasonable candidate for accurate ground full spline shafts.
Yeah… brainstorming motions… I have saved another MPSM Z-axis motor and lead screw saved in my watchlist. Same goes with the print head… thinking a Dragon or Mosquito. Surprisingly… I might cave and just go with a roll of PETG for starters first and foremost since seems like a stock option… I have this feeling I’ll try making some 1.75mm filament though from the PET bottle strips. Figured better plan ahead though for issues and mitigation.
Plus, not 3D printing lately…, I have this thing where I don’t want to use more PLA (like save for lost PLA castings) and like noted above want to get jump into PETG or more-so PET recycling and eventually Nylon. Then from there maybe more, exotic 3D printed from what I’ve read at least, photonic or phononic optimal materials. Will need to complete my metal shelf 3D printer enclosure with ventilation and other sensors first… maybe with the exception of a roll of PETG.
This seems kind of genius. A lot of plastic, maybe, although maybe less than typical supports. But it looks like it might take some of the pain out of supports.
Uses half the support of regular support since it skips layers
Yes, I get that. I usually avoid supports like the plague, so really I was unfairly comparing this with unsupported printing.
Next video: how to clean bits of ramen support out of your laptop keyboard
Philips makes noodle and pasta machine that can do parallel printing. :P You just have to feed it the right ingredients and deep fry the noodles.
Obligatory comment about not being food-safe….
:-)
Not being safe food!
FTFY
Cura will skip support certain lines in one of the settings to make it weaker. I am not sure what is novel here. I just printed some stuff this weekend with that setting.
What’s novel is actually doing it. Congratulations on having independently discovered this. _I_ found it useful.
This is me, I appreciate the interest, still working on the Cura settings. I posted a more in depth walkthrough and live ramen support removal demonstration on my channel.
https://youtu.be/DbxZAohOf8I
Settings from what i have collected from Johns posts (untested):
Simplify 3d settings:
Add > generate support >
support tab:
-Support infill percentage= 13%
-Extra Inflation Distance= 2.0 mm
-Combine support Every= 2 Layers
-Dense Support Dense support layers= 6
-Dense infill percentage =80
-Separation From Part:
-Horizontal offset from part= 0.30mm
-Upper Separation layers = 1
-Lower Separation layers= 1
-Support Infill angles: [45,-45]