It’s Noodles All The Way Down: Ramen Comes To 3D Printer Support

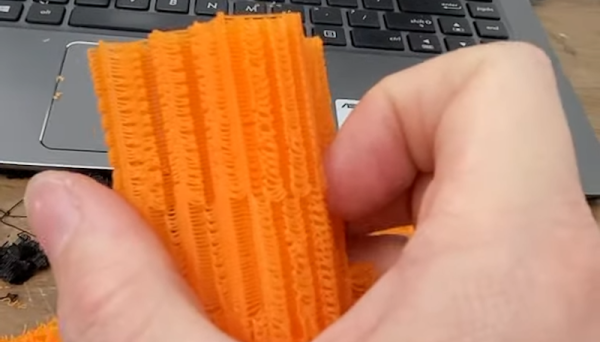
While ramen support might sound like a help desk for soup, it is actually a technique [GeoDroidJohn] uses to get easy-to-remove support structures on 3D prints. We saw the video below and we have to admit that it did remind us of a brick of uncooked ramen noodles.

We had to dig a little further to find out how he did it. We finally found a Reddit post that gives the recipe for Simplify 3D:

  • Nozzle diameter/2= layer height
  • Support material every other layer, 15% crossing at -45, and 45
  • 5 dense layers at 90% 0 gap layers top or bottom.

We have to admit, we try to avoid support where we can, and where we can’t we just pick one of the stock Cura settings. It wasn’t entirely clear how — or even if — you could replicate this in slicers other than Simplify 3D. The layer height, of course, is a given. We think 15% support density with [-45, 45] in the “line directions” box might get partially there. Maybe someone who is an expert in Simplify and some other slicers can help translate.

In any event, it did make us think about experimenting with different support structures. We’ve played with Cura’s tree supports before this and liked them. So maybe the defaults aren’t always the best.

We’d like to have time to try more of what we read about supports. You can also fit your printer with a marker if you want to try that.

Continue reading “It’s Noodles All The Way Down: Ramen Comes To 3D Printer Support”

How Did The Nintendo Virtual Boy Work?

What do you know about the Nintendo Virtual Boy? Everybody knows that it was the console giant’s mid-90s foray into 3D graphics and VR, and that it was a commercial flop. Sickness and headache-inducing graphics are probably first to mind, and that’s it. But since most of us will never have handled one in real life, all we have on this legendary console is this Received Opinion. What was it Really like? [Rodrigo Copetti] has put up a detailed technical examination, and it reveals a machine well ahead of its time in more than just the market it was trying to create.

The first surprise is that this machine eschews the expected LCD screens that were the norm on handheld consoles of the day, instead using a persistence-of-vision display with a single vertical bar of LEDs facing a vibrating mirror through a lens system. He goes into significant detail on how this system worked, and in doing so gives us a new respect for the console.

The meat of this article lies though in a detailed look at the console’s architecture. The NEC V810 CPU was significantly more powerful than those in other portable consoles of the day, and we get a peek of how it and the custom silicon handled the graphics. The GPU had dual framebuffers for each display to ensure each frame could be delivered smoothly while the next one was being created.

Everything that can be said about the Virtual Boy in the marketplace has been done to death, leading to the received opinion we mentioned at the start of the article. This write-up provides new information on one of Nintendo’s rarer machines and casts it in an entirely new light.

There have been understandably few Virtual Boy projects that have made it to these pages. One that has, was a VGA interface for the console.

Via Hacker News.

Vintage Calculator Design Shows Just How Much We Take For Granted Today

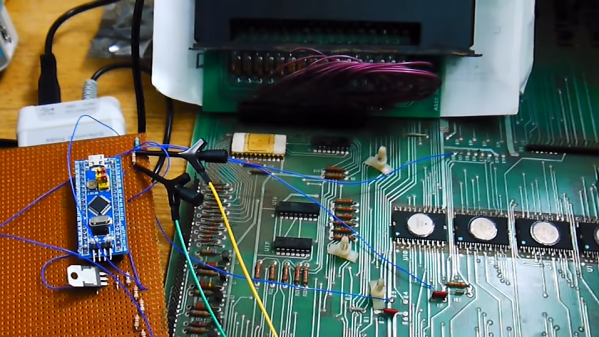
[Amen]’s Rockwell 920 calculator from the 70s was a very impressive piece of hardware for its time. It sported a 16-digit display, a printer, and it could run programs. It even had a magnetic card reader/writer that could be used to store programs and data externally. Seen through today’s eyes, it was less like a calculator and more like what we would call a single-board computer. They are also a window into another era, a time when many of the electrical design assumptions we take for granted hadn’t happened yet. When the time came to dig into what made the calculator tick, [Amen] had a lot of work to do just to get basic tools running.

For example, [amen]’s Blue Pill (an open-source, multipurpose test and measurement tool) is, on one hand, the perfect tool to snoop on the inner workings. However, those inner workings happen to use negative logic at -17 Volts, which means a logical zero is -17 V and a one is 0 V. Oh, and it uses an oddball clock rate, to boot. Since the Blue Pill doesn’t support -17 V negative logic (does anything?) a bit of custom work was needed to craft an interface. Once that was working, the Blue Pill was off to the races.

The unfamiliar elements didn’t end there. The pins on each IC, for example, are in a staggered layout quite unlike the DIP pattern most of us (and our tools, breadboards, and IC clips) are familiar with. As for the processor itself, [amen] has access to low-level documentation on Rockwell processors and instruction sets, but the timing diagrams are puzzling until one realizes the processor has two clock inputs at two different frequencies, resulting in what [amen] describes as four separate “clock phases”.

These design decisions were certainly made for good reasons at the time, and they even have a certain internal harmony to them, but it’s still a window into an era when the elements underpinning much of what we now have and work with had not yet happened.

Check out the video embedded below to see [amen] explain what it took to hook the Blue Pill up to a Rockwell 920. Also, if you’d like to see one of these vintage machines demonstrated in all its functioning glory, here’s a video of one being put through its paces.

Continue reading “Vintage Calculator Design Shows Just How Much We Take For Granted Today”

A Look At The “Risky” Tech In NASA’s Martian Helicopter

On February 18th, the Perseverance rover safely touched down on the Martian surface. In the coming days and weeks, the wide array of instruments and scientific payloads tucked aboard the robotic explorer will spring to life; allowing us to learn more about the Red Planet. With a little luck, it may even bring us closer to determining if Mars once harbored life as we know it.

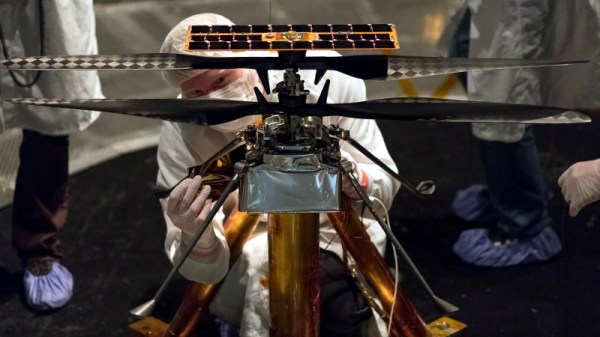
Among all of the pieces of equipment aboard the rover, one of the most intriguing must certainly be Ingenuity. This small helicopter will become the first true aircraft to take off and fly on another planet, and in a recent interview with IEEE Spectrum, operations lead [Tim Canham] shared some fascinating details about the vehicle and some of the unorthodox decisions that went into its design.

Ingenuity’s downward facing sensors.

[Tim] explains that, as a technology demonstrator, the team was allowed to take far more risks in developing Ingenuity than they would have been able to otherwise. Rather than sticking with legacy hardware and software, they were free to explore newer and less proven technology.

That included off-the-shelf consumer components, such as a laser altimeter purchased from SparkFun. It also means that the computational power packed into Ingenuity far exceeds that of Perseverance itself, though how well the helicopter’s smartphone-class Snapdragon 801 processor will handle the harsh Martian environment is yet to be seen.

On the software side, we also learn that Ingenuity is making extensive use of open source code. Not only is the onboard computer running Linux, but the vehicle is being controlled by an Apache 2.0 licensed framework developed by NASA’s Jet Propulsion Laboratory for CubeSats and other small spacecraft. The project is available on GitHub for anyone who wants it, and according to the changelog, the fixes and improvements required for the “Mars Helicopter Project” were merged in a few releases ago.

The fact that code currently ticking away on the surface of Mars can be downloaded and implemented into your own DIY project is a revelation that’s not lost on [Tim]. “It’s kind of an open-source victory because we’re flying an open-source operating system and an open-source flight software framework and flying commercial parts that you can buy off the shelf if you wanted to do this yourself someday.”

Of course, it took a whole lot more than some Python libraries and a handful of sensors from SparkFun to design and build the first space-going helicopter. But the fact that even a small slice of the technology inside of a project like Ingenuity is now available to the average hacker and maker is a huge step towards democratizing scientific research here on Earth.

Continue reading “A Look At The “Risky” Tech In NASA’s Martian Helicopter”

Google-Inspired USB-PD Sniffer For The DIY Crowd

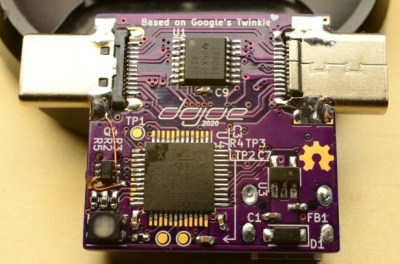
If you want to hack around with the communication protocol that USB Power Delivery devices use to negotiate their power requirements with the upstream source, a tool like Google’s Twinkie really helps. With it you can sniff data off the line, analyze it, and even inject your own packets. Luckily for us, the search giant made the device open source so we can all have one of our own.

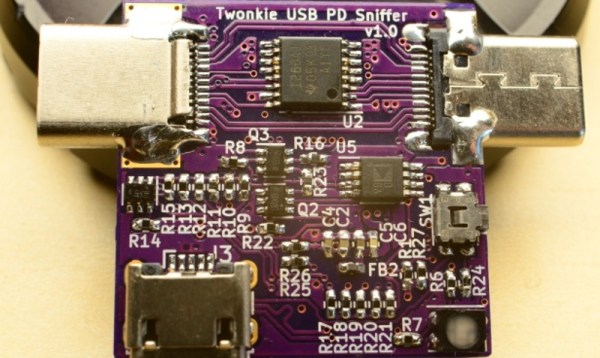
Unfortunately, as [dojoe] found out, the Twinkie isn’t particularly well suited for small-scale hobbyist manufacturing. So he came up with a revised design he calls Twonkie that replaces the six layer PCB with a much more reasonable four layer version that can be manufactured cheaply by OSHPark, and swaps out the BGA components with QFP alternatives you can hand solder.

That said, it’s still likely to be a challenging build for the home gamer. There’s quite a few 0402 passives on there, and while those are doable with an iron, it can certainly be tricky. To take some pressure off, [dojoe] says he tried to optimize the board layout as much as possible for hand assembly. He was even able to avoid needing hot air by straddling the PCB with USB-C mounts intended for vertical applications.

Given the current chip shortage, [dojoe] says the biggest problem might actually getting your hands on the STM32F072CB microcontroller at the Twonkie’s core. To that end, the board supports TQFP44 and QFN44 footprints, and you can even use a STM32F072C8 at the cost of some functionality. With a bit of luck, hopefully you can find a chip that will work in the parts bin.

It Ain’t Broke, But Should I Fix It?

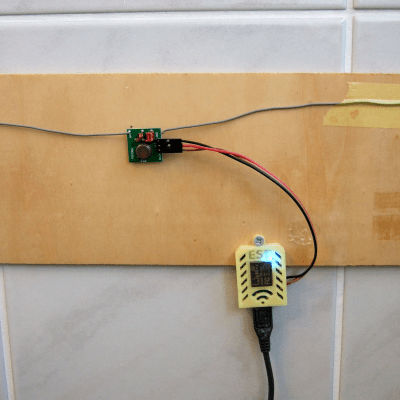
Five years ago, I wrote a series on getting started with your own MQTT-based home information/automation network. Five years is a long while in Hackaday time. Back then, the ESP8266 was a lot newer, and the 8266 Arduino port wasn’t fully in shape yet, and the easiest software framework to get MQTT up and running was NodeMCU; so that’s what I used for the article series, and as a consequence a handful of devices around my house run minor modifications of that basic “hello world”, but doing useful stuff.

Since then, NodeMCU has changed a bunch of its libraries and the ESP32 has replaced the ESP8266 in my parts drawer. If you tried to run my code, you’d find that it won’t run on an ESP8266 without porting or compiling an old version of NodeMCU for yourself anyway, and it won’t run on an ESP32 at all. When [Chris Lott] tried to follow my guide, he discovered that Micropython is probably a better language choice in 2021. To minimize lines of code, I’d agree, although the Arduino and Espressif’s own native IDF have grown into the job just about as well. In short, anything but NodeMCU.

Built in an hour, survived for five years.

But my home automation system doesn’t care. Those little guys are running 24/7, flipping bits like it was still 2016. Thermometers, light sensors, and power meters haven’t changed much in five years, and although I’ve revamped the databasing, display, and user control a number of times since then, using a fixed communication transport protocol means that they’re still talking the same language. Indeed, even if NodeMCU is dead to me, the MQTT content of my original series is all still valid, and installing a broker on a Raspberry Pi has only become easier in the intervening five years.

So I’ve got a bunch of legacy code running within the walls of my own home, and it makes me nervous. If the devices fail, or maybe when they eventually fail, it’s not going to be “just flash another ESP8266 and replace it”, because even though I have some ancient NodeMCU binaries sitting around, I know when to throw in the towel. But there’s no good reason to pull them down and start reflashing either. Except that it makes me a little bit itchy, just knowing that there’s orphaned, dead-end code running all around me. Surrounding me. Staring deep into my hacker’s heart.

I know better than to tear down a running system, even though I could do it one device at a time, and each module would surely be a simple, independent fix; even though I’d love the excuse to play around with Micropython and its MQTT implementation on the ESP8266, or maybe even swap some of them out for ESP32s; even though these were all temporary quick hacks that have somehow served for five (5!) years. I certainly know better, right? (Right?)

Stochastic Markov Beats

[Attoparsec] has been building intriguing musical projects on his YouTube channel for a while and his latest is no exception. Dubbed simply as “Node Module”, it is a rack-mounted hardware-based Markov chain beat sequencer. Traditionally Markov chains are software state machines that transition between states with given probabilities, often learned from a training corpus. That same principle has been applied to hardware beat sequencing.

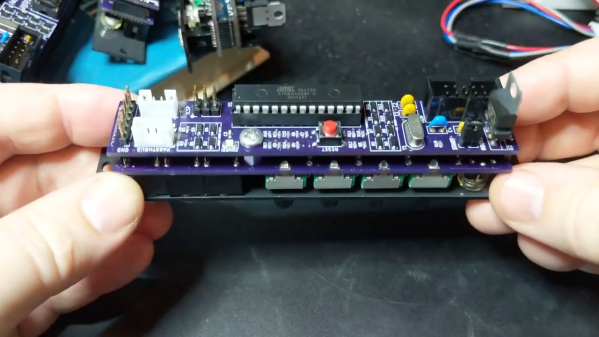
Each Node Module has a trigger input, four outputs each with a potentiometer, and a trigger out. [Attoparsec] has a wonderful explanation of all the different parts and theories that make up the module at the start of his video, but the basic operation is that a trigger input comes in and the potentiometers are read to determine the probabilities of each output. One is randomly selected and fired. As you can imagine, there are loops and even dead-end nodes and for some musical pieces there is a certain number of beats expected, so a clever reset signal can be sent to pull the chain back to the initial starting state at a regular interval. The results are interesting to listen to and even better to imagine all the possibilities.

The module itself is an Arduino-based custom PCB that is laid out quite cleanly. The BOM, code, and KiCad files are available on GitHub if you want to make one yourself. This isn’t the first instrument we’ve seen [Attoparsec] make, and we’re confident it won’t be the last.

Continue reading “Stochastic Markov Beats”