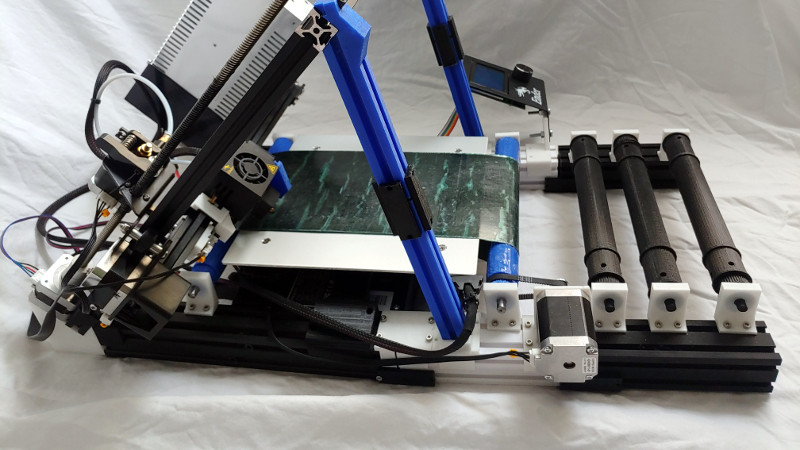
Infinite-bed 3D printers have long been an object of desire in our community, but it has taken a long time for the promise to catch up with the reality in terms of relatively affordable models that live up to expectations. They’re still a little expensive compared to their fixed-bed cousins though, so if you hanker for a Creality CR30 but only have the cash for an Ender 3, [Michael Sgroi] may have the project for you. He’s created the EnderLoop, a set of parts to perform the conversion from a stock Ender 3 to a fully-functional belt printer.
It takes the Ender 3 gantry and tilts it sideways on a pair of 3D printed supports, and replaces the stock Y azis with a belt on rollers driven by a larger motor through a timing belt drive. He has a variety of suggestions for sourcing a belt, and in his case he’s chosen one from PowerBelt3D. As well as the GitHub repository already linked, it can also be found on Thingiverse.
It’s clear that hacking apart a reliable printer in this way is not for the faint-hearted, and that a cautious hacker might prefer to wait a while for a cheaper off-the-shelf model. But we can see that the reliability of the Ender 3 will mean that its parts are still of decent quality in the new configuration, and that it looks as though the base printer can be reassembled should a belt-based build be a failure. Infinite bed printers will inevitably have a major presence in our community, and it is designs such as this one which will lead the way as they evolve into reliable machines.


What’s the purpose of tilting the Z axis in belt-bed printers? Why don’t printers without a belt bed use a tilted Z axis?
slicing infinite Y axis stuff could make the software fall over. Instead slice into more limited angled Y axis….This means the maximum height is restricted to the diagonal between the bed and the Z axis at maximum height, rahter than the maximum y width being unlimited
I think that there is a patent on vertical z axis, and to get around the patent the z axis is at an angle other than 90° (compared to the bed.)
Also if you put it on a angle you get the ability to print one long piece that is not limited by your bed size.
I don’t understand- the layers are still being printed on a flat surface in the XY plane. How does Z axis tilt allow longer prints than bed length? Wouldn’t tilting the extruder carriage instead of the whole Z axis accomplish the same thing (whatever it accomplishes?)?
I would recommend that you search for videos of belt printers, it is alot easier to understand if you have seen one in action.
In the slicer program, the belt is defined as the z axis. The x axis is still the x axis. What is traditionally the z axis is actually the y axis in the slicer and that is what is tilted.
Early on your model in the slicer wold look really warped because the slicer didn’t know how to handle a belt printer, I don’t know how it is today.
I would suggest you study a video of one of these printers in operation printing a long piece, that’s going to be more instructive than any text description can be.
One note: these do not print in the “XY” plane. They have an independent X and Z axis (Z being the belt direction which is usually called Y in normal cartesian printers) but the remaining tilted axis is Y+Z, so to get a move only in Y requires both the belt and Y+Z axes to move together. So it actually prints in the tilted X(Y+Z) plane.
From my understanding, if it was vertical (perpendicular to the bed) and printing the entire object in a traditional layer by layer fashion, in an ideal world a long object could protrude off the front and rear edges of the bed and the Y axis would feed it back and forth to get to either end. The issue is that, as far as I’m aware, no print bed material can cycle through adhering to or peeling off the part quickly or accurately enough to support that, let alone deal with the leverage exerted by a long unsupported part sticking off one end.
To get around this the belt printer prints from one end of the object the other. It can’t print with the layers/slices 90 degrees to the bed, as there would be a lot of unsupported material and the layer you’re printing would knock into the previous layer, so instead it prints at 45 degrees; no support needed and you no risk of hitting the previous layer as it’s now 45 degrees “below” the next, like a cross hatched box.
That’s my understanding of its anyways and may be entirely wrong :)
One of the main reasons to tilt the printing axis towards the bed is so that the tip of the nozzle can make the molten plastic adhere to the bed.
If the axis were truly perpendicular, then the nozzle can’t extrude onto the bed’s surface.
One “solution” is to print onto the “edge” of one of the rollers, but good luck getting the print to adhere when it rolls over to the flat plain between the rollers.
Another solution is to keep the nozzle itself perpendicular to the bed (instead of horizontal), but then we need to roll our belt back and forth, since we can’t finish one vertical slice before we start working on the next, since the nozzle is much larger than the slice and will need to have access in order to print the next slice. (This would require us to work on multiple slices in a stair step fashion that is going to form an angled working plane.)
In short, a more 45 degree angle for the axis and nozzle gives the above solution without needing to move our belt back and forth like a maniac. But still have a sufficiently “parallel” angle to the bed to make our plastic adhere to the bed.
Since squirting out molten plastic over a surface won’t make it stick, it needs to be pushed against the surface to better adhere to it, due to surface imperfections that the plastic would otherwise just rest atop of. (It is frankly the same reason for why we can’t just stick to pieces of wood together, we need glue to fill in the gaps.)
The “slicing infinite Y axis stuff could make the software fall over.” is just incompetence on the programmers part, there is no actual reason for why one axis couldn’t be infinite. Since we would just make relative moves in said axis. Absolute positioning on a belt is unneeded.
it´s the Y axis which is tilted. The Z axis is the belt itself.
For clearance, the hotend could only get as low as the precedent wall height in a vertical roller bed.
I believe it was Naomi Wu who first suggested this to Creality and she has a video about it: https://youtu.be/1UwaWLnGmXk
The obvious flaw here is smaller parts will fall between the belt and the extra rollers
Actually the extra rollers are entirely modular so you can remove them if you want to print smaller parts and drop them into a container. You can also snap on more extensions if you want to print longer pieces as well
I actually have a half designed model on 360 that is almost identical to this just for another printer. I had started it last March with the whole ppe production thing. I gave up on it as I could not find an option for a belt. I may revisit the project seeing someone else succeeding at coming up with a design.
Belt sourcing is definitely the trickiest part. I would check out PowerBelt3D’s web store. Adam will sell custom sized belts on there.
Love conveyor belt printer concept , just in a project with one developed
https://www.facebook.com/conveyor3dproject/
Not naming this the “NeverEnder” was a real missed opportunity.
Oof, you’re right, that would have been a great name choice. Tbh I kinda slapped a name on this because I needed something to list it under and then it just kind of became the name because I didn’t want to double back and rename all references to it.
One market for belt fed 3D printer is to make custom trim pieces , add molding. Old house have trim profiles that are not available from lumber yards, and often only a few feet are needed for a repair, or upgrade. Having custom trim milled has a very high NRE. I have had trim made on a CNC router with an 8′ bed, but complex shapes require multiple tool changes. Looking forward to seeing progress in belt fed printer technology.
That’s an interesting use case that I wouldn’t have expected, but that makes a lot of sense.