[TheStaticTurtle] built a custom controller for automating his garage doors. He wanted to retain the original physical button and RF remote control interfaces while adding a more modern wireless control accessible from his internet connected devices. Upgrading an old system is often a convoluted process of trial and error, and he had to discard a couple of prototype versions which didn’t pan out as planned. But luckily, the third time was the charm.
The original door-closer logic was pretty straightforward. Press a button and the door moves. If it’s not going in the desired direction, press the button once again to stop the motor, and then press it a third time to reverse direction. With help from the user manual diagrams and a bit of reverse-engineering, he was able to get a handle on how to plan out his add-on controller to interface with the old system.
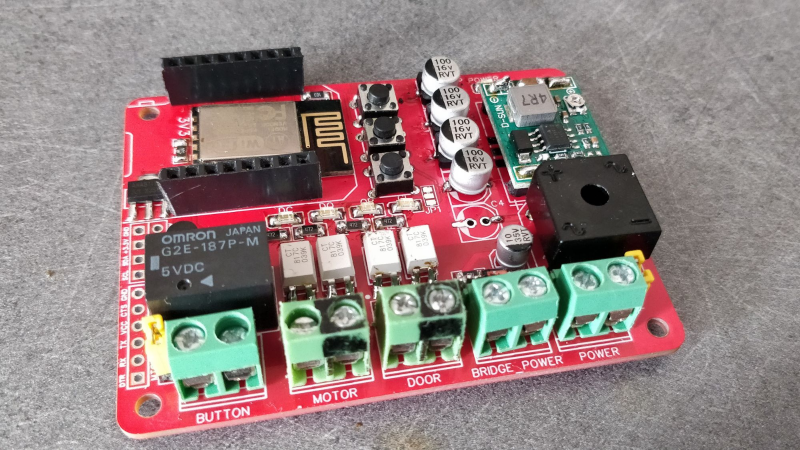
There are many micro-controller options available these days when you want to add IoT to a project, but [TheStaticTurtle] decided to use the old faithful ESP8266 as the brains of his new controller. For his add-on board to work, he needed to detect the direction in which the motor was turning, and detect the limit switches when the door reached end of travel in either direction. Finally, he needed a relay contact in parallel with the activation button to send commands remotely.
To sense if the motor was moving in the “open” or “close” direction, he used a pair of back-to-back opto-couplers in parallel with the motor terminals. He connected another pair of opto-couplers across the two end-limit switches which indicated when the door was fully open or closed, and shut off the motor supply. Finally, a GPIO from the ESP8266 actuates a relay to send the door open and close commands. The boards were designed in EasyEDA and with a quick turnaround from China, he was able to assemble, test and debug his boards pretty quickly.
The code was written using the Arduino IDE and connects the ESP8266 to the MQTT server running on his home automation computer. The end result is a nice dashboard with three icons for open, close and stop, accessible from all the devices connected to his home network. A 3D printed enclosure attaches outside the original control box to keep things tidy. Using hot melt glue as light pipes for the status LED’s is a pretty nifty hack. If you are interested in taking a deeper look at the project, [TheStaticTurtle] has posted all resources on his Github repository.


Nice if… you have reliable 24×7 internet, your garage is reasonably close to your router or you’re okay adding mesh, you don’t already have too many IOT devices on your LAN, your router and LAN are locked-down.
Nah, garage door openers have no real security. Even if you are just connecting from your smartphone directly to the device, it’s still more secure than before.
Super cool. If you just want to bodge a modernized option together you can get away with some sonoff switches and their 433mhz to wifi bridge (doesn’t do rolling codes though). Managed to get our 3phase roller door on the web that way. Makes getting into work in the morning way easier. Throw in some home assistant magic and things tie together nicely.
Look at Chamberlain MyQ
Whaaaat? MyQ? You are joking, right?
Probably 80% of the people making garage IOT were “inspired” by the *revolting* MyQ experience. You can’t be a regular HaD reader.
I have a MyQ as it may not be the best it was easy to implement. Cost was minimal. I am a regular Hackaday reader and a full time Embedded Systems Designer. Sometimes it is easier to just purchase an off the shelf version than reinvent the wheel.
idk man, with an even-tempered, polite, grammatically correct, AND informed response; are you sure you’re a regular HAD reader/commenter? :)
I recognize the name….
Haha, I’m actually reading this article because MyQ doesn’t work on my Chamberlain opener.
Not sure how much he has wrapped up in this, but almost all new openers come with WiFi built in, and the Lift Master MyQ app even syncs with Amazon for secure package delivery in your garage. The real problem with IOT, and I did try it for several years, is that, unless you can code, it’s not user friendly. Almost anything you want to control these days can now be purchased, and easily integrated with Ring, Alexa, Siri, or other reliable mainstream manufacturer.
I have one of those MYQ devices, I wrote code to make it work with my custom automation setup. They don’t publish the API, you have to use wireshark to figure out the protocol. My setup worked for a while then they changed something and now i needed to reverse engineer it all over again. The MYQ is not home automation friendly. I ended up recycling it and creating something similar to the post above which allows control over MQTT. Building my own ended up costing less then the MYQ device, and works 10x better.
I’d love to do this to my garage door, problem is all modern openers are wireless! Those 2 wires that where supposed to be bridged to open the door, now are used to power the wireless opener… Linus tech tips did a video about this problem and is a worth while watch.
I have a new opener and even though those wires are used for power if you short them together the door will still open/close. I have a Lift Master opener (new jackshaft type).
Is there a copper pour directly under the wireless module’s inverted F antenna? If so, you may want to clear that out for the next board revision.
That and the unusual placement of the esp12 caught my eye, too.
Turn it 180°, remove top/bottom copper and route all traces to the right.
I did exactly the same, except I’m using a single ina219 to measure current sent to the motor. It gives both direction + moving time. With auto calibration of time for full open/close, you get the exact position of the door at any.
Photo of the result: https://raw.githubusercontent.com/wiki/nouknouk/ma_domotique/diy/portes_garage/porte_garage_boitier_electronique.jpg
I sortof followed you proceeding with the project and it worked out great !
Sonoff sv, with tasmota or esphome, and Bob is your uncle.
Hopefully it gets integrated seamlessly into vehicle with separate connection from within the mobile phone apparatus. That way there are multiple mode of entry to avoid technology setbacks
I see you use optocouplers for determining the direction of the motor. Are you able to detect a motor stall with that? As in, if it attempts to close on a child’s leg, undetected by the optical sensor, will it still reverse like a stock controller would, or will that child be trapped until the motor burns out or someone manually intervenes?
I love home-grown solutions like this, but am wary of reinvented products that may not be aware of the hard-earned lessons that guide the complexity of a commercial solution. Part of that is industry’s fault in making existing standards difficult or costly to obtain and impossible to understand.
The solution to this is not more product development, but more parenting. Teach your kids the dangers of heavy moving objects like garage doors and not to play with them.
OK, I’m a LITTLE unclear here… Why is direction sensing needed at all?
The existing momentary contact switch still works? Putting an additional switch in parallel is simple enough.
My garage door opener (and it’s at least 10 years old) has optical obstruction sensors across the doorway built in… I think it’s been a requirement for some time now, but I could be wrong.
It also does the open/stop/go-the-way thing all by itself when I push that momentary contact button.
I added a magnetic reed switch attached to the bottom of the garage door. The switch is a common thing you see screwed to concrete floors in auto motive garages as a part of the alarm system… When the door isn’t closed the switch is an either open or closed state depending on how you wired it, because the magnet isn’t engaging the switch.
This sort of feels like the elevator that only goes to two floors and has a button for each; It only needs one… “Other floor”
“Other floor” — that’s one button too many! It just needs a weight sensor and a 555 timer.
But seriously, “open” and “close” are redundant relative to “toggle”, but when you’ve just driven a mile from home and can’t remember if you closed the garage door, you’ll be stoked for the “close” button.
It’s a conceptually simpler system, and the command is failsafe. For the price of an extra button, you gain idempotence.
Of course, he’s hooked in the limit switches too, so you’re actually right — in my example, you’d just check the closed switch state.
But what do you do when no switches are closed? Do you prevent unintentional double-clicking at the price of not being able to reverse the door when it’s in motion? Etc. Getting rid of the state dependence makes things simpler, at the cost of an extra button.
(In the end, this is a philosophical/taste difference. Both systems work, but I like extra buttons. Our garage is “push to open” only, and closes after 30 seconds or whatever… that works too.)